Access points
The Access points page provides a centralized view of all registered wireless access points, including details such as name, MAC address, IP, model, firmware/upgrade status, workload, channel, and mesh role. You can register new devices, configure country settings, schedule firmware upgrades, and export access point data.
A wireless access point is a networking hardware device that allows a Wi-Fi enabled device to connect to a wired network. To configure an access point in Sophos Central, you must connect it to the internet and register it with Sophos Central using the serial number available on the package.
Go to My Products > Wireless > Access Points to see your access points.
Access points
The Access Points tab lists all access points registered with Sophos Central in alphabetical order by name. You can filter the list by choosing a site from the drop-down menu.
You can export your access points' details into a CSV file. To do this, click Export to CSV. The CSV file automatically downloads.
The list refreshes automatically. You can refresh the list manually by clicking Refresh.
You can see the following details about your access points:
- Name: Access point name.
- MAC: Access point's MAC address.
- Serial number: Access point's serial number.
- Internal IP: Access point's assigned internal IP address.
- Model: Access point model.
- Config status: Access point's update and configuration status, such as up to date, waiting to update, or offline.
- Workload: Connected device load on an access point. The workload is calculated based on memory and CPU usage. Memory usage up to 60% or CPU usage up to 50% is shown as green. Memory usage of 60% to 80% or CPU usage 50% to 80% is shown as yellow. Memory or CPU usage above 80% is shown as red.
- Available Power: Shows the power available from the power sourcing equipment (PSE) connected to the access point. A green lightning bolt
 indicates the access point has sufficient power. A red lightning bolt with an exclamation point
  indicates the PSE can't provide sufficient power to the access point.
 - Band: Configured radio bands on an access point.
- Mode: Channel operating mode such as autochannel (AO), dynamic channel (AC), or manual channel (M).
- Channels: Displays configured and operating channels. It's displayed as configured channel (operating channel). The operating channel might differ if radar is detected on the configured Dynamic Frequency Selection (DFS) channel. See AP6 channel selection guide.
- Profile: Shows the profile assigned to the access point. See Profile management.
- Firmware: Firmware version installed on an access point. A green check
 indicates an access point it up to date. A blue arrow
  indicates a firmware upgrade is available. A clock icon
  indicates the access point is scheduled for a firmware upgrade.
 - Uptime: Displays the uptime for an access point.
- Mesh Role: Displays the role of access points in a mesh network. An access point can either have a root role or a node role. A hyphen in this column means the access point hasn't been assigned to a mesh network and doesn't have a mesh role. Hovering over the icon shows the root and node access points for the mesh network.
You can click the arrow ![]() for an access point to see the following details:
for an access point to see the following details:
- Current site: The site to which the access point is assigned.
- Connected devices: The number of devices connected to the access point.
- TX: Rate: The rate of outbound traffic. Byte shows the amount of outbound traffic. Both values are measured on the access point's wired interface.
- RX: Rate: The rate of inbound traffic. Byte shows the amount of inbound traffic. Both values are measured on the access point's wired interface.
- CPU Usage: The percentage of CPU used. Green is below 50%, yellow is 51% to 80%, and red is 81% or more.
- Memory usage: The percentage of memory used. Green is below 60%, yellow is 61% to 80%, and red is 81% or more.
- Last activity: The last time the access point communicated with Sophos Central.
Register an access point
Before you can register an access point, it must meet the following requirements:
- It can communicate with Sophos Central. See Domain requirements.
- It's reset to the factory default settings. See Factory default.
- It's been deleted from any Sophos Firewall to which it was previously registered.
You can register access points individually or in bulk.
To register a single access point, go to My Products > Wireless > Access Points, click Register, and enter the serial number. The access point is validated after you click Register again.
To register multiple access points, you must have the serial numbers of all the access points in the first column of a comma-separated value (CSV) file. Each row must have a unique serial number. Go to My Products > Wireless > Access Points > Register, click Bulk Provisioning, and upload your CSV file. The access points are validated.
You can then enter and save the hostnames. When registration is complete, the access points are displayed on the list.
Access points registration status
The Access points registration status table shows the status of access points during the Sophos Central registration process.
If an access point fails to register, an error message shows the reason for the failure. For troubleshooting help, click the link in the error message to open the AP6 registration guide. See AP6 device fails to register with Sophos Central.
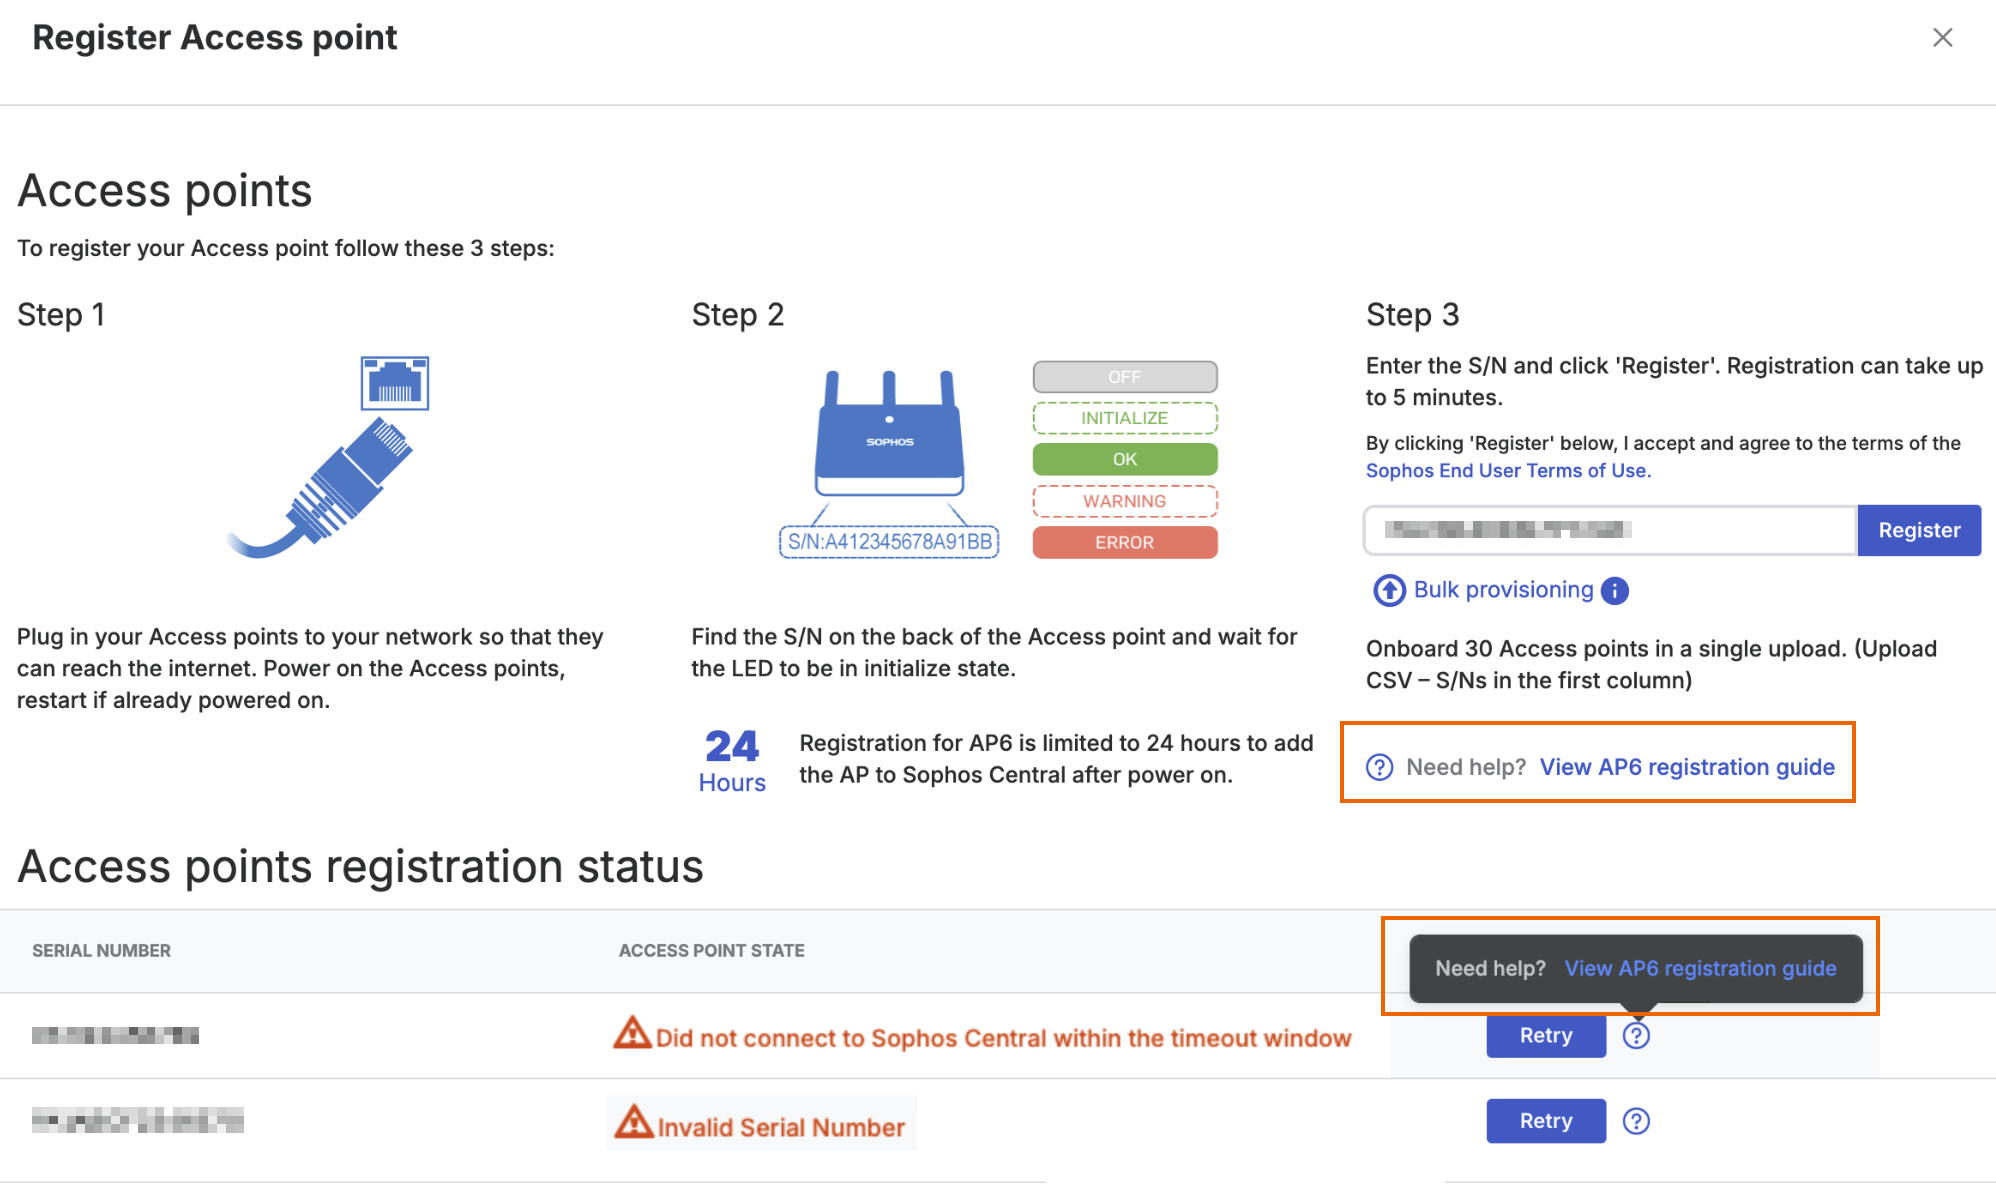
After you resolve the issue, reset the access point, then click Retry to start the registration process again.
Country setting
The country setting of an access point regulates the available channels to comply with local laws. For AP6 access points, it also affects what sites you can assign the access points to. For more information on access points, see Access point operating instructions.
When you register an AP6 access point, it chooses a default location based on its stock-keeping unit (SKU). See Sophos Wireless: AP6 SKU country mapping.
To change the location of an access point, add it to a site. For AP6 access points, you can also set the country in the local UI. See the following pages:
Note
When you change the location of an access point, it restarts to complete the configuration change.
Firmware upgrade
You can upgrade the firmware for APX and AP6 access points in Sophos Central.
AP6 series firmware upgrade
You can schedule firmware upgrades for AP6 access points from Sophos Central, or manually upgrade from the AP6 GUI.
To upgrade the firmware of AP6 series access points from Sophos Central, do as follows:
- Go to My Products > Wireless > Access Points.
- Click Firmware upgrade.
- Select the access points you want to upgrade.
-
Click Choose schedule. You can select from the following scheduling options:
- Now: Click Upgrade to immediately upgrade the firmware on the selected access points.
- Custom: Select a specific date and time for the upgrade to take place and click Save.
- Recurring: Select a daily, weekly, or monthly schedule to automatically apply firmware upgrades to the selected access points. The default schedule is weekly on Tuesdays at 03:00 AM.
If an AP6 access point is scheduled for a firmware upgrade, you can cancel the scheduled upgrade by clicking Firmware upgrade, selecting the access point for which you want to cancel the upgrade, and clicking Cancel schedule.
To manually upgrade the firmware on AP6 access points, do as follows:
- Sign in to Sophos Central.
- Go to My Environment > Installers.
- In Wireless, click Download firmware for your wireless.
- From the downloaded archive file, extract the
tar.gz.sigfile for the AP6 model you want to upgrade. - Sign in to the AP6 GUI.
- Go to Advanced > Update firmware.
- Select a file on your PC.
- Click Choose file.
- Select the
tar.gz.sigfile you extracted earlier and click Open. - Click Update.
APX series firmware upgrades
You can upgrade the firmware of APX series access points by clicking Firmware upgrade and then clicking Upgrade legacy AP? to go to Basic settings where you can schedule a firmware upgrade. See Basic settings.
Delete
Select the access points you want to delete and click Delete to remove them.
Restriction
You can't delete access points with a mesh network assigned to them. Delete the mesh network first, then delete the access points.
Override VLAN
You can override the VLAN assigned to an access point by an SSID. This feature allows you to assign multiple VLANs to the same SSID and separate traffic from multiple locations or groups of access points without creating multiple SSIDs. To override VLAN for an SSID, do as follows:
- Sign in to Sophos Central.
- Go to Wireless > Access Points.
- Click Override VLAN.
-
Select an SSID from the drop-down list.
Note
The list doesn't show SSIDs with RADIUS VLAN assignment or mesh SSIDs.
-
Enter a new VLAN.
-
Select all the access points from the drop-down list to which you want to assign the new VLAN.
Note
The list only shows access points with the SSID assigned to them. If you want to assign the VLAN to other access points, you must first assign the SSID to them. See Assigned SSIDs.
-
(Optional) Click Add another to add more VLANs to the SSID and assign access points to them.
-
Click Override to save your changes and assign the VLANs to the access points.
Warning
The access points update immediately when you click Override, causing a brief period of downtime. Connected wireless devices may briefly disconnect during the update and will reconnect when it's complete.
Profile management
On the Profile management tab, you can create profiles to assign specific configuration settings, such as SNMP, date and time, and advanced wireless settings, to multiple AP6 access points without having to configure these settings individually for each access point.
You can see the following details about the AP6 profiles in Sophos Central:
- Name: The name of the profile.
- Management: The settings categories configured by the profile.
- AP applied: The number of access points to which this profile is applied.
- Last edited: The last time changes were made to the profile.
To edit the profile, click the three dots ![]() next to the profile, and click Edit. You can also Clone or Delete the profile.
next to the profile, and click Edit. You can also Clone or Delete the profile.
Click Create profile to create a new AP6 profile. Enter a Name and, optionally, a Description, and use the Management and Advanced wireless tabs to configure the profile settings.
Management
On the Management tab, you can configure the SNMP and date and time settings.
SNMP
To turn on SNMP, expand SNMP and click SNMP settings. You can configure the following settings:
-
Version: Select one of the following options:
-
v1/v2c: Configure the access point for SNMPv1/v2c management. You must configure the following settings:
- Get community (v1/v2c): Enter the SNMP GET community name for SNMP-GET messages.
- Set community (v1/v2c): Enter the SNMP SET community name for SNMP-SET messages.
-
v3: Configure the access point for SNMPv3 management. You must configure the following settings:
-
V3 privilege: Select the SNMPv3 security level from the following options:
- No authentication: No authentication is used. We don't recommend this.
-
Authentication: Messages are authenticated, but not encrypted. You must configure the following options:
- V3 authentication: Select MD5 or SHA.
- V3 password: Enter the password for SNMPv3.
-
Privilege: Messages are authenticated and encrypted. You must configure the following options:
- V3 encryption: Select DES or AES.
- V3 key: Enter a key. It must have a minimum of 10 characters.
-
V3 name: Enter the username for SNMPv3.
-
-
-
Trap: Select Enabled or Disabled to turn SNMP trap on or off. This setting lets the access point notify the SNMP manager of network errors. If you turn on Trap, you must enter the IP address of the SNMP trap manager.
- Trap community: Enter an SNMP trap community name for SNMP-TRAP messages.
Date & time
Expand Date and time to configure the following settings:
- Maintain local configuration: Select this option to use the date and time settings configured locally on the access point.
- Timezone: Select a timezone from the drop-down list.
-
Use NTP: Turn NTP on or off. You must configure the following settings:
- Auto daylight saving: Adjusts the time automatically for daylight saving changes.
- Server name: Select a server from the drop-down list. Select User-defined to use your own NTP server.
Note
Sophos provides the following NTP server pools:
0.sophos.pool.ntp.org,1.sophos.pool.ntp.org,2.sophos.pool.ntp.org, and3.sophos.pool.ntp.org.- Update interval: Sets the interval from
1to24hours.
Advanced wireless
We don't recommend changing advanced wireless settings from the defaults unless you're familiar with them and have tested their impact on your environment. Incorrect settings can negatively impact network performance.
Band settings
On the Advanced wireless tab, you can configure the following settings for the 2.4 GHz, 5 GHz, and 6 GHz frequency bands:
- Maintain local configuration: Select this to use the advanced wireless settings configured locally on the access point.
- Contention slot: 2.4 GHz only. Sets the Wi-Fi Multimedia (WMM) contention window. This setting determines how long devices must wait and listen for other transmitting devices before they can transmit. This is also known as the backoff period. Choose from Short (default) or Long.
- Preamble type: 2.4 GHz only. The preamble type in 802.11-based wireless communications defines the Cyclic Redundancy Check (CRC) block length for communication between the access point and roaming wireless adapters. CRC can help reduce data transmission errors. Choose from Short (default) or Long.
- 802.11g protection: 2.4 GHz only. Select Enable or Disable to turn 802.11g protection on or off. This setting increases reliability but reduces bandwidth. Devices will send Request to Send (RTS) messages to the access point, which then broadcasts Clear to Send (CTS) messages before the devices can send a packet.
-
Guard interval: This interval gives time for reflections from the previous transmissions to dissipate and reduces signal loss. A longer guard interval may lower overall throughput, but will provide better stability for VoIP and other devices that require more throughput. Select the time devices must wait between transmissions from the following options:
- Auto (default)
- Normal GI (0.8 µs)
- Double GI (1.6 µs)
- Quadruple GI (3.2 µs)
-
DTM period: The Delivery Traffic Indication Message (DTIM) alerts devices in power-saving mode that the access point has traffic for them, so they can wake up to receive the traffic. Set a value between
1(default) and255. Multiplying the Beacon interval by this value determines how often the access point sends DTIMs. A larger value may improve wireless device power consumption by allowing devices to keep their Wi-Fi radios turned off longer, but it can reduce wireless network performance by introducing delays before traffic can be sent to a device. Here's an example:
Example
If you set Beacon interval and DTM period values to the defaults of 100 and 1, respectively, then the access point will send DTIMs every 100 ms. Increasing the DTM period to 100 will cause the access point to send DTIMs every 10000 ms, delaying traffic by up to ten seconds.
- RTS threshold: The RTS threshold of the wireless radio determines the frame size limit, in bytes, before devices must transfer RTS packets. A smaller value may reduce wireless network performance by causing devices to send RTS packets more frequently. Set a value between
1and1023(default). - Beacon interval: The Wi-Fi beacon is a repeating broadcast that informs devices of nearby wireless networks and access points. The beacon interval of the wireless radio determines how often, in milliseconds, the access point sends that broadcast. Set a value between
40and1000milliseconds. The default is100. -
Sip station idle timeout: The SIP station idle timeout determines how often, in seconds, the access point sends keepalive messages to wireless devices to check if they're still active. Set a value between
30and65535seconds. The default is60. Reducing this value may cause devices to disconnect from the network when they enter sleep mode, requiring them to reauthenticate when they wake up.Tip
IP phones and other VoIP devices may enter sleep mode often. To improve VoIP performance, we recommend increasing the Sip station idle timeout value to
300or more to prevent disconnections and improve VoIP stability. -
Keep same settings as 2.4GHz: Select this for the 5 GHz and 6 GHz frequency bands to use the 2.4 GHz frequency band's Guard interval, DTM period, RTS threshold, Beacon interval, and Sip station idle timeout settings.
WMM-EDCA settings
We don't recommend changing WMM-EDCA settings from the defaults unless you're familiar with them and have tested their impact on your environment. Incorrect settings can negatively impact network performance.
Wi‑Fi Multimedia (WMM) Enhanced Distributed Channel Access (EDCA) is a QoS mechanism that prioritizes traffic requiring higher throughput and lower delay over traffic for which delays aren't as noticeable.
Select Maintain local configuration to use the WMM-EDCA settings configured locally on the access point.
The access point's WMM-EDCA settings affect downlink traffic and the SIP station's settings affect uplink traffic. You can configure the following settings for the access point and SIP station independently:
- CWMin: Defines the minimum contention window size used for random backoff. A lower value increases the likelihood that a device can transmit sooner.
- CWMax: Defines the maximum contention window size used for random backoff. A lower value increases the likelihood that a device can transmit sooner.
- AIFSN: The Arbitration Inter-Frame Space Number (AIFSN) specifies additional time between when a channel goes idle and the access point or device sends data frames. Traffic with a lower AIFSN value has a higher priority.
- TxOP: The transmission opportunity. The maximum interval of time an access point can transmit. This makes channel access more efficiently prioritized. A higher value means higher priority.
WMM-EDCA settings can be applied to each of the following traffic categories:
- Back ground: Low priority. High throughput, non-time-sensitive bulk data, such as FTP.
- Best effort: Medium priority. Traditional IP data. Medium throughput and delay.
- Video: High priority. Time-sensitive video data with low delay.
- Voice: Highest priority. Time-sensitive data, such as VoIP and streaming media, that requires a minimal time delay.
Click Save & assign APs to save your settings and create the profile. You can assign the profile by selecting access points from the drop-down list or you can add them later by selecting Add APs later.
Click Save to assign the profile to the selected access points and close the New profile dialogue.