Reports
The Reports page provides detailed reports on ZTNA activity.
You can select a report template, specify filters, and generate a report. You can save templates for your frequently-generated reports and set up export schedules for reports.
Sophos provides several report templates that you can use as a basis for your reports. You can't delete these. See Default reports.
To create and run a report, do as follows.
- Go to ZTNA > Reports.
- Click the Report Generator tab.
- Choose the filters you want to apply.
- Click Generate.
After generating your report, you can do as follows:
- Download the results in CSV or HTML format or as a PDF file.
- Click Save Template to save the filter settings in a template for future use.
- Click Schedule to save the filter settings as a template, and configure it to run regularly.
You can see, edit, and delete your saved report templates in Saved Templates.
You can see, download, and delete your recent exports in Scheduled Exports.
Default reports
Authenticated users: This report shows users who are successfully authenticated by ZTNA gateways, regardless of the gateway deployment mode.
Denied resource access: This report shows users who have been denied access to configured resources, along with the reasons for the denial. The possible reasons are as follows:
- No Access: A user isn't a member of a user group assigned to the ZTNA resource, or the group isn't security-enabled in Microsoft Entra ID (Azure AD).
- Device Health: A user tries to access a ZTNA resource from a device that doesn't meet the health status requirements defined in the ZTNA policy.
- Policy Off: The ZTNA policy assigned to a resource is turned off by an administrator in Sophos Central.
For more information, see Denied resource access report.
Gateway bandwidth: Shows the total bandwidth consumed, aggregated by each gateway. You can view the list of resources accessed by users for each gateway.
Resource bandwidth: Shows the total bandwidth consumed, aggregated per resource.
Filters
Under Filters, you can select a report template and time frame. You can also specify queries.
Under Report templates, select a report template. See Default reports.
Under Time frame, you can specify the time frame for which information is shown by selecting one option. If you select Custom, you can select the dates and times between which information is shown.
Add filters
To add filters, do as follows:
- Under Query, select or enter the name of the column on which you want to filter.
- Enter the values by which you want to filter the report.
-
To change the operator used for comparison, click the equals sign next to the column name and select an option from the drop-down list.
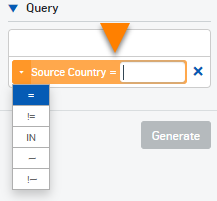
The table below shows a list of the operators:
Operator Rows shown =Rows in which the column value matches the value you want to filter
The value is case-sensitive.
!=Rows in which the column value does not match the value you want to filter
The value is case-sensitive.
<Rows in which the column value is less than the value you want to filter (applies only to numeric values) <=Rows in which the column value is less than or equal to the value you want to filter (applies only to numeric values) >Rows in which the column value is greater than the value you want to filter (applies only to numeric values) >=Rows in which the column value is greater than or equal to the value you want to filter (applies only to numeric values) INRows in which the column value matches any value in a comma-separated list of values you want to filter
The values are case-sensitive.
~Rows in which the column value matches a wildcard expression you want to filter. The wildcard is an asterisk: *
The expression isn't case-sensitive.
!~Rows in which the column value does not match a wildcard expression you want to filter. The wildcard is an asterisk: *
The expression isn't case-sensitive.
-
Repeat this process if you want to add more filters. A row is only shown if it meets the conditions of all the filters.
- To remove a filter, click the delete button next to the filter:
 .
. - Click Generate to show the selected report using the filters that you've specified.
Charts
You can select the chart type in the top-right of the area.
- Bar
- Horizontal bar
- Pie
- Line
- Stack-area
Note
The chart types available depend on the report template you select.
To select which information is shown on each axis, do as follows:
- Click the wrench button in the top-right of the area:
 .
. - In the top box, select which information is shown on the x-axis.
- In the next box, click the arrow and select which information is shown on the y-axis.
- If a line or stack-area chart is shown, in the bottom box, click the arrow and select which information is shown on the z-axis.
When you select a different chart type, it shows default information on each axis, even if you previously changed it.
If you hover over the chart, the data values are shown.
Tables
When the table is first shown, it uses a default set of columns. You can select which columns to show by clicking the column selection button in the top right of the table area: ![]() .
.
To add a filter from the table, click a value under the column on which you want to filter. The column and its value appear under Query. You can select multiple column-value pairs. Click Generate to generate the report.
You can click the column headers to sort the values in ascending or descending order.
If the date column is shown, duplicate rows are grouped on the date and time as follows:
| Time frame | Row grouping |
|---|---|
| 1 hour, 8 hours, and 24 hours | Rows in which the date, hours, and minutes are the same. |
| 7 days and custom selection of <= 7 days | Rows in which the starting hour is the same. |
| For 30 days and custom selection of > 7 days | Rows in which the days have a default timestamp of 12:00 AM. |
Some columns include values that are hyperlinks. If you click one of these, a filter on that value is added to the Query box. You can then use this to filter the report.
Schedule reports
You can set up export schedules for reports. You can create a maximum of 200 schedules.
To set up an export schedule for reports, do as follows:
- Click Schedule.
-
Enter a Template Name.
Maximum characters for the name: 64.
-
Select the Time frame for the data you want to include.
-
Configure the Export frequency settings as follows:
-
Select one of the following options:
- Daily: If you select this option, all days of the week are selected.
- Weekly: If you select this option, select a day of the week on which you want to export the report.
- Monthly: If you select this option, select a day of the month on which you want to export the report.
-
In Duration, select one of the following options:
-
Until I cancel: Reports are exported according to the configured frequency until you cancel the schedule.
To cancel a schedule, in the Scheduled Exports tab, select a schedule and click Delete.
-
Ends on: Select a date on which to end the schedule.
-
-
-
Select the Export format.
You can export the report in PDF, CSV, or HTML format.
Note
The report formats have the following restrictions:
- PDF: A maximum of 10,000 rows and 15 columns.
- HTML: A maximum of 10,000 rows and 23 columns.
- CSV: A maximum of 100,000 rows and 23 columns.
-
Select the Export notification/delivery method.
We recommend that you send the link in an email if the report includes personally identifiable information.
The report is sent to your Sophos Central email address, as specified in Account Details.
You must enter your Sophos Central sign-in credentials to view reports from a link.
You can send the report to other Sophos Central administrators.
-
Click Save.
You can download your exported reports from Scheduled Exports. You can filter the reports by the following formats: PDF, CSV, and HTML. You can also use the Created by filter to filter the reports by user.
To update a schedule, in the Scheduled Exports tab, select a schedule and click Update ![]() .
.
To delete a schedule, in the Scheduled Exports tab, select a schedule and click Delete.
Generate an export manually
Without creating a schedule, you can also manually generate an export by clicking PDF, CSV, or HTML. You can download your exported reports from Scheduled Exports. The exported reports are deleted after 90 days.
Save a report template
Click Save Template to save the selected report template with any of the filters or display settings that you've applied, including the following:
- Query filters
- Chart type
- Chart axes
- Table sorting
- Table columns
Saving your templates prevents you from having to make all the selections again. The report template is saved to the Saved Templates tab. The data and timeframe aren't saved with the template.
Note
You can create a maximum of 1000 templates across DNS Protection, ZTNA, and Sophos Firewall reports.
You can also turn export scheduling on and off for this report template.
To update a template, in the Saved Templates tab, select a template and click Update ![]() .
.
To delete a template, in the Saved Templates tab, select a template and click Delete. You can delete only 25 templates at a time.