Set up an on-premises gateway
Set up a ZTNA on-premises gateway that will control access to resources on your network.
The steps differ depending on whether you want to host the gateway on an ESXi server or Microsoft Hyper-V.
Before you start
Here are some things you should know before configuring your gateway:
- Don't configure gateways to operate in subnets used for internal services. If you do, you may have issues accessing applications. These subnets are as follows:
10.42.0.0/16,10.43.0.0/16,10.108.0.0/16. - Don't configure IPv6 addresses for your gateways, or allow DHCP IPv6 addresses to be assigned to endpoints, because IPv6 isn't supported. If you already have endpoints with IPv6 addresses assigned to them, your users must manually turn off the IPv6 settings on each endpoint.
- If your users need to access ZTNA resources from the same network as the ZTNA gateway, add an SNAT rule of the type MASQ to prevent asymmetric routing.
- When you set up gateway clusters with multiple nodes, you must make sure that the nodes are all in the same subnet and there's very low network latency between the nodes.
Configure your gateway
To get step-by-step instructions, click the tab for your host below.
You set up a gateway on ESXi in two stages:
-
Download a gateway image (OVA file) and deploy it in ESXi.
-
Add gateway settings in Sophos Central to generate an ISO file ("seed image") that you use to boot the gateway in ESXi.
You can set up a gateway cluster to ensure availability. To do this, you set up additional instances of the gateway, as described here.
Note
Make sure that the correct time and date are set on the ESXi host. You must set the timezone as UTC. The ZTNA gateway encounters problems if you don't set the time correctly. See Requirements.
If you're using a two-arm proxy, see Network configuration.
Download and deploy image
-
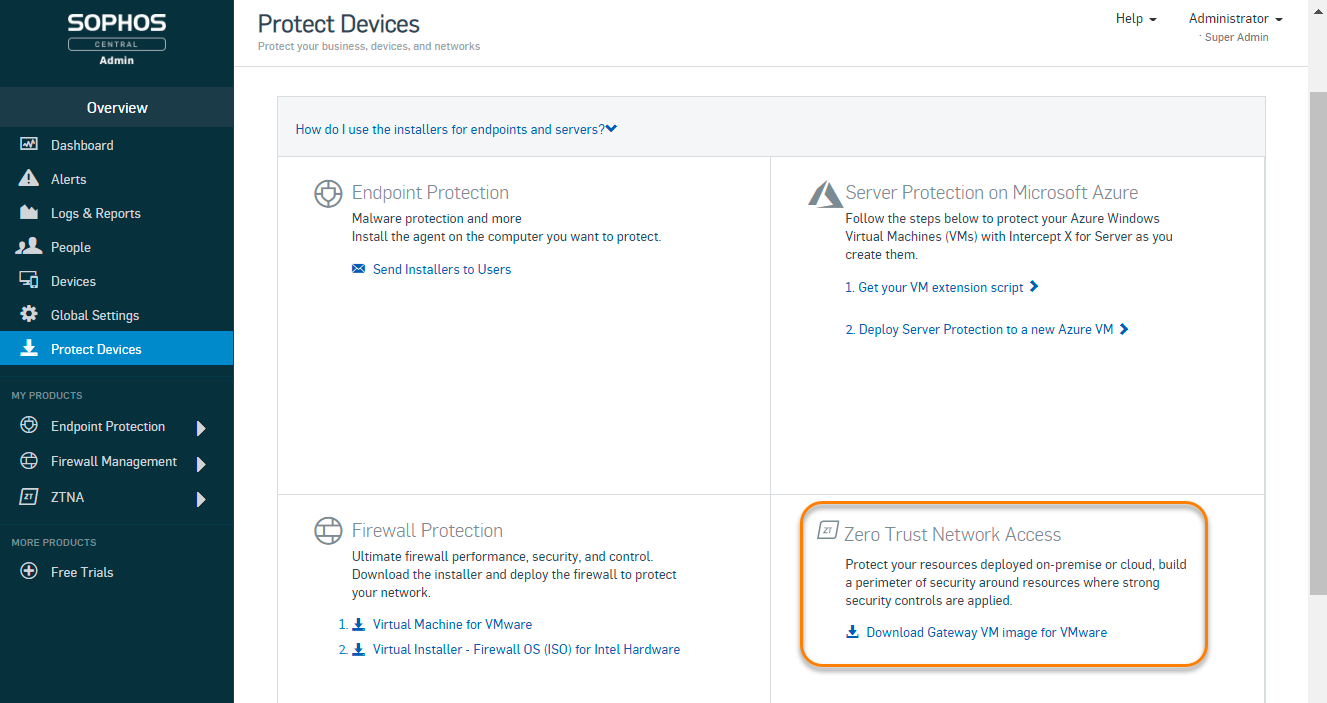
In Sophos Central, go to Devices > Installers.
-
Find Zero Trust Network Access.
- Click the download link for a gateway image.
- Accept the license agreement and (if you're prompted) the software export compliance forms.
- The gateway image is downloaded. This is a generic OVA image of the ZTNA gateway for ESXi servers. You can reuse it as many times as you want.
-
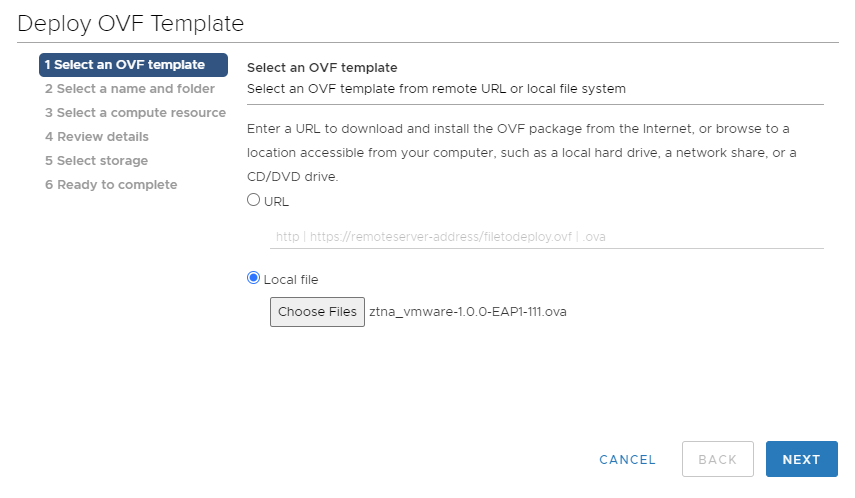
Deploy the OVA image to your ESXi host. In VMware vSphere, right-click the host and select Deploy OVA Template. This runs an assistant to guide you through deployment.
Warning
Turn off the option for automatic power-on (the default on ESXi) or prevent the ZTNA gateway from booting after you finish. If you don't, the gateway will boot without the ISO files and you'll have to start again.
Add settings and boot gateway
-
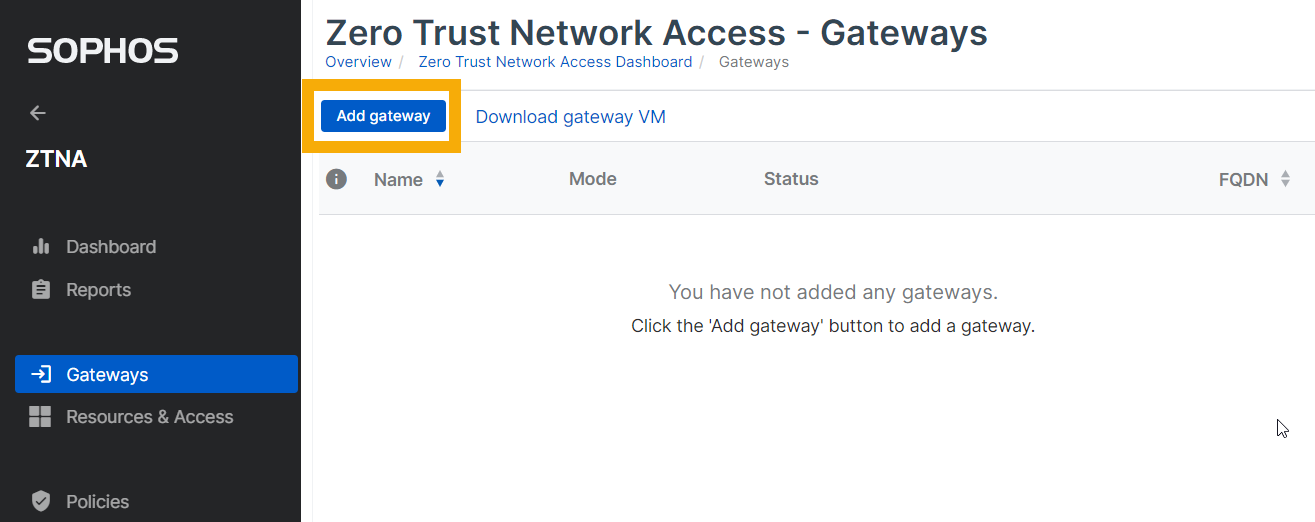
Go back to Sophos Central and go to My Products > ZTNA > Gateways. Click Add Gateway.
-
For Gateway Mode, select On-premises.
-
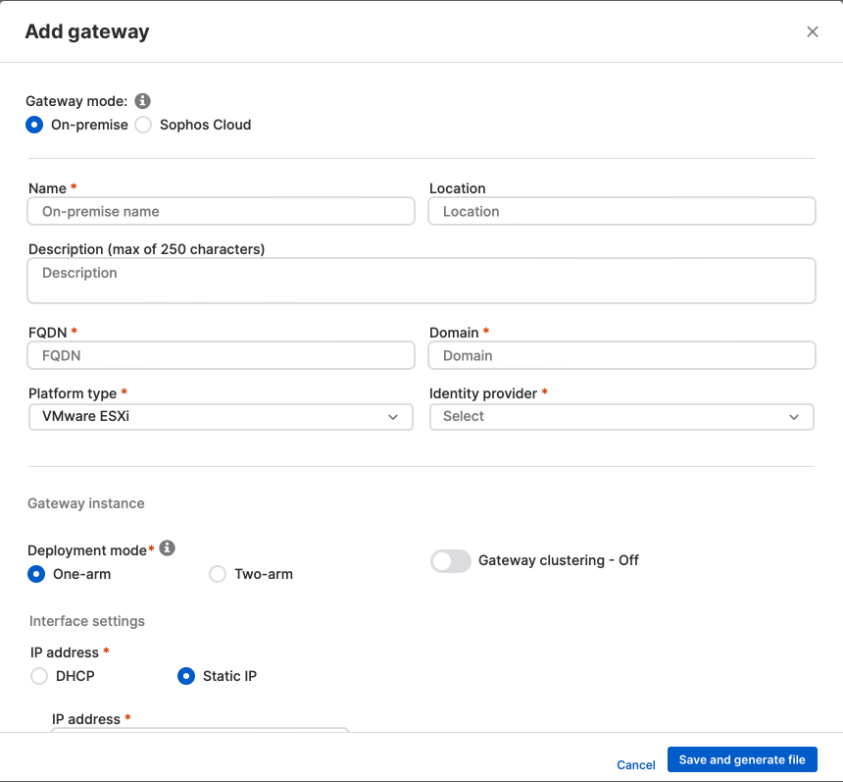
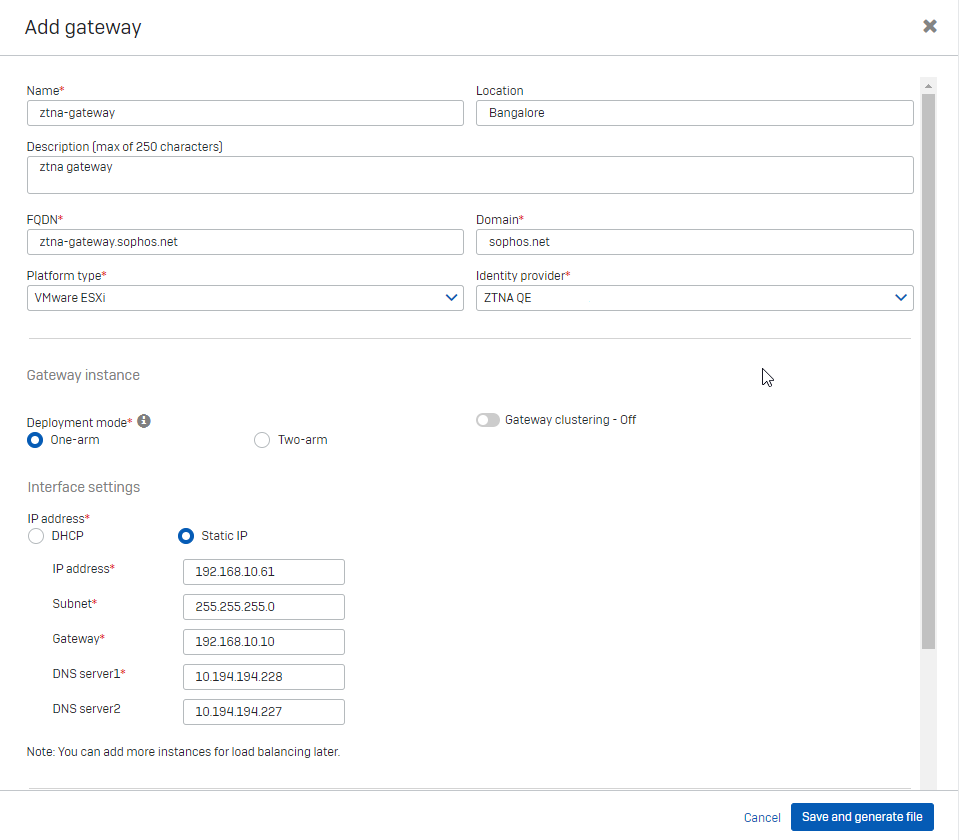
In Add gateway, do as follows:
- Enter a gateway name and the gateway FQDN.
- Enter the domain for the resources (apps).
- In Platform type, select VMware ESXi.
-
Select the Deployment mode.
- One-arm uses the external interface for incoming and outgoing traffic.
- Two-arm uses both external and internal interfaces.
-
Enter the Interface settings.
-
If you select DHCP, set a reservation on the DHCP server.
Warning
The gateway can't handle changes in its IP address. You must set a reservation to ensure that it always keeps the initial IP address that DHCP assigns.
-
If you select Static IP, specify IP address, subnet, and DNS server settings.
In a two-arm deployment, you must specify Static routes if you have apps hosted on multiple internal networks.
-
-
Upload the certificates you created earlier.
- Click Save and generate file.
Note
Only a single, wildcard certificate is supported in this release.
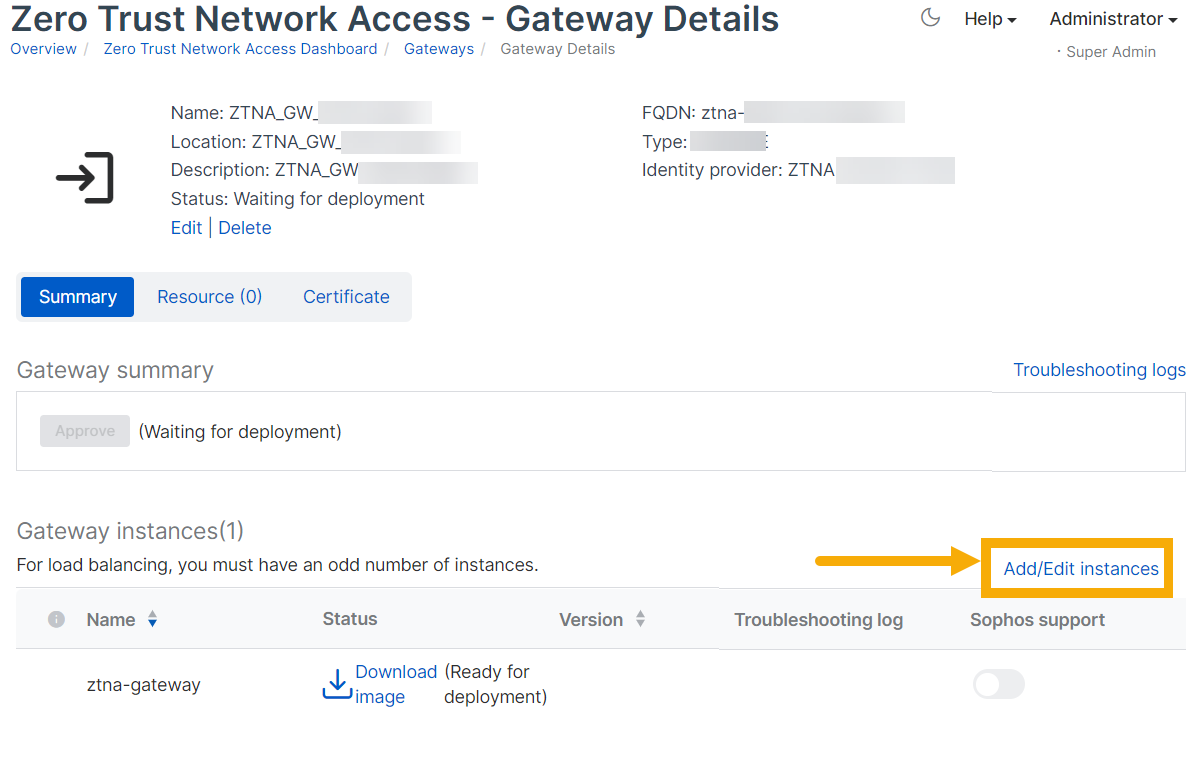
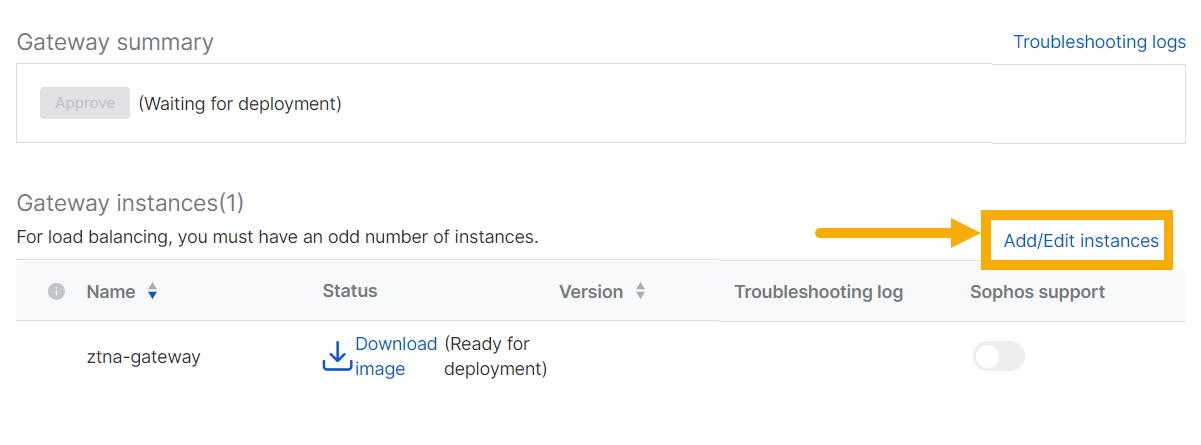
-
On the Gateways page, the gateway's status is Waiting for Deployment.
The seed image ISO is ready for download. You'll need it to boot the gateway and complete the registration process. The ISO is unique for each gateway. You can't reuse it.
Note
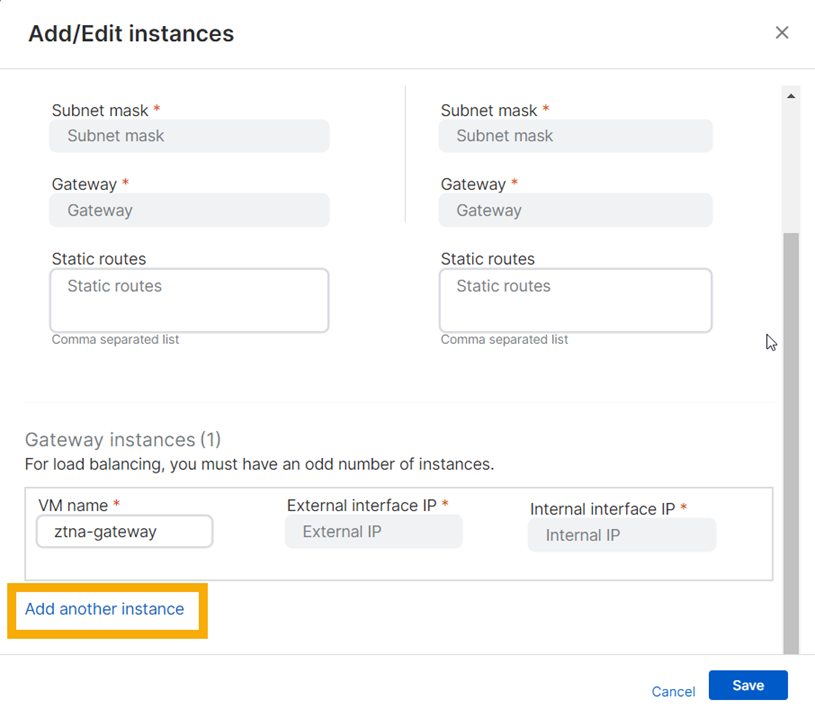
Before you download the image, we suggest that you create a gateway cluster. If you don't want a cluster, skip to step 6.
 .
. -
Click your new gateway to open its details page. Click Add/Edit instances.
-
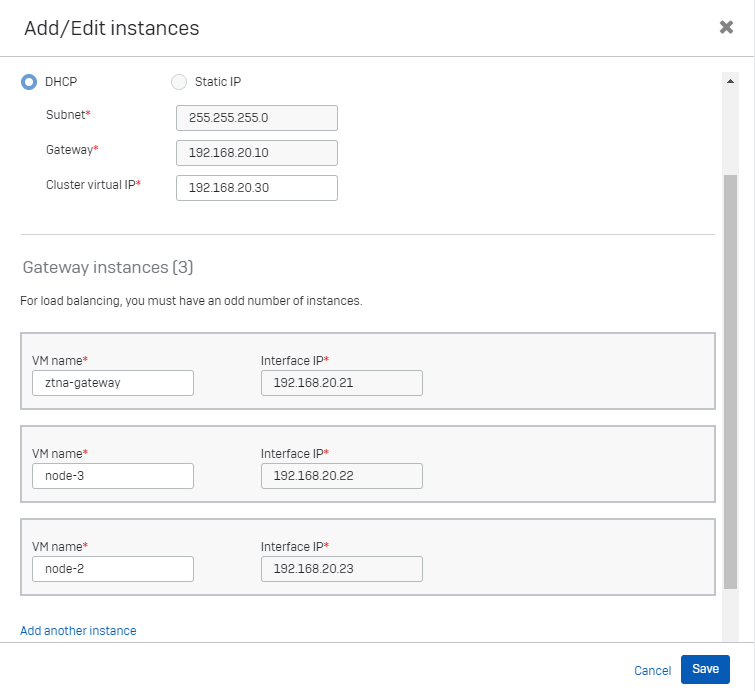
In Add/Edit instances, do as follows:
- Click Add another instance. Clustering turns on automatically.
-
Enter a Cluster virtual IP. This is used for cluster management and load balancing. It must be in the same IP range as the gateway instances.
In a two-arm deployment, the external cluster VIP is for load balancing only. If you use an external load balancer, leave this blank.
-
Enter a VM name and Interface IP for the new instance.
In a two-arm deployment, enter an internal and external interface IP.
-
Repeat the process to add another instance.
Note
-
You must have at least three instances for a cluster. You can have up to nine instances, but you must always have an odd number.
-
If you create a cluster, make sure the DNAT rules you created on the firewall point to the cluster's external virtual IP address. If a gateway node is down, the requests are forwarded to the other nodes in the cluster.
-
To keep your cluster active, make sure that at least half the gateways in it are active.
-
-
Download each ISO file and mount it on your host, then attach it to the gateway.
Note
If you don't mount the ISO at this time, you must deselect "Power on when finished" in the last step of the wizard. You can manually power the virtual machine on after you mount the ISO.
To attach the ISO file to your gateway, do as follows:
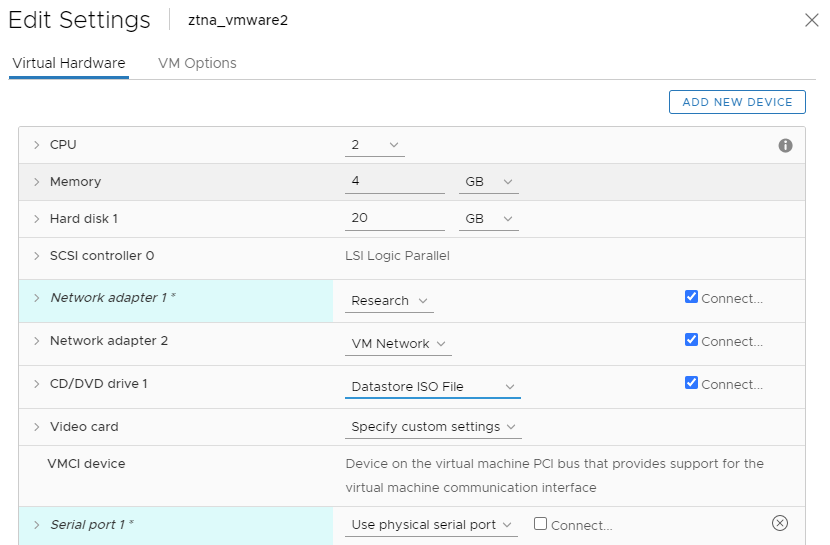
- Go to VMware vSphere.
- Right-click the gateway VM and select Edit Settings.
- On the Hardware tab, in CD/DVD drive, ensure the ISO file is shown and select Connect.
- In Status, select Connect at Power on.
- Click Save.
If a serial device is listed in the virtual hardware, you can safely remove it.
When the gateway boots with the ISO file, it'll contact Sophos Central to register.
-
Go back to Sophos Central. On the Gateways page, the gateway status changes to Awaiting Approval.
When you're prompted, approve gateway registration.
It can take up to ten minutes for approval to take effect. The gateway status then changes to Connected. You'll see an option to create a password if you want to.
Note
If you have a cluster of gateway instances, you only approve gateway registration for the first gateway instance. Subsequent instances are managed without explicit approval.
Note
The ISO file must stay attached to the gateway. You can't unmount it after the gateway is booted.
You've finished setting up the on-premises gateway.
Note
If the gateway can't connect to Sophos Central, go to VMware vSphere and run diagnostics on the VM.
When a new virtual machine version is available, a green check mark shows in the version column. Click the version number to start or schedule an update. See Gateway updates in Gateways.
To set up a gateway on Microsoft Hyper-V, do as follows:
-
Download and deploy the gateway VM image.
-
Add gateway settings to generate an ISO file ("seed image").
-
Download the ISO file and boot the gateway.
Download and deploy image
-
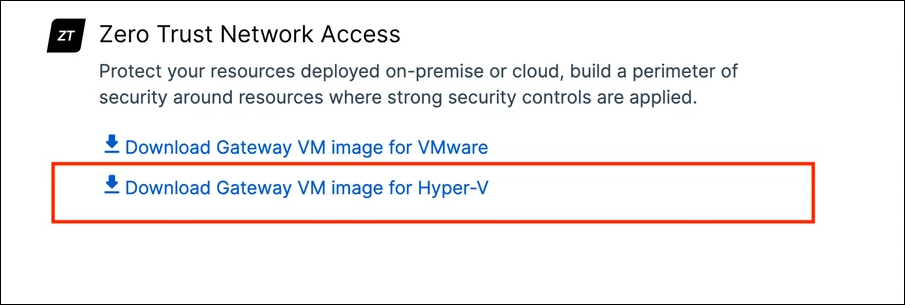
In Sophos Central, go to Devices > Installers.
-
Under Zero Trust Network Access, click Download Gateway VM image for Hyper-V.
A ZIP file containing the VM image is downloaded.
-
Extract the Hyper-V base image from the ZIP file you downloaded.
This gives you the
.vhdxfile you need to set up the gateway. You can't use this file to deploy more than one VM, but you can make copies and use them for additional VMs. -
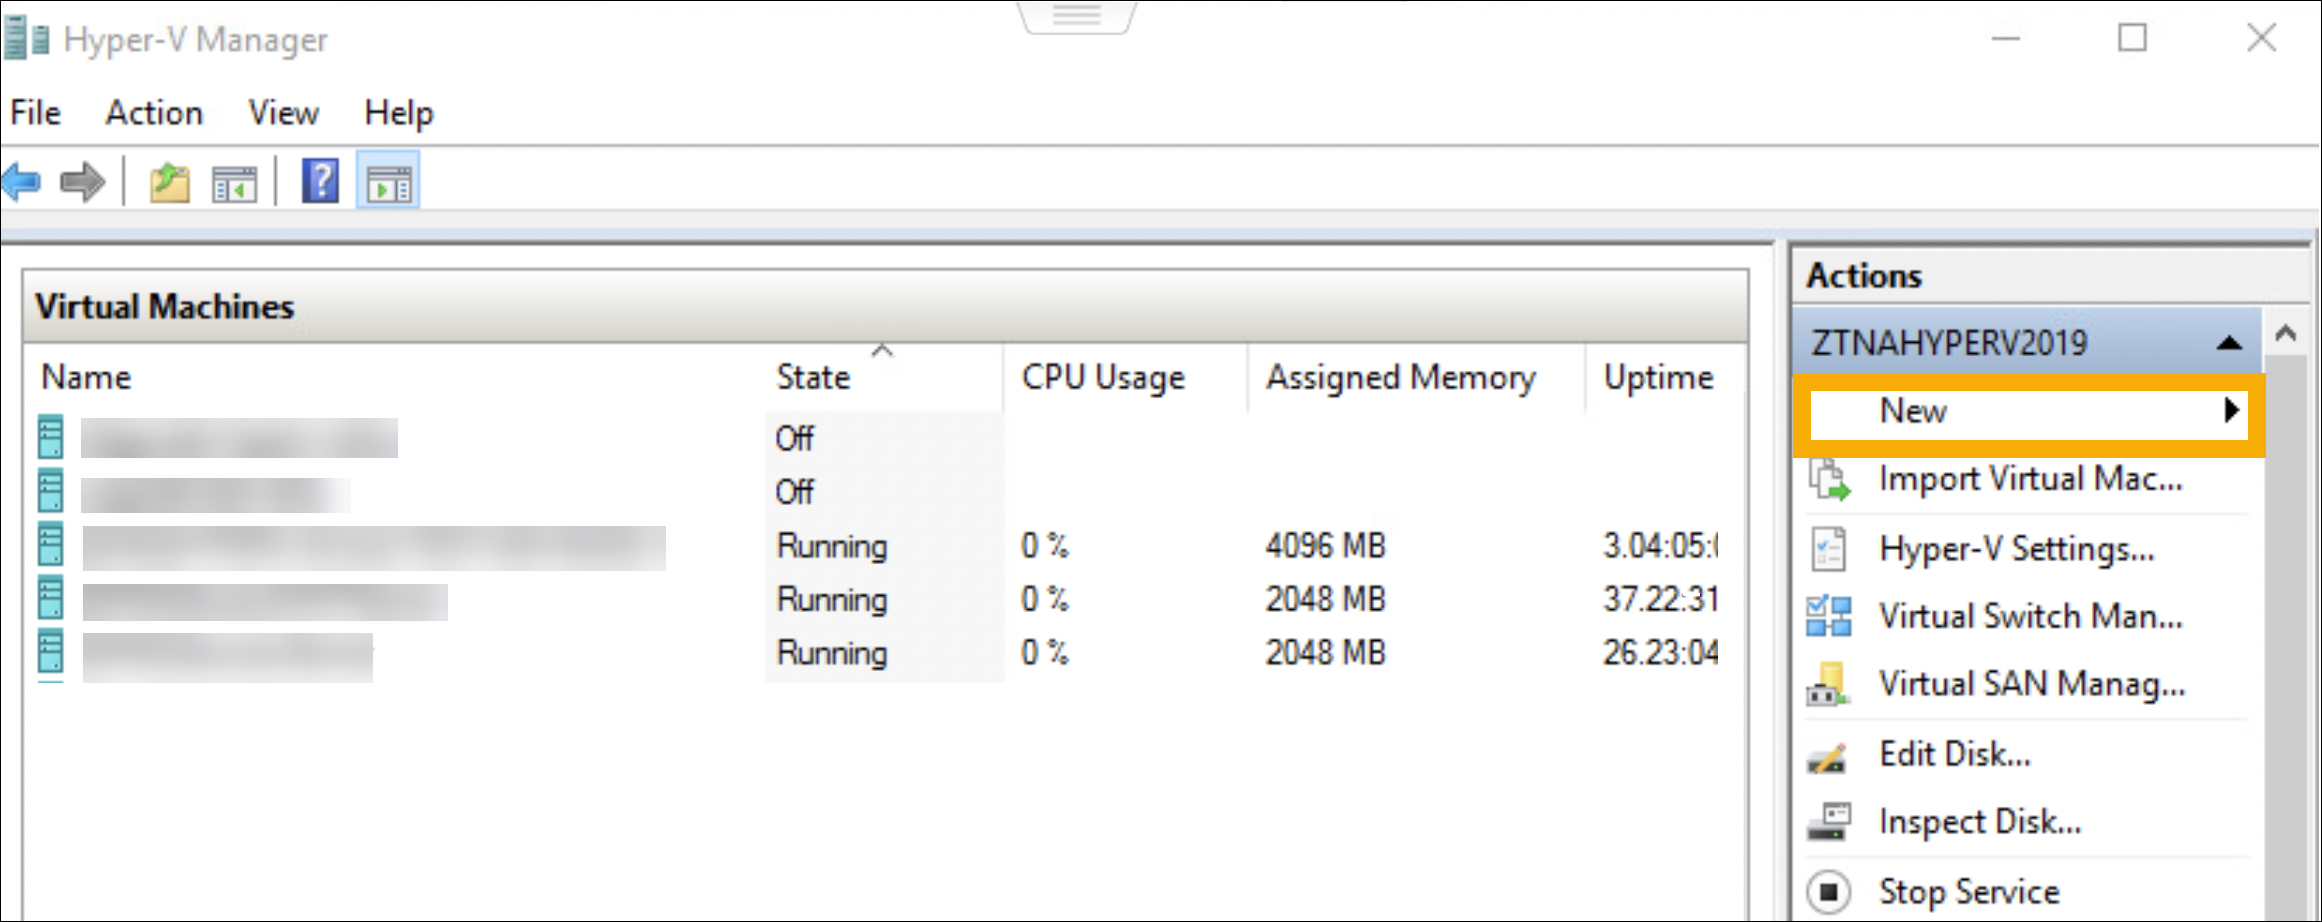
In Hyper-V Manager, in the Virtual Machines list, in Actions, click New.
-
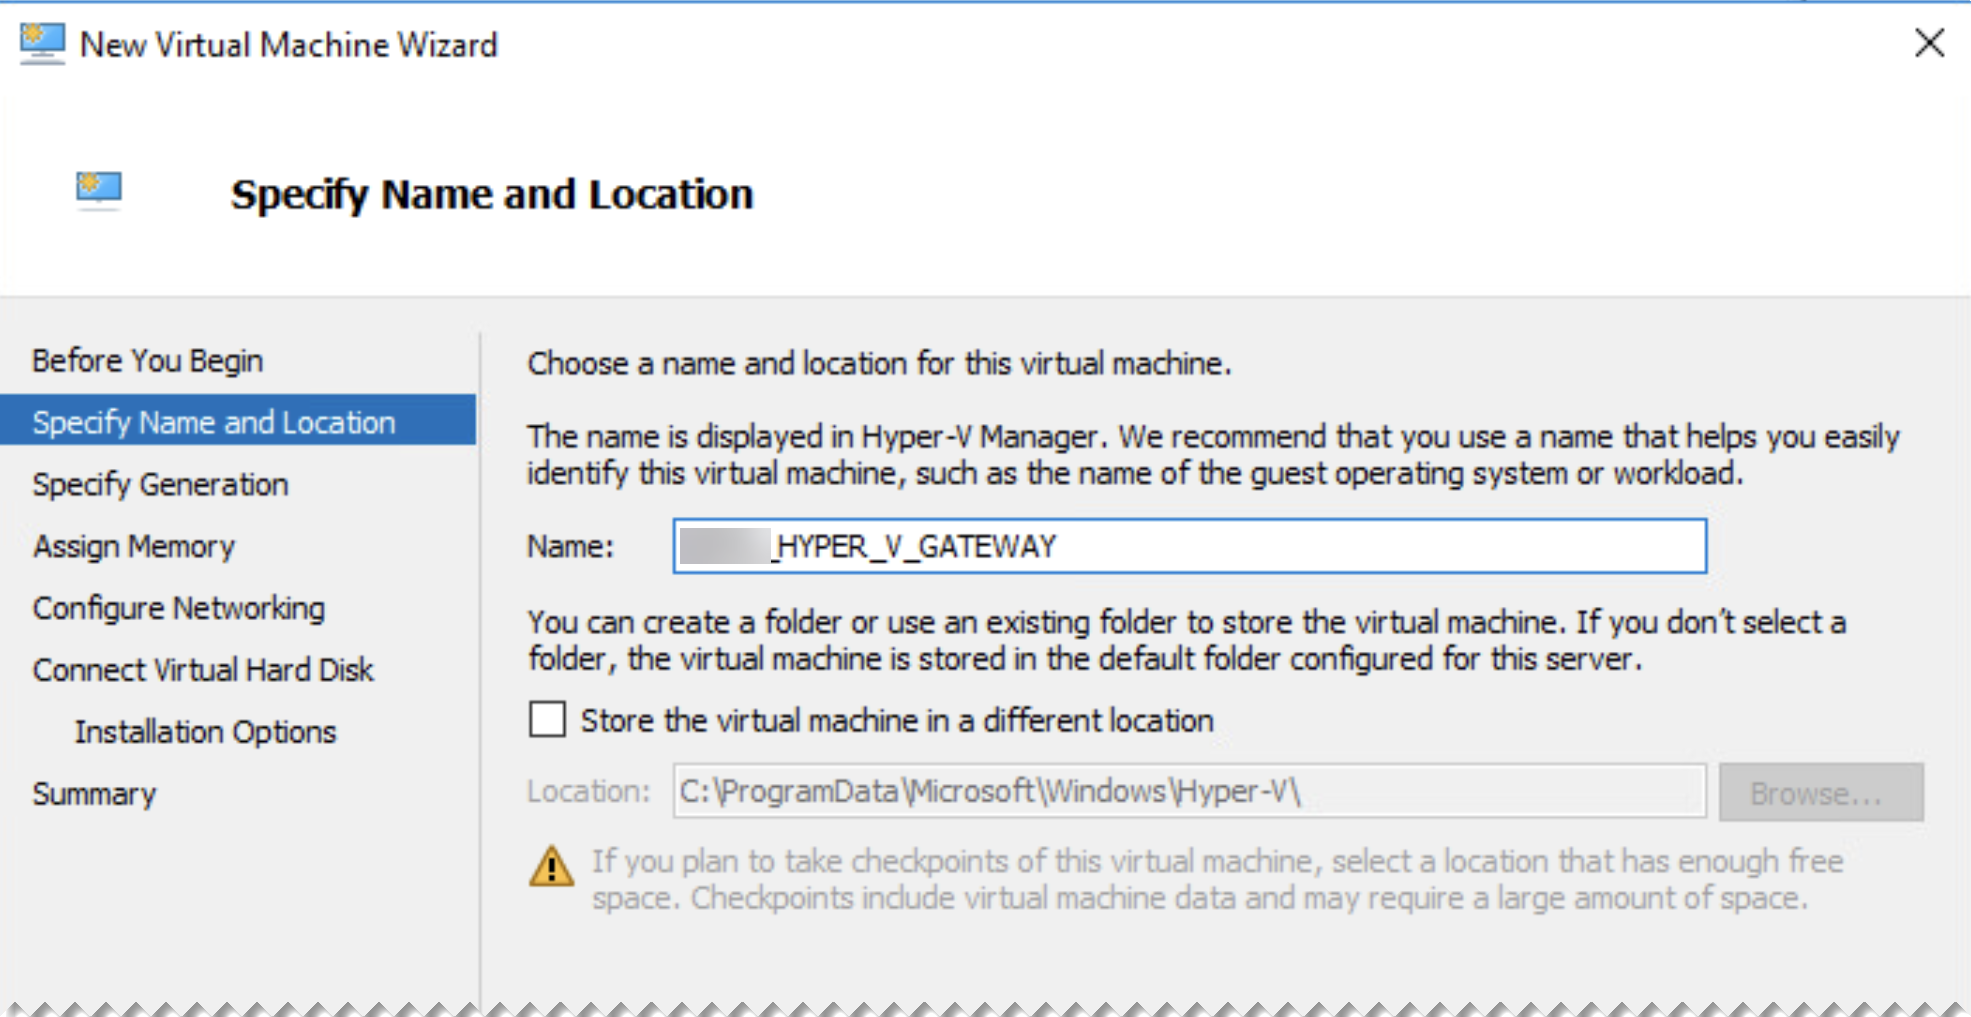
Enter a name for the VM.
-
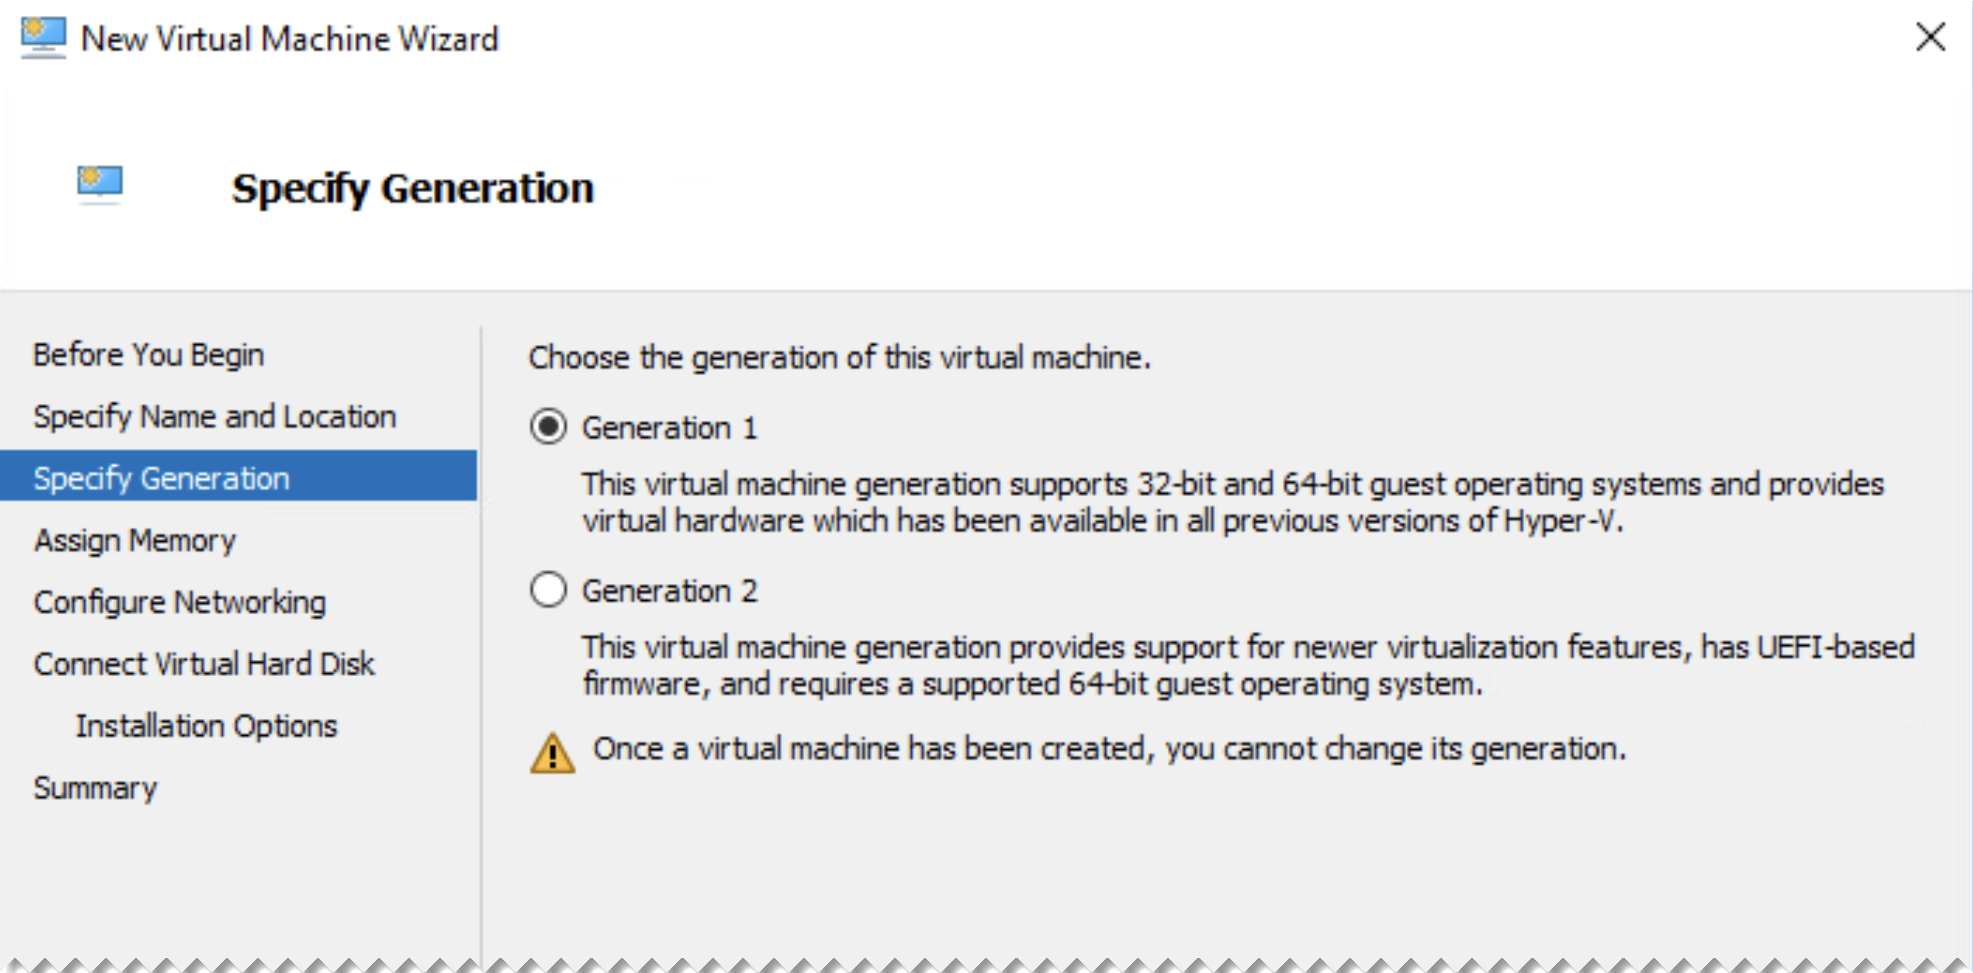
Select the generation. Generation 1 supports both 32-bit and 64-bit operating systems.
-
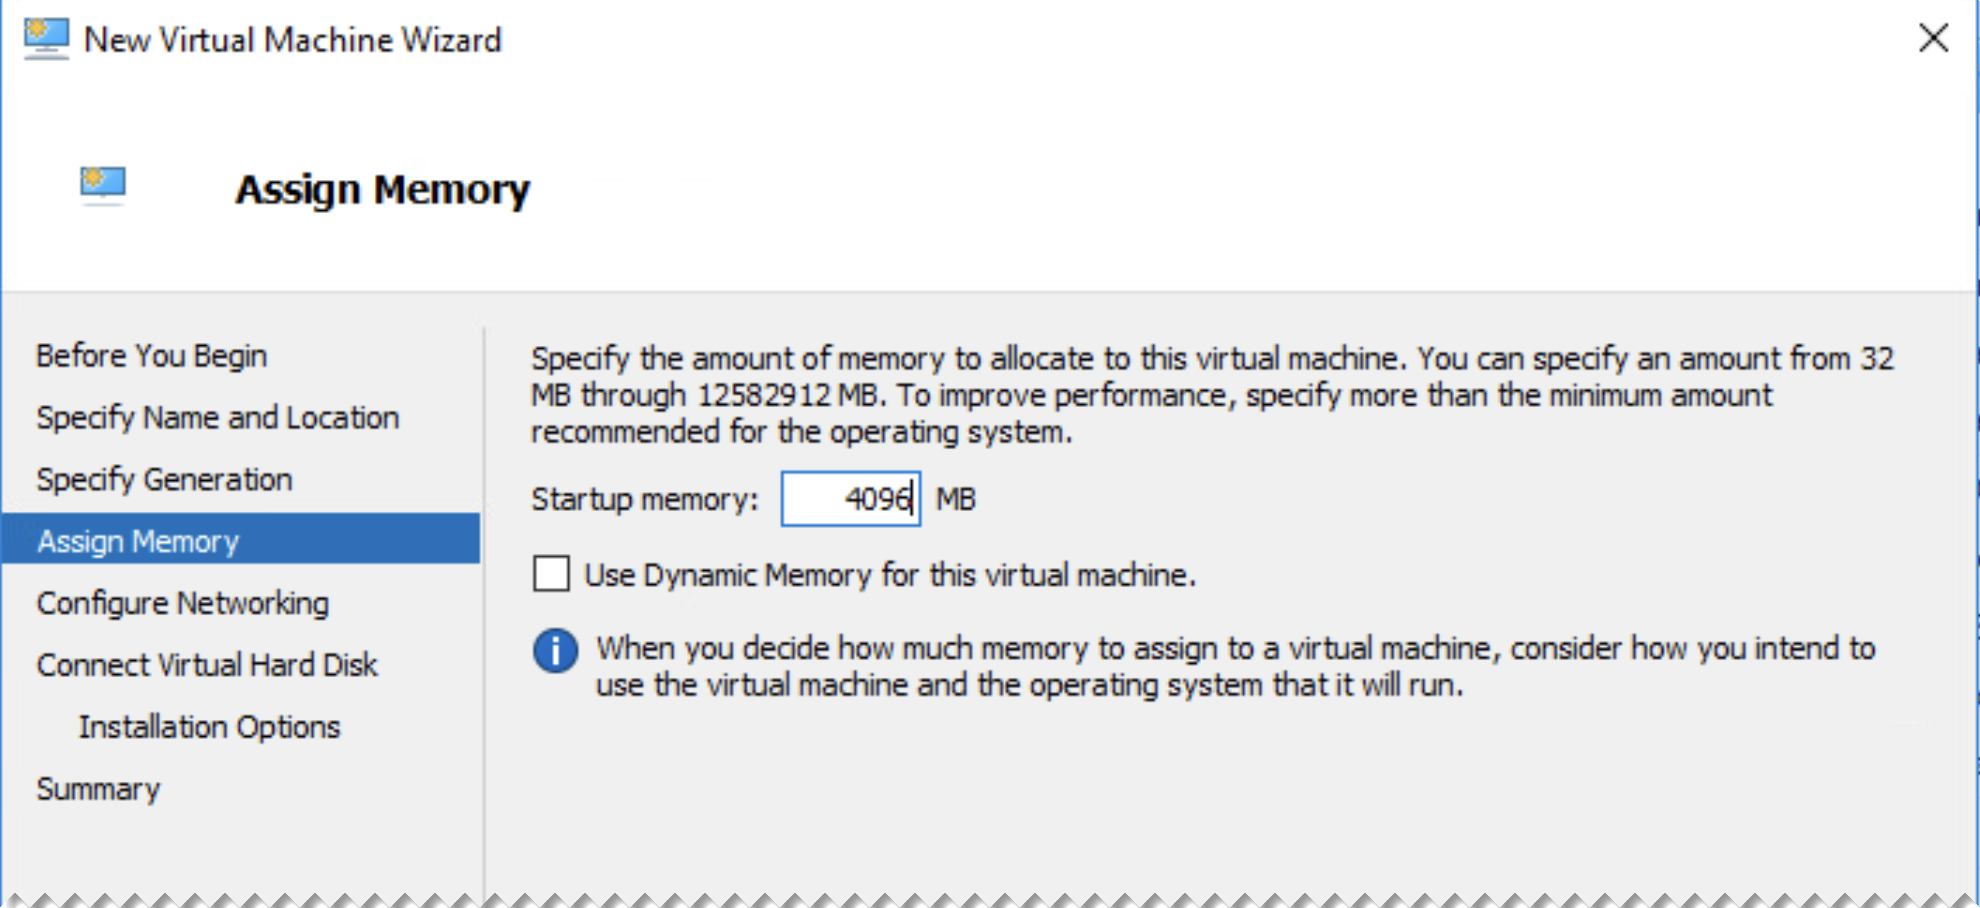
In Assign Memory, enter at least 4096 MB of startup memory.
-
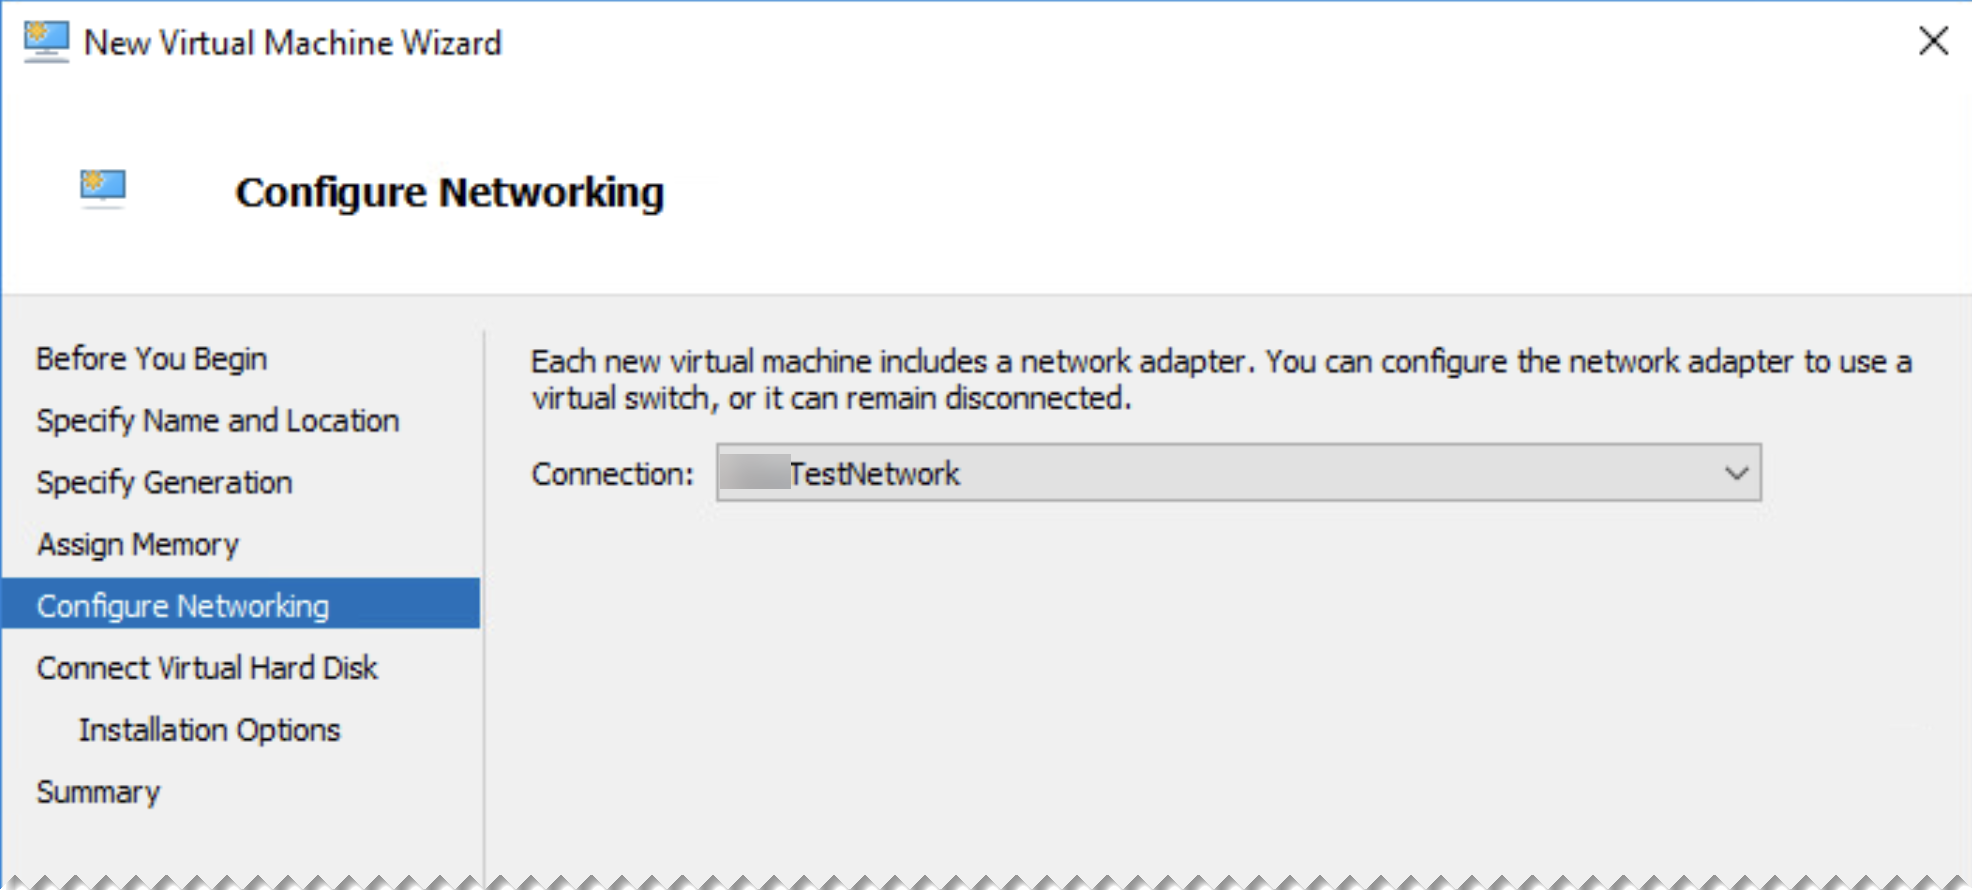
In Configure Networking, select a network adapter.
-
In Connect Virtual Hard Disk, select Use an existing virtual hard disk and browse to the
.vhdxfile that you extracted from the VM image download.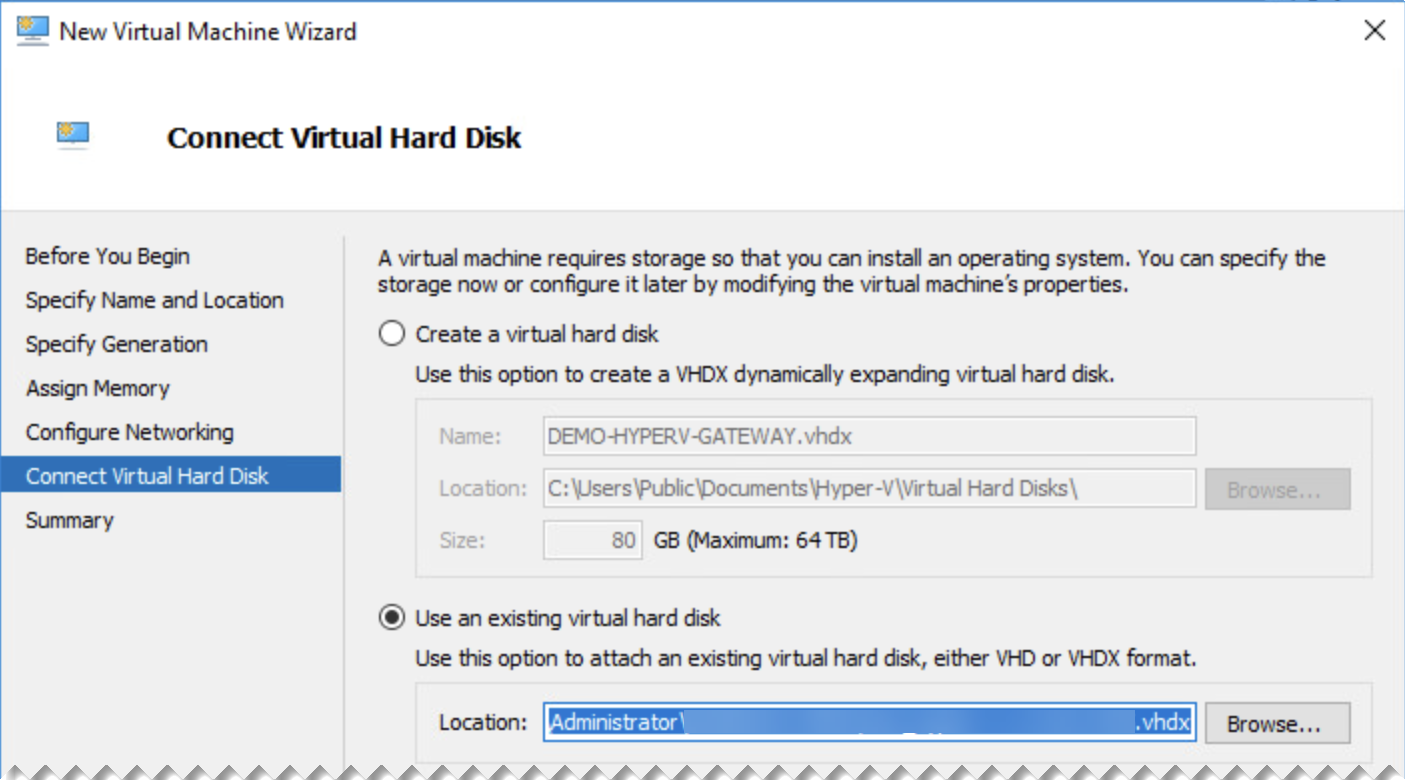
-
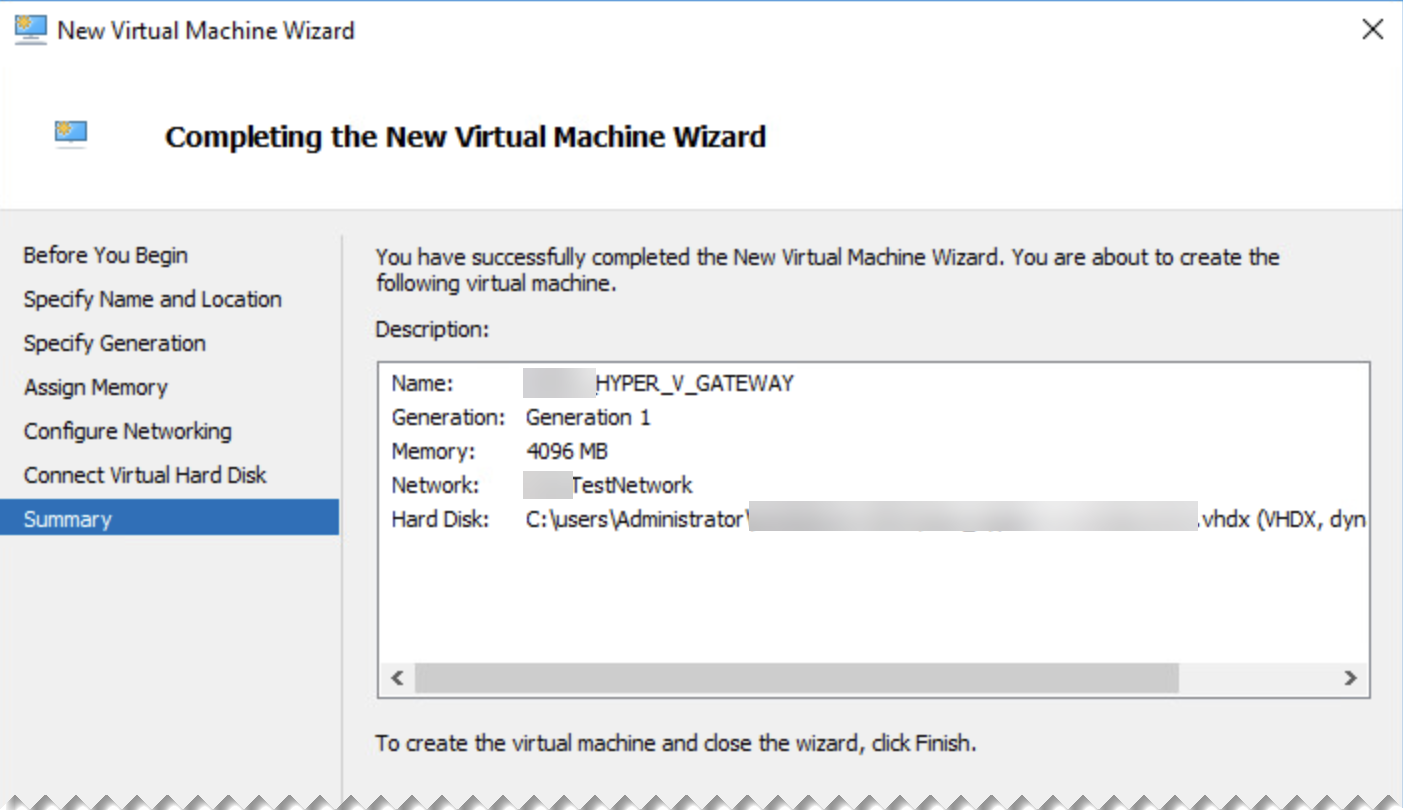
Click Finish.
-
Go to the Settings for the new VM.
-
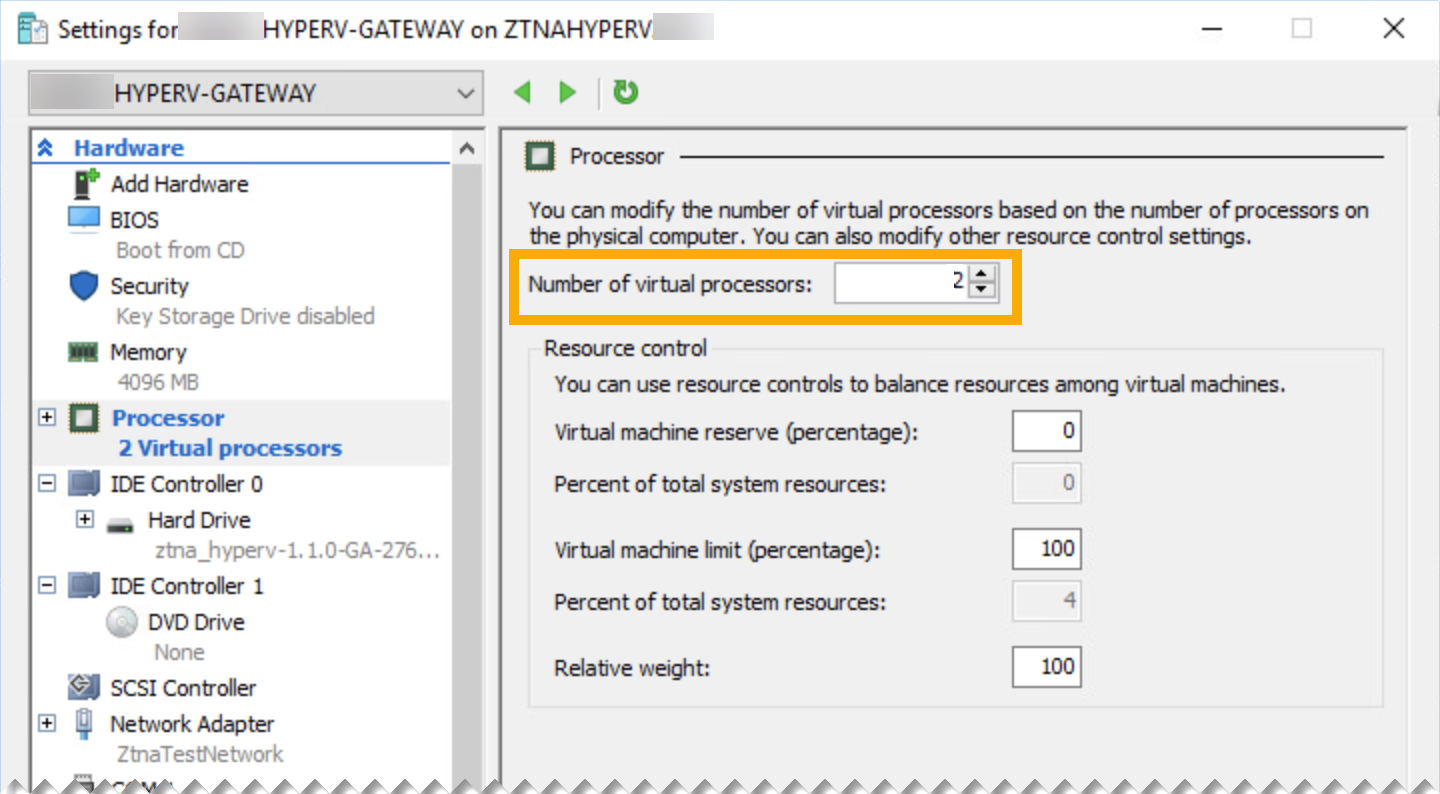
In Hardware > Processors, set Number of virtual processors to "2".
-
If your gateway is in a two-arm deployment, go to Network adapter and add another adapter to the VM.
Note
If you're using VLANs, make sure you tag your network interfaces with the appropriate VLAN IDs.
-
-
Click Apply and Save.
Add gateway settings
-
Go back to Sophos Central and go to My Products > ZTNA > Gateways. Click Add gateway.
-
For Gateway Mode, select On-premises.
-
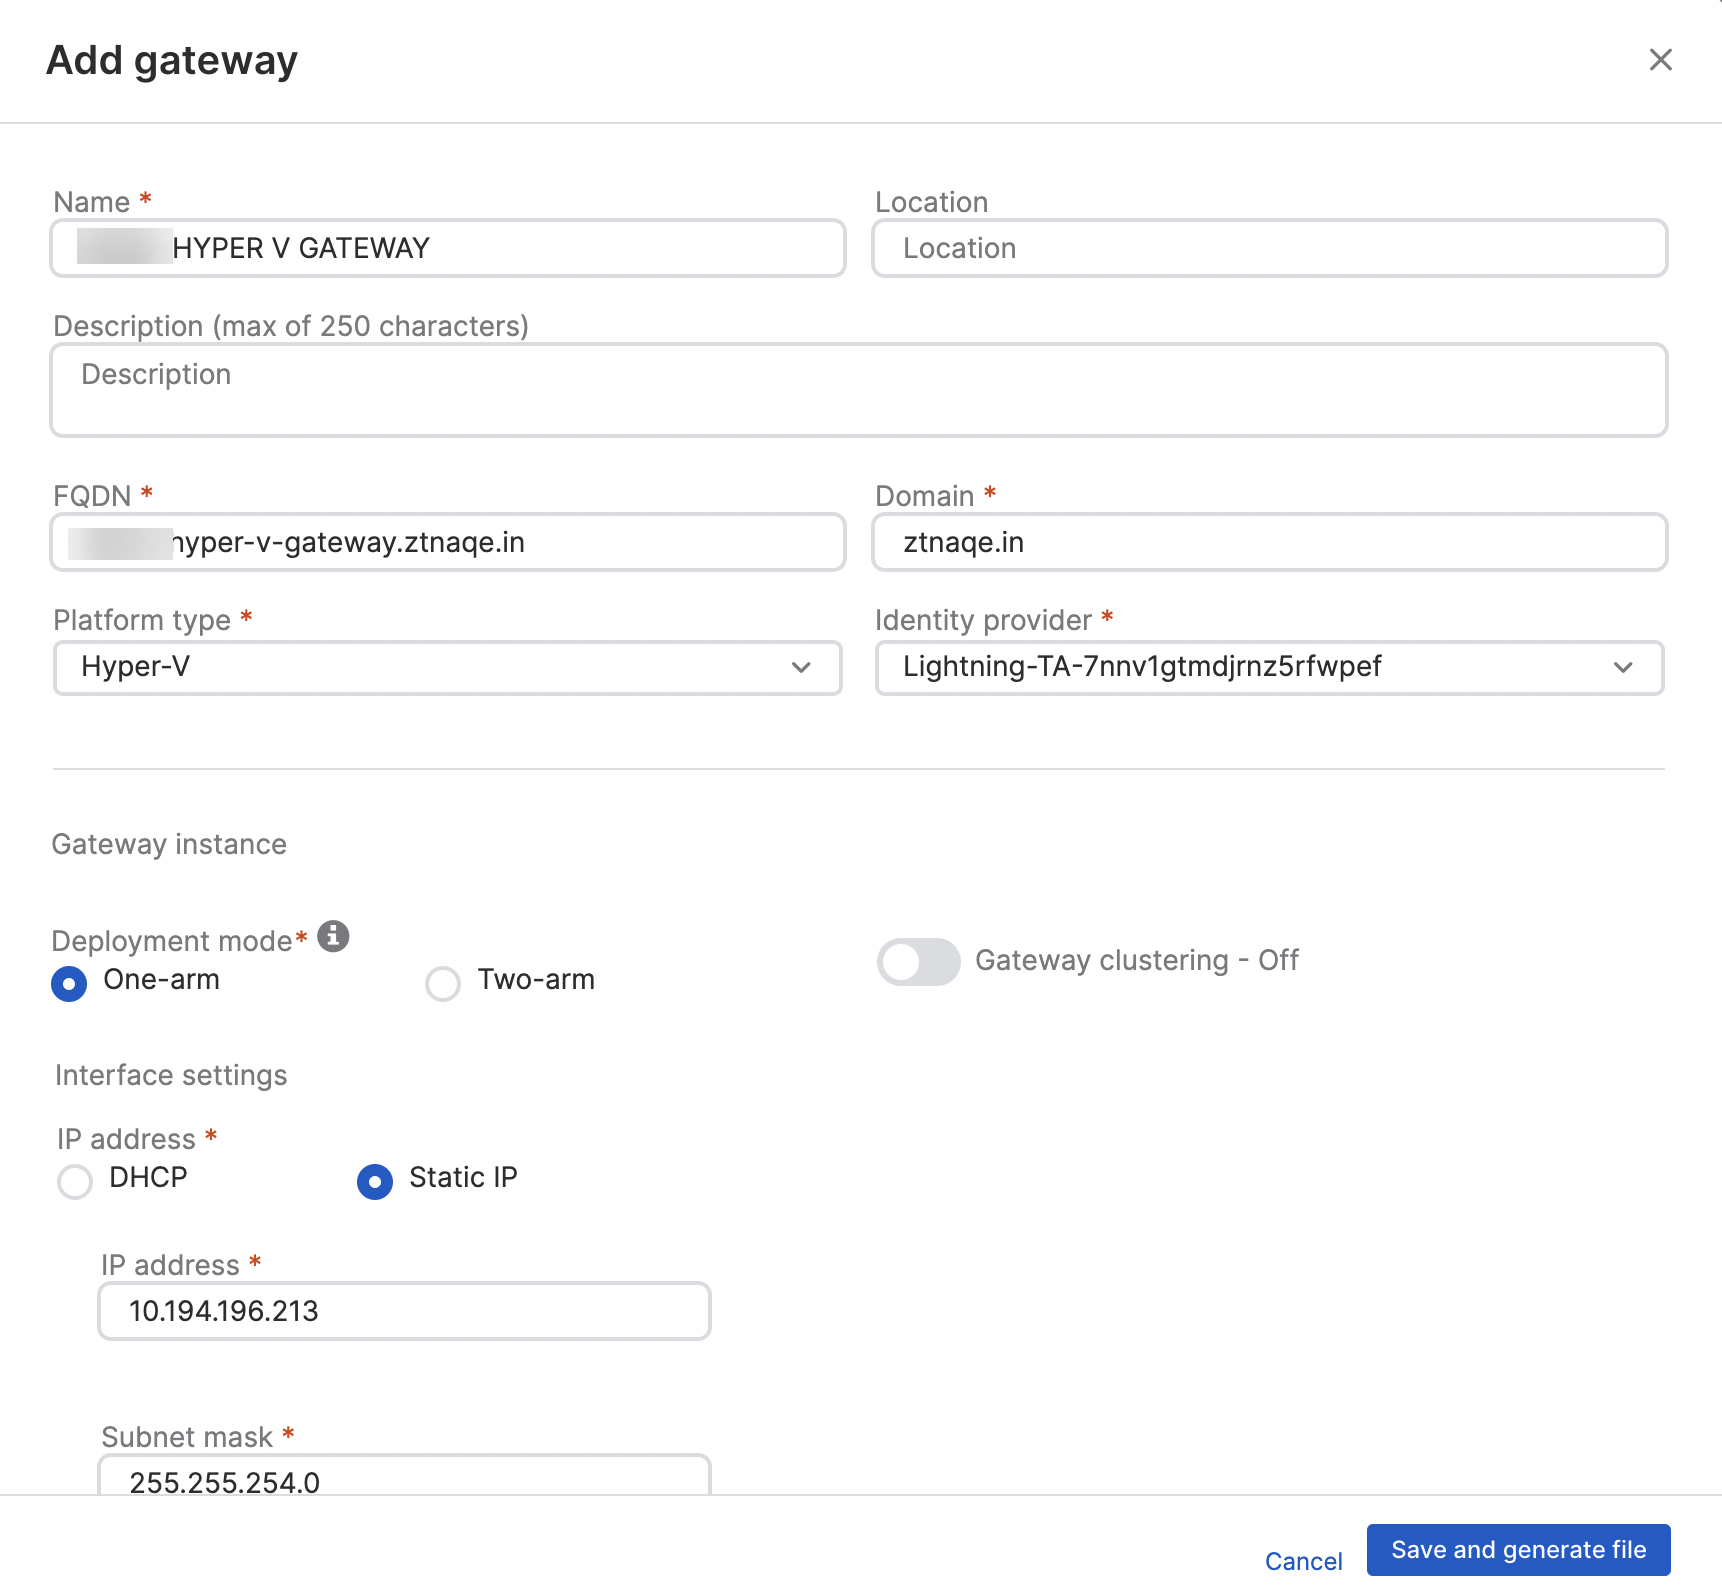
In Add gateway, do as follows:
- Enter a gateway name and the gateway FQDN.
- Enter the domain for the resources (apps).
- In Platform type, select Hyper-V.
-
Select the Deployment mode.
- One-arm uses the external interface for incoming and outgoing traffic.
- Two-arm uses both external and internal interfaces.
-
Enter the Interface settings.
-
If you select DHCP, set a reservation on the DHCP server.
Warning
The gateway can't handle changes in its IP address. You must set a reservation to ensure that it always keeps the initial IP address that DHCP assigns.
-
If you select Static IP, enter an IP address, a subnet, and DNS server settings.
In a two-arm deployment, you must specify Static routes if you have apps hosted on multiple internal networks.
-
-
Upload the certificates you created earlier.
- Click Save and generate file.
Note
Only a single, wildcard certificate is supported in this release.
-
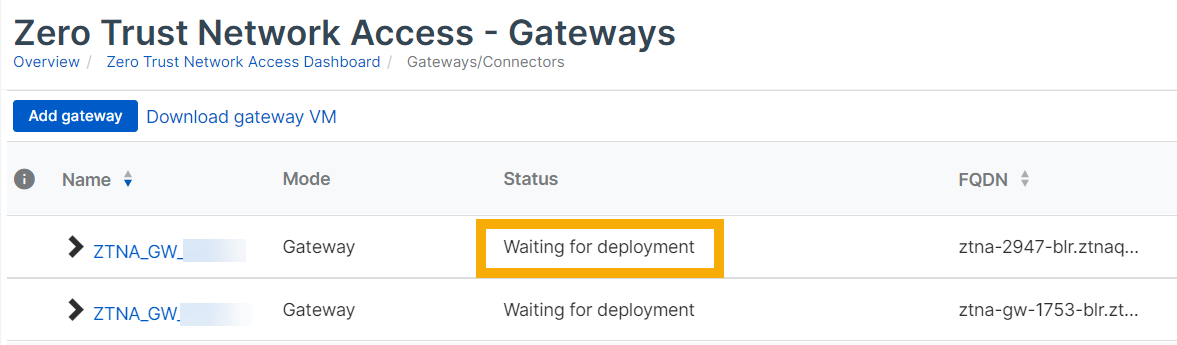
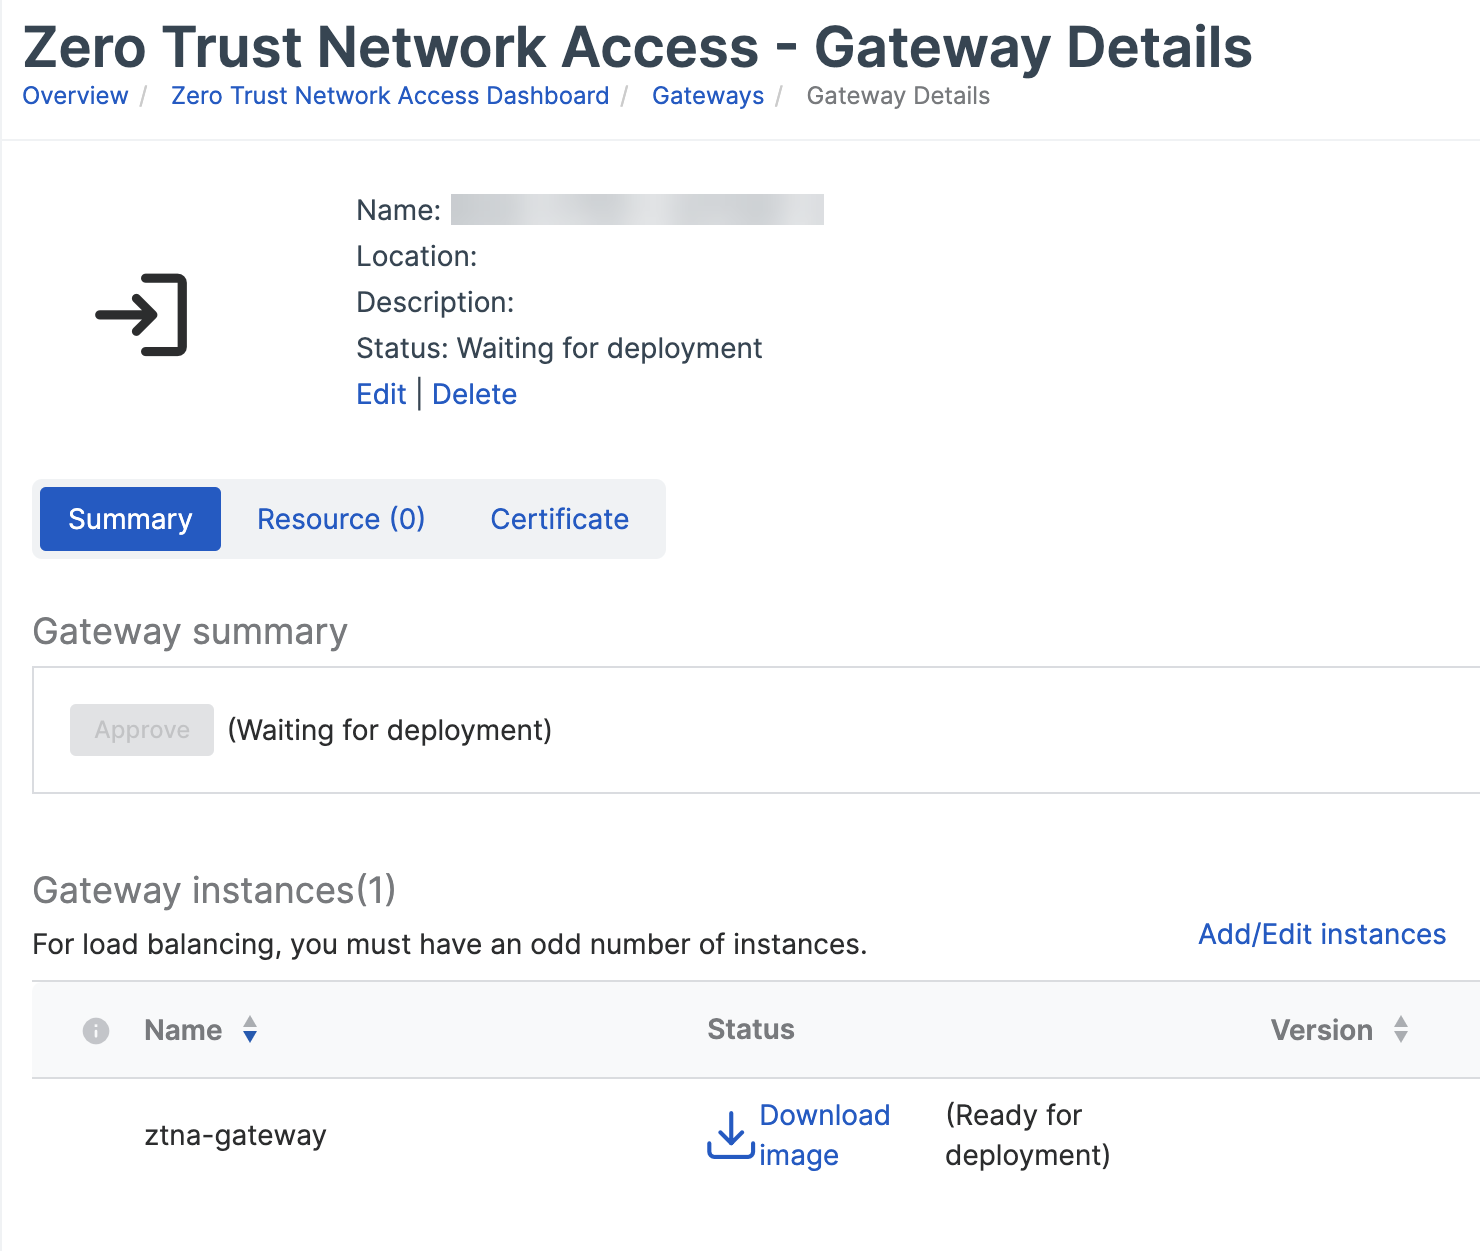
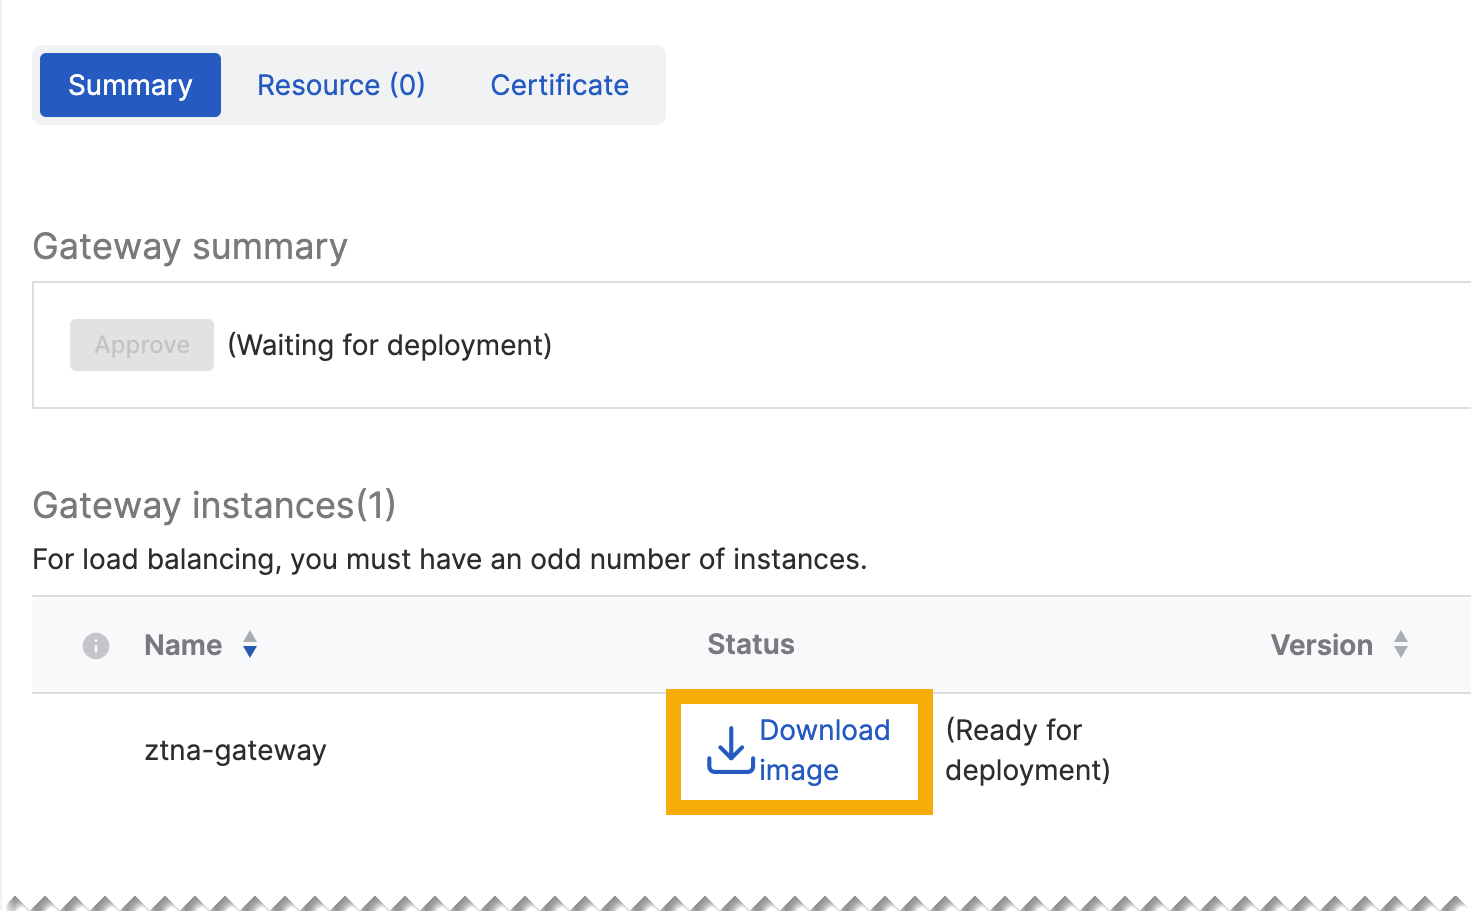
On the Gateways page, the new gateway's status is Waiting for Deployment. Click the gateway to see details.
-
In the gateway details, you can see that the ISO image is ready for download. You'll need it to boot the gateway. The ISO is unique for each gateway. You can't reuse it.
Before you download the image, we suggest that you create a gateway cluster. If you don't want a cluster, skip to the 'Download ISO files and boot the gateway' section.
-
In the gateway details, click Add/Edit instances.
-
In Add/Edit instances, click Add another instance. Clustering turns on automatically.
-
Enter the details of the new instance as follows:
-
Enter a Cluster virtual IP. This is used for cluster management and load balancing. It must be an IP address that you haven't used before in this configuration, and it must be in the same IP range as the gateway instances.
Tip
In a two-arm deployment, the external interface IP address is used for load balancing only. If you use an external load balancer, leave this field blank.
-
Enter a VM name and Interface IP for the new instance.
In a two-arm deployment, enter an internal and external interface IP.
-
Repeat the process to add another instance.
Note
You must have at least three instances for a cluster. You can have up to nine instances, but you must always have an odd number.
Note
To keep your cluster active, make sure that at least half the gateways in it are active.
-
Next you download the ISO files and boot the gateway.
Download ISO files and boot the gateway
Download the ISO file for each instance, attach them to the gateway VM, and boot the gateway, as follows:
-
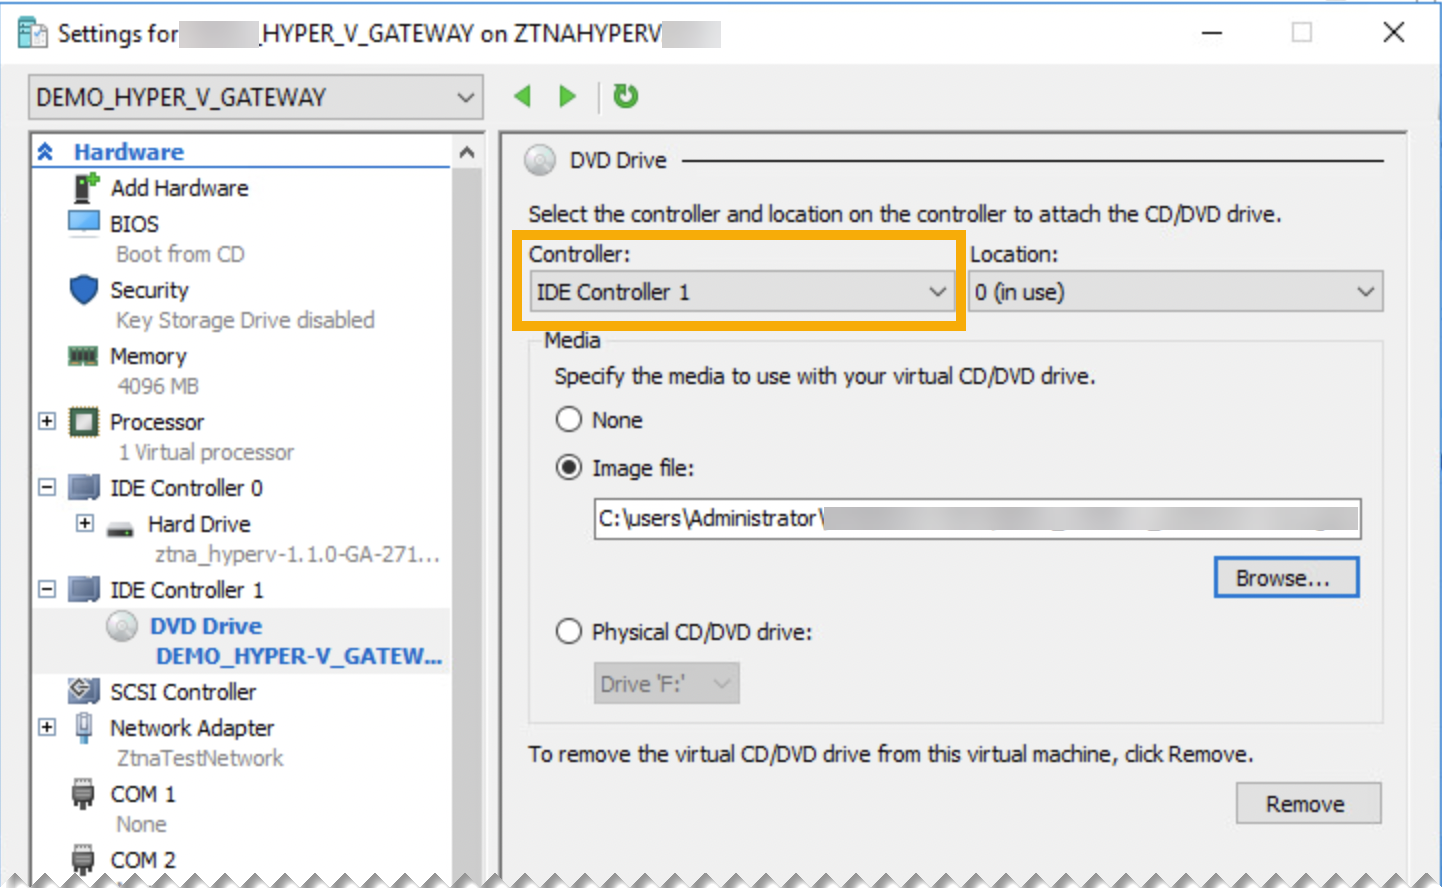
In the gateway details, go to each instance and click Download image.
-
In Hyper-V Manager, go to Settings for the VM. In DVD Drive, do as follows:
- In Controller, select IDE Controller 1.
- In Media, select Image file and enter the path to the seed ISO.
- Click Apply and Save.
Note
The ISO file must stay attached to the gateway. You can't unmount it after the gateway is booted.
-
Power on the gateway instances. Wait for a few minutes.
-
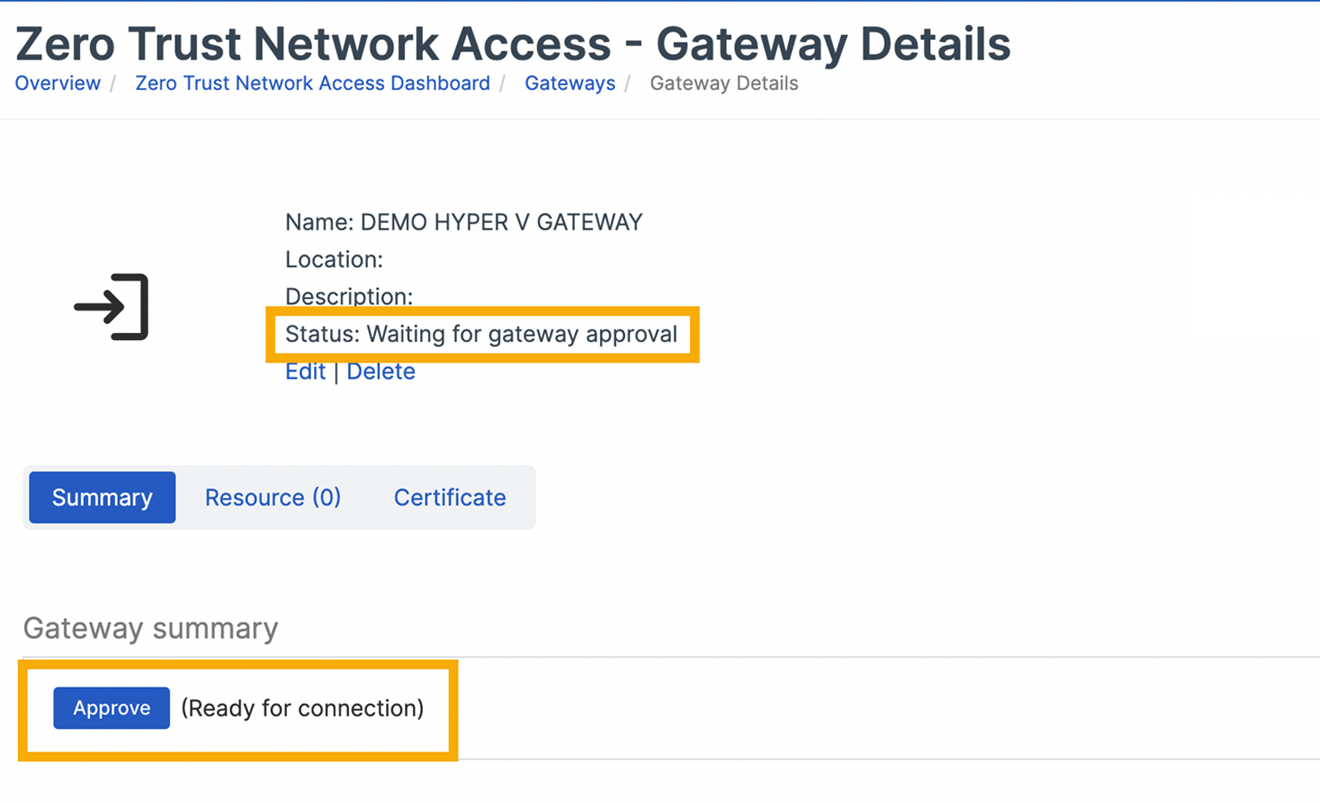
In Sophos Central, go to My Products > ZTNA > Gateways and click the new gateway to open its details page.
The gateway status changes to Waiting for gateway approval. Click Approve.
Note
If you have a cluster of gateway instances, you only approve gateway registration for the first gateway instance. Subsequent instances are managed without explicit approval.
-
The gateway's status changes to Active.
You've finished setting up the on-premises gateway.
Note
If the gateway can't connect to Sophos Central, go to Hyper-V Manager and run diagnostics on the VM.
When a new virtual machine version is available, a green check mark shows in the version column. Click the version number to start or schedule an update. See Gateway updates in Gateways.
Next, you add DNS settings. See Add your DNS settings.