Integrate Cisco ISE
You must have the Identity integrations license pack to use this feature.
You can integrate Cisco ISE with Sophos Central so that it sends alerts to Sophos.
This integration uses a log collector hosted on a virtual machine (VM). Together they're called an integration appliance. The appliance receives third-party data and sends it to the Sophos Data Lake.
This page describes integration using an appliance on ESXi or Hyper-V. If you want to integrate using an appliance on AWS, see Integrations on AWS.
Key steps
The key steps in an integration are as follows:
- Add an integration for this product. In this step, you create an image of the appliance.
- Download and deploy the image on your VM. This becomes your appliance.
- Configure Cisco ISE to send data to the appliance.
Requirements
Appliances have system and network access requirements. To check that you meet them, see Appliance requirements.
Add an integration
To add the integration, do as follows:
- In Sophos Central, go to Threat Analysis Center > Integrations > Marketplace.
-
Click Cisco ISE.
The Cisco ISE page opens. You can add integrations here and see a list of any you've already added.
-
In Data Ingest (Security Alerts), click Add Configuration.
Note
If this is the first integration you've added, we'll ask for details about your internal domains and IPs. See Provide your domain and IP details.
Integration setup steps appears.
Configure the appliance
In Integration setup steps, you can configure a new appliance or use an existing one.
We assume here that you configure a new appliance. To do this, create an image as follows:
- Enter an integration name and description.
- Click Create new appliance.
- Enter a name and description for the appliance.
- Select the virtual platform. Currently we support VMware ESXi 6.7 Update 3 or later and Microsoft Hyper-V 6.0.6001.18016 (Windows Server 2016) or later.
-
Specify the IP settings for the Internet-facing network ports. This sets up the management interface for the appliance.
-
Select DHCP to assign the IP address automatically.
Note
If you select DHCP, you must reserve the IP address.
-
Select Manual to specify network settings.
-
-
Select the Syslog IP version and enter the Syslog IP address.
You'll need this syslog IP address later, when you configure Cisco ISE to send data to your appliance.
-
Select a Protocol.
You must use the same protocol when you configure Firepower to send data to your appliance.
-
Click Save.
We create the integration and it appears in your list.
In the integration details, you can see the port number for the appliance. You'll need this later when you configure Firepower to send data to it.
It might take a few minutes for the appliance image to be ready.
Deploy the appliance
Restriction
If you're using ESXi, the OVA file is verified with Sophos Central, so it can only be used once. If you have to deploy another VM, you must create an OVA file again in Sophos Central.
Use the image to deploy the appliance as follows:
- In the list of integrations, in Actions, click the download action for your platform, for example Download OVA for ESXi.
- When the image download finishes, deploy it on your VM. See Deploy appliances.
Configure Cisco ISE
You must configure Cisco ISE to send data to Sophos using syslog.
Note
You can configure multiple instances of Cisco ISE to send data to Sophos via the same appliance. After you finish integration, repeat the steps in this section for your other instances of Cisco ISE. You don't need to repeat the steps in Sophos Central.
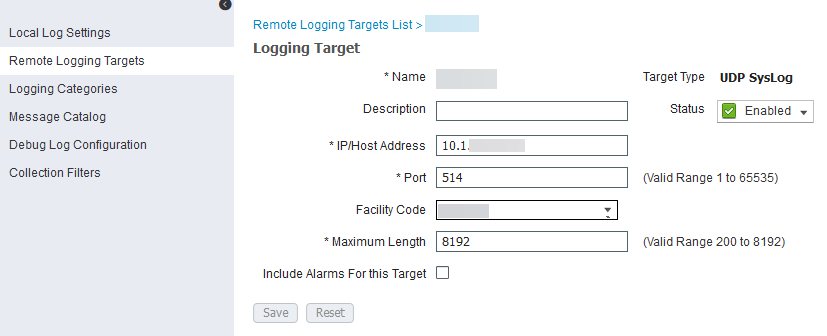
To forward syslog events, configure your Cisco ISE appliance with a remote logging target, as follows:
- Log in to your Cisco ISE Administration Interface.
- Go to Administration > System > Logging and select Remote Logging Targets.
-
Click Add, then do as follows:
- Enter a name and description for the remote target system.
- Enter the IP Address and Port that you specified in Sophos Central earlier.
- From the Facility Code list, select the syslog facility to use for logging events.
- In Maximum Length, you must enter
8192. This sets the maximum packet length for a syslog message. - Clear the Include Alarms For this Target checkbox.
-
Click Submit.
-
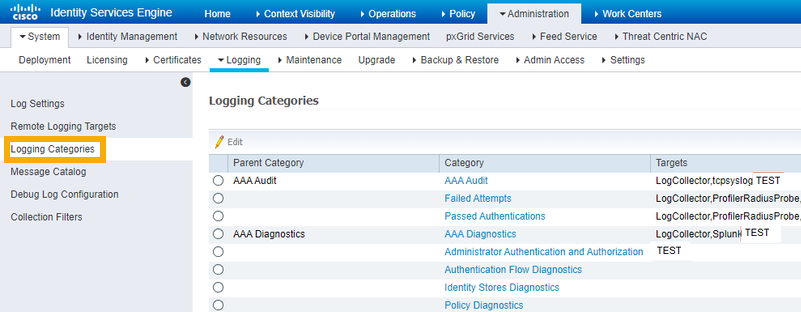
Go to Logging Categories.
For each category, make sure the Targets column contains your previously configured Sophos logging target.
Cisco ISE log data is now sent to the Sophos Data Lake.