Web Control Policy
Web control policies let you control the websites your users can access.
About web control
There are two types of web control policy:
- Web profile. This type uses our new web filtering profiles.
- Classic settings.
Both policy types let you block, allow, or warn about categories of websites or custom lists of websites.
Web profile policies have the following additional features:
- They can control access to new "Productivity" website categories.
- They can control access to Generative AI websites.
You can have policies of both types, depending on your needs and whether your devices support them.
Web profile policies are currently only available for Windows devices.
Default policy
If you're new to Sophos or haven't created custom policies, a "Base" web control policy applies to all your devices.
The policy has settings for both Classic settings and Web profile.
- By default, classic settings are turned on with recommended settings. These settings are initially used for all devices.
- By default, web profile settings are turned off.
If you turn on Web profile, the base policy automatically tries to use web profile settings for any device that supports them. However, you must create a profile or profiles first. See Web filtering profiles.
If the base policy fails to apply web profile settings to devices, it applies the classic settings instead.
You can edit both web profile settings and classic settings in the base policy. However, in any additional policies you create, you can only configure one or the other in each policy.
Requirements
Web control policy requirements are as follows:
- Policies with web profiles are only available for Windows devices running Sophos Endpoint 2026.1 or later.
- You must turn on decryption of HTTPS websites to receive warning messages through the web control policy. See SSL/TLS decryption of HTTPS websites.
Restrictions
The following restrictions apply to web control policies:
- Web control settings don't apply to websites you've excluded from checks for threats. See Threat Protection Policy.
- You can't customize the message we show the user when we block a website.
- We don't currently support filtering or blocking of IPv6 network traffic on Macs. However, we can enforce restrictions via IPv4 when blocking content such as streaming services.
Create a policy
This section tells you how to create and configure a policy of either type: web profile or classic settings.
You can only include settings for one policy type in each policy.
Click the appropriate tab below to see instructions for the policy type you want.
Web profile policies are for Windows devices running Sophos Endpoint 2026.1 or later.
To create a web profile policy, do as follows:
- Go to My Products > Endpoint > Policies.
- Click Add policy in the upper right.
-
In the Add policy dialog, do as follows:
- In Feature, select Web Control.
- In Type, Select User or Device. This specifies whether the policy applies to users or devices.
-
Enter a Name for the policy.
-
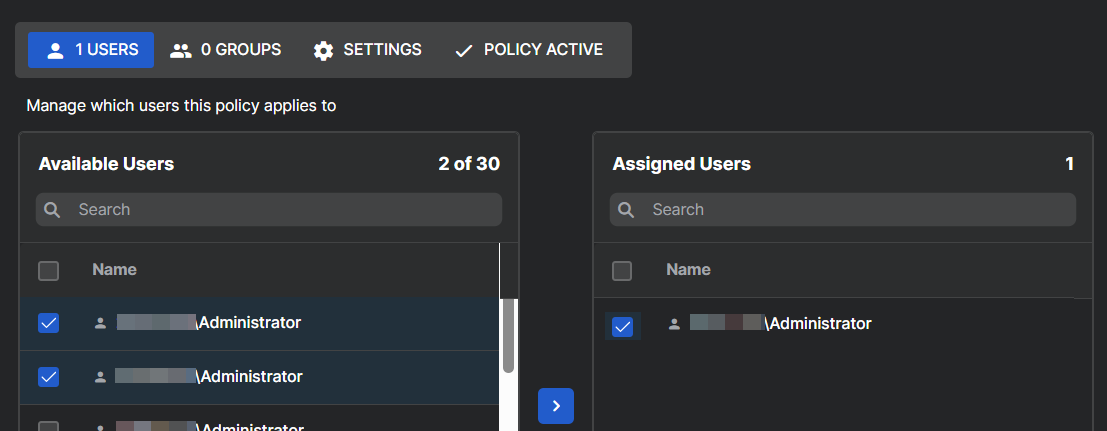
On the Users tab, or the Computers tab if you selected a device policy, assign the policy. For example, select users in the Available Users list and move them to the Assigned Users list.
-
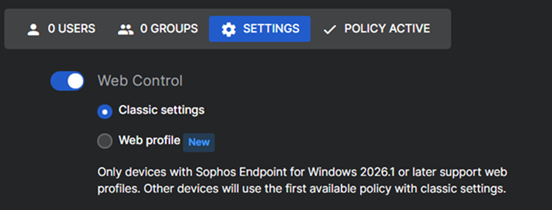
Click the Settings tab.
-
Select Web profile as the policy type.

On the Settings tab, you see the settings shown below. Configure them as described in the sections below.
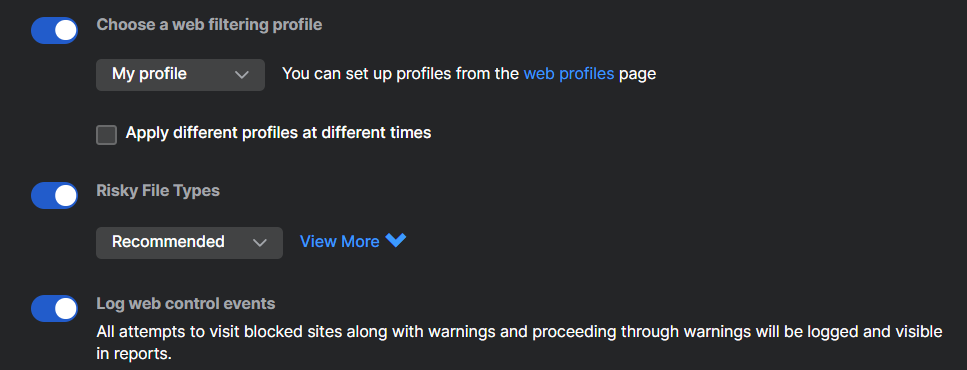
Choose a web filtering profile
You need to set up your own web profiles before you can use profiles. We don't provide default profiles.
Your profile is where you set up filtering by website categories or by site lists. See Web filtering profiles.
To choose a profile, do as follows:
-
Select a profile.
Your policy uses this profile by default. You can change it later.
-
(Optional) Select Apply different profiles at different times and set a schedule.
Your policy can use multiple profiles as long as they're used at different times.
Risky file types
- Turn on Risky File Types.
-
Select one of the following actions:
- Recommended: This gives you recommended settings. Click View More to see a list of file types and the action we'll take for each.
- Allow: Allows all risky file types.
- Warn: Warns the user that a file may be risky before they can download it.
- Block: Blocks all risky file types.
- Let me specify: This lets you set an action for individual file types. Click View More, then select Allow, Warn, or Block next to the file type.

Note
You can only configure actions for risky file types that are already listed. You can't add more risky file types.
Log web control events
Select Log web control events to log attempts to visit blocked websites or websites for which we display a warning.
Note
If you don't enable logging, only attempts to visit infected sites will be logged.
Classic settings are mostly used for macOS devices or Windows devices running Sophos Endpoint 2025.2.3.8 or earlier.
To create a classic settings policy, do as follows:
- Go to My Products > Endpoint > Policies.
- Click Add policy in the upper right.
-
In the Add policy dialog, do as follows:
- In Feature, select Web Control.
- In Type, Select User or Device. This specifies whether the policy applies to users or devices.
-
Enter a Name for the policy.
-
On the Users tab, or the Computers tab if you selected a device policy, assign the policy. For example, select users in the Available Users list and move them to the Assigned Users list.
-
Click the Settings tab.
-
Select Classic settings as the policy type.
Now configure the settings, as described in the sections below.
Additional security options
-
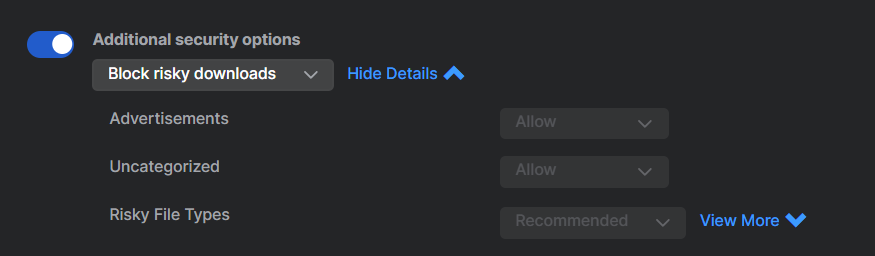
Turn on Additional security options to configure access to advertisements, uncategorized sites, and risky downloads.
-
Select one of the following settings:
- Block risky downloads: This setting blocks risky file types, but allows advertisements and uncategorized files.
- None: This setting allows risky file types, advertisements and uncategorized files.
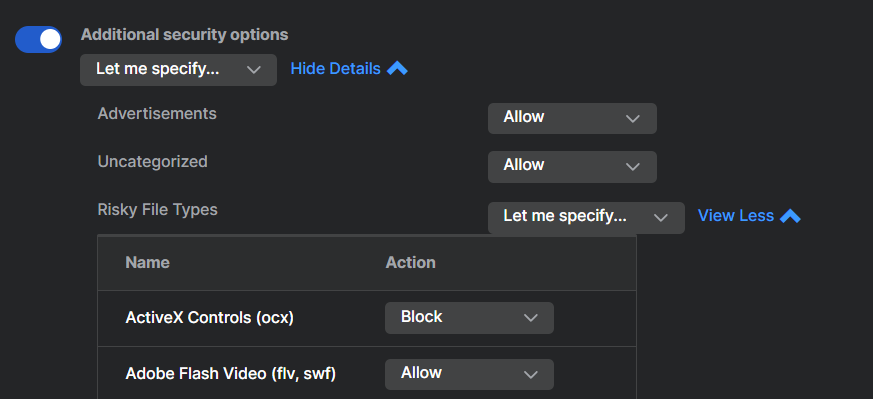
- Let me specify: This allows you to set advertisements and uncategorized file types to Allow or Block.
-
If you selected Let me specify in the previous step, you can also set Risky File Types to:
- Recommended: This gives you the settings shown in the table of file types below. Click View More to see them.
- Allow: Allows all risky file types.
- Warn: Warns the user that a file may be risky before they can download it.
- Block: Blocks all risky file types.
- Let me specify: This lets you set a number of individual file types to Allow, Warn, or Block. Click View More to see the list and select actions.
The screenshot below shows the "Let me specify" setting used to configure action for individual risky file types.
Note
You can only configure actions on risky file types that are already listed. You can't add more risky file types.
Acceptable web usage
-
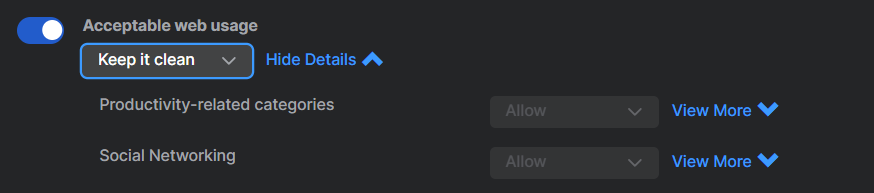
Turn on Acceptable web usage.
-
Select one of these settings to control which sites users are allowed to visit.
- Keep it clean: Prevents users from accessing adult and other potentially inappropriate websites.
- Gentle guidance: Blocks inappropriate browsing and warns users before visiting website categories that may impact their productivity.
- Conserve bandwidth: Blocks inappropriate browsing and warns users before visiting productivity-impacting websites. Blocks site categories likely to consume high bandwidth.
- Business only: Only allows site categories that are generally business-related.
- Let me specify: Allows you to configure individual site categories. For each group of categories, you can choose to Block, Warn, or Allow*, or Let me specify**.
Choosing Let me specify allows you to configure individual categories within these groups.
For more control over how policy affects websites, use the Website Management feature. See Create and control custom website categories.
For more information on how Sophos filters websites, see Sophos Web Security and Control Test Site.
Protect against data loss
Turn on Protect against data loss to configure data loss settings.
Turning this setting on allows you to select Block data sharing, Allow data sharing, or Let me specify. These settings control access to web-based email and file downloads.
Log web control events
Turn on Log web control events to log attempts to visit blocked websites or websites for which we display a warning.
Note
If you don't turn on logging, only attempts to visit infected sites will be logged.
Create and control custom website categories
You can put websites into your own custom categories by "tagging" them, and then use a web control policy to control sites in each category.
To tag websites and control them, do as follows:
- Click the Global Settings icon
 .
. - Go to Protection & Remediation > Web Settings, and click Website Management.
- Click Add.
-
In Add Website Customization, enter a website and add a tag. You can either type in a new tag name, or select a tag you've used before. You'll see suggested tags when you start typing.
If you exclude a domain, then we automatically exclude all of its subdomains. For example, if you exclude
http://google.com, you also excludehttp://www.google.comorhttp://foo.google.com.You don't need to use any wildcards or special characters.
-
Click Save.
- Go to My Products > Endpoint > Policies.
- Under Web Control, select a policy.
- Click the Settings tab.
-
In Control sites tagged in Website Management, click Add New.

-
In Add Website Tag, do as follows:
- Select the website tag you created.
- Choose the Action you want to take against websites.
- Click Save.

-
At the top of the policy, click Save.
For more information on how Sophos filters websites see Sophos Web Security and Control Test Site.
Apply this web control policy at set times only
Restriction
This setting is not available in the Base policy.
You can set times when you want to apply the policy.
- Turn on Apply this web control policy at set times only.
- Click Add.
- Select the days and times when the policy will apply.
Note
This setting uses the local time on the computers that the policy applies to. This may not be the same as the Sophos Central administrator's local time.
Video
This video shows how to set up and configure the classic web control policy.