Alerts
Sophos Central shows alerts for events that you might need to investigate.
Alerts can come from any product managed by Sophos Central and can be about installation, updates, licensing, connectivity, threats, and more.
View your alerts
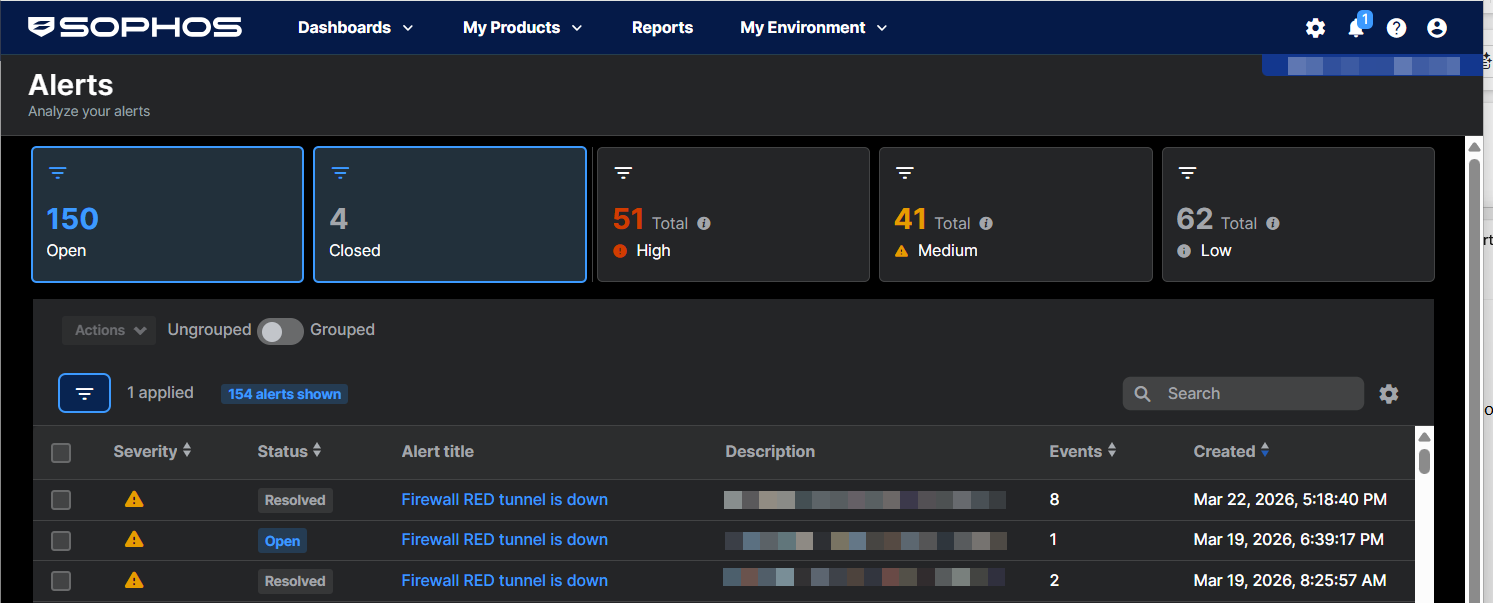
To see your alerts, go to My Environment > Alerts.
The alerts list shows details for each alert:
- Severity: High, Medium, or Low.
- Status: Open, Closed, Reopened, or Resolved.
- Events: Some alerts combine multiple events. This column shows the number of events.
- Device: The device where the event or events occurred.
Alerts with multiple events
You may see alerts that include multiple events.
Sophos Central automatically collates some repeated events and shows them as a single alert. For example, if a firewall VPN tunnel goes down and is later restored, both events are included in one alert.
Alerts resolved automatically
You may see alerts that are resolved automatically.
If an event resolves an earlier event in the same alert, as in the case of a connection that goes down and is then restored, the alert closes automatically. The alert is shown as Resolved.
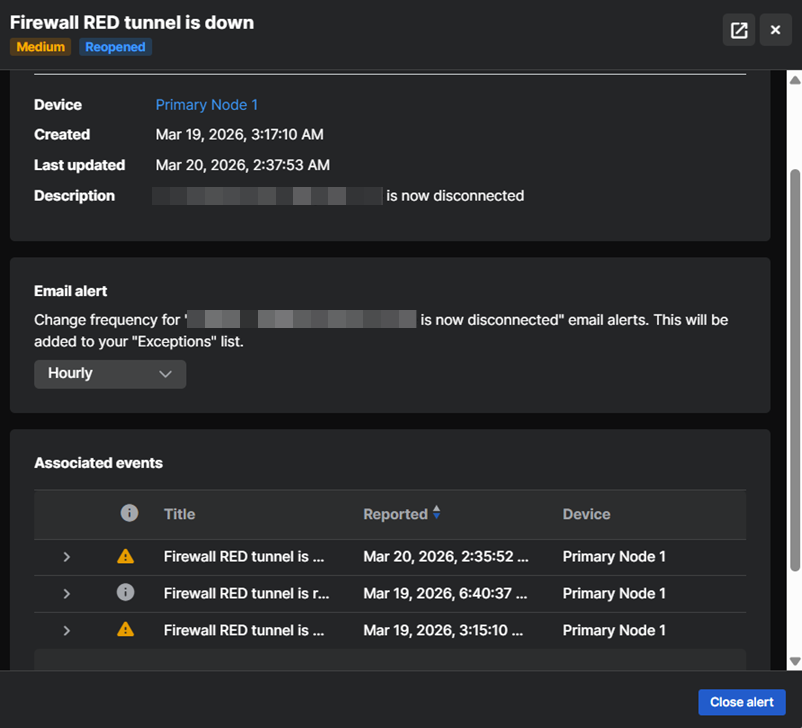
View alert details
To view the full details of an alert, do as follows:
-
Click the alert's Alert Title in the alerts list.
A slide-out opens on the right of the screen, showing alerts and the Associated events the alert is based on.
-
Click the Full screen icon
 in the upper right to see the details full-screen.
Group alerts
You can group together all alerts for a specific threat or event under a single entry in the list. This makes alerts easier to manage.
Turn on Group above the alerts list.

To see the number of alerts for each group entry, look in the Count column.
To display all the alerts in a group, click the arrow on the right of the group description.
Filter alerts
To view alerts with a specific priority, click the filter icon next to the figures for High, Medium or Low alerts at the top of the page.
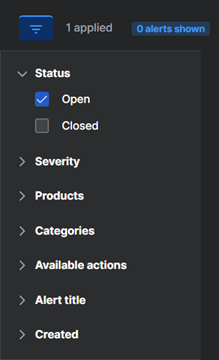
To view alerts for a specific product or threat type, do as follows:
-
Click the filter icon above the alerts list.
-
Select the filter you want to use. You can filter by Status (Open or Closed), Severity, Products, Category (for example, Malware or Product Updates), Available actions, Alert title, or alert dates.
You can select multiple filter options. For example, you can select malware alerts from a specific product.
-
Click Apply to view your filtered alerts.
To reset filters, click Reset to defaults, and then click Apply.
Customize columns
You can choose which columns you want to show in the alerts list.
Click the Customize column icon ![]() above the alerts list on the right, and select the columns you want.
above the alerts list on the right, and select the columns you want.
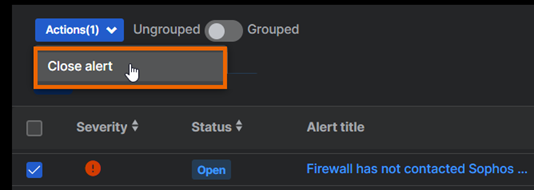
Take action against alerts
You can take action against alerts.
To take action against an individual alert or a group of alerts, select it in the alerts list and click Actions above the list.
Alternatively, for a group of alerts, click an action (if available) in the Actions column.
We show you the actions available for all your selected alerts. We don't show you actions that are only available for some of your selected alerts.
Note
If you have Sophos XDR you can investigate, block and clean up threats from Threat Graphs.
Note
If you want to allow an application that Sophos reports as malware, you do it from the Events page, not here.
Available actions
The following actions are available for alerts, depending on the alert type.
-
Mark As Acknowledged: Click this to remove an alert from the list. The alert won't be displayed again.
This doesn't resolve threats or remove threat details from the quarantine manager on the device.
-
Mark As Resolved: Click this if the threat has already been resolved on the device. This action removes the alert from the list in Sophos Central and clears threat details from the quarantine manager on the device.
This action doesn't resolve threats.
This action is only available for Windows devices.
-
Clean Up: Click this to remove ransomware from a server.
- Reinstall Endpoint Protection: Click this to go to the Installers page, where you can download the Sophos agent software for reinstallation.
- Contact Support: Click this to get additional help. This action becomes available when you might need help, for example when malware cleanup fails.
-
Authorize PUA: Click this to authorize a Potentially Unwanted Application (PUA) to run on all computers. You might do this if you consider the application useful. See Deal with PUAs.
This action is available only for computers.
Close alerts
You can close alerts in one of these ways:
- Click the alert's Alert title to open its details, and then click Close alert.
- Select the alert in the alerts list, go to Actions, and click Close alert.
Use the Closed filter to see closed alerts.
Change the frequency of email alerts
You can change the frequency at which you receive email notifications about an alert type.
- Click the Alert Title of an alert to open its details.
- In Email Alert, select the frequency for sending this alert type.
This setting is added to Exceptions in your email alert settings. You can also edit the setting there.
Outbreak alerts
We report a malware outbreak if a device experiences 100 detections in 24 hours. We do this to avoid overwhelming you with similar or repeated detections. You must investigate and resolve these alerts. Detection reporting only resumes when you mark the alert as "Resolved". See Deal with outbreaks.