Configure Windows devices to use DNS Protection with Secure DNS
If you have a Workspace Protection license, we recommend that you protect your Windows endpoints using the Endpoint DNS Protection policy. See Configure Endpoint policy.
Alternatively, you can configure your users' devices to directly use DNS Protection with Secure DNS if you're using a DNS cloud service, such as Google Public DNS or Cloudflare DNS. When you configure your users' devices as described on this page, DNS Protection handles all DNS requests instead of your configured cloud service.
Requirements
You must meet the following requirements:
- In Sophos Central, make sure you copy the DNS over HTTPS URL that's generated when you add a location with Secure DNS. See Add a location.
-
Copy the DNS Protection IP addresses as follows:
- In Sophos Central, go to My Products > DNS Protection > Installers.
- Next to IP addresses, click Copy to copy the DNS Protection IP addresses.
Configure Windows devices
To configure Windows devices to use DNS Protection with Secure DNS, do as follows:
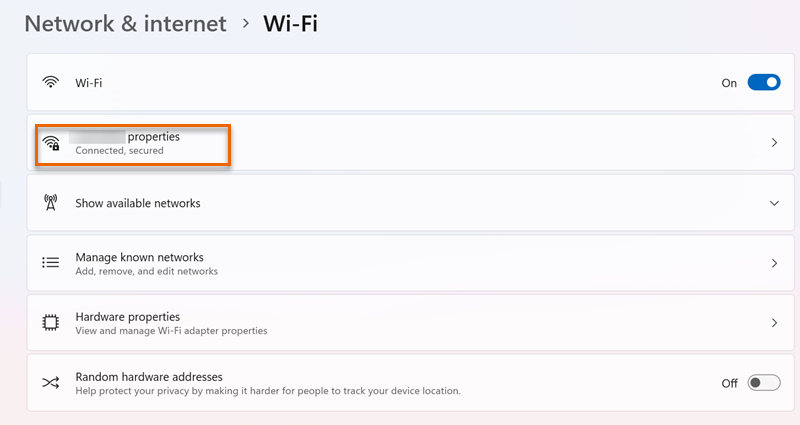
- On the Windows device, go to Settings > Network & internet > Wi-Fi.
-
Click your Wi-Fi network's properties. For example, click CompanyNetwork properties.
-
Go to DNS server assignment and click Edit.
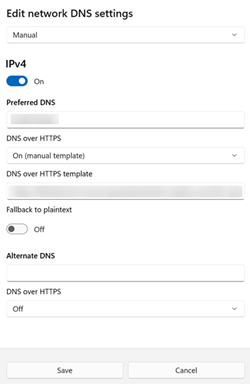
- Select Manual.
- In Preferred DNS, enter one of the DNS Protection IP addresses you copied from Sophos Central.
- Turn IPv4 on.
- In DNS over HTTPS, select On (manual template).
- In DNS over HTTPS template, enter the URL you copied from Sophos Central when you added a location. See Add a location.
-
Click Save.