DMARC Manager portal
You must have a DMARC Manager Add-on for Sophos Email license to use this feature.
The DMARC Manager portal provides a comprehensive view of your domain's email authentication and compliance. The portal provides in-depth reporting and visibility into how senders use your domains to send email and whether those messages comply with DMARC policies.
Go to My Products > Email Security > DMARC Manager, then click Manage DMARC in the upper right. You'll be redirected to the DMARC Manager portal.
From the portal, you can also perform CNAME-based DNS validations through DMARC, SPF, DKIM, BIMI, TLS-RPT, and MTA-STS records. You can configure a CNAME record once and manage future changes directly from the DMARC Manager portal.
What you can do
The DMARC Manager portal allows you to manage your domain authentication setup, review sender activity, and track your overall DMARC compliance.
Here are some of the key things you can do in the portal:
- Monitor domain health with a summary of reporting status and DMARC-compliant email volume.
- View which services or servers are sending emails on behalf of your domains.
- Approve valid senders to improve compliance and reduce false positives.
- Set up and verify DMARC, SPF, DKIM, BIMI, TLS-RPT, and MTA-STS DNS records.
- Track authentication trends over time using charts and historical data.
- Set up alerts for compliance changes, new senders, or DNS verification issues.
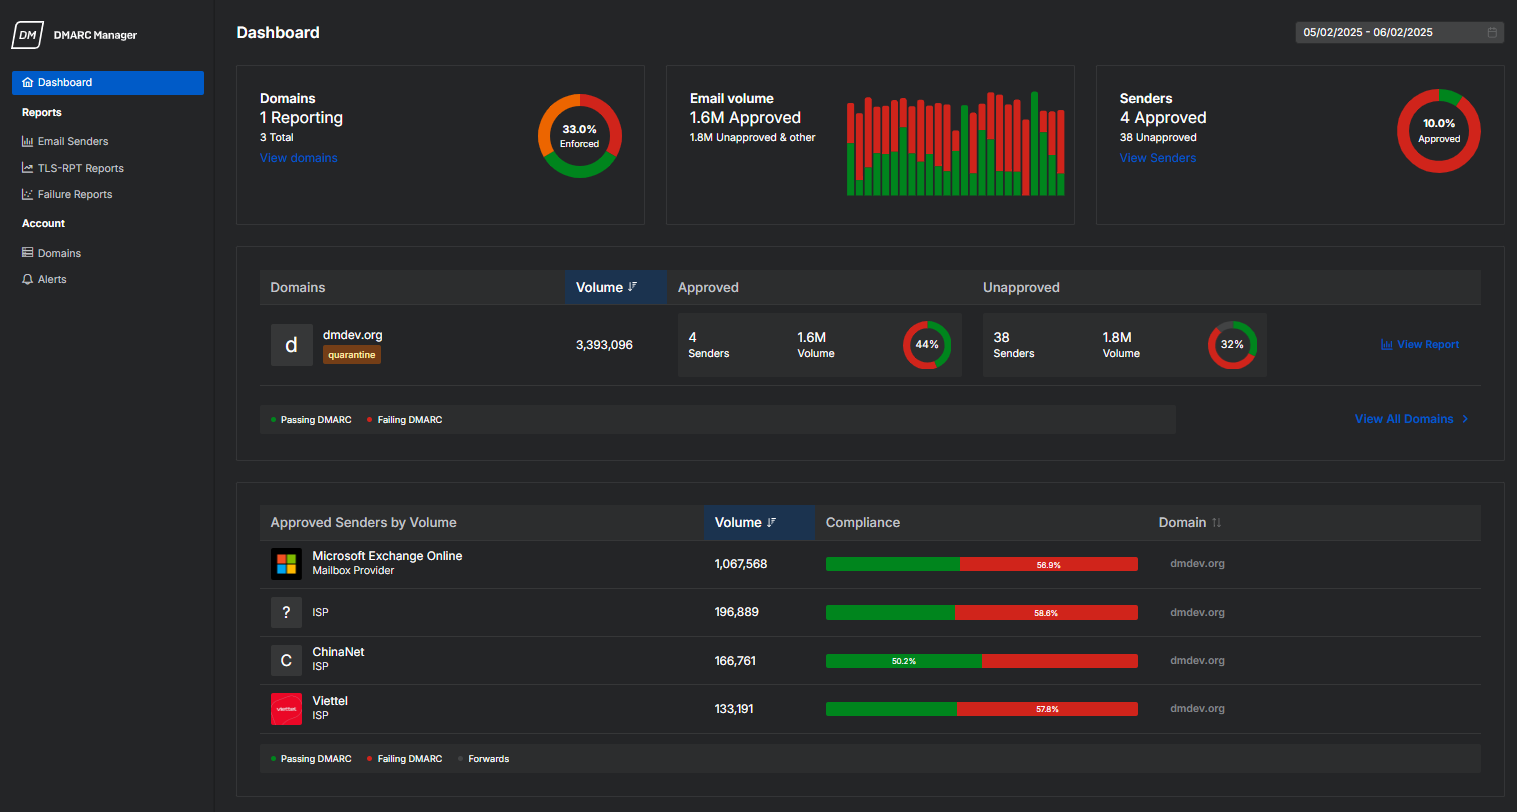
Dashboard
The dashboard provides detailed information on your domain authentication status and email security posture. It shows how many domains have DMARC Reporting turned on, the percentage of messages that meet enforcement policies, and the number of approved and unapproved senders.
You can view trends in email volume and compliance over time, assess which domains or senders might need attention, and access detailed reports for further investigation. The dashboard is your central view for monitoring DMARC performance and improving domain protection.
Click any link in the dashboard for more details.
For more information on the dashboard, see Dashboard.
Reports
This section includes detailed views for email senders, TLS-RPT reports, and failure reports. Use these reports to monitor authentication behavior and troubleshoot issues across your domains.
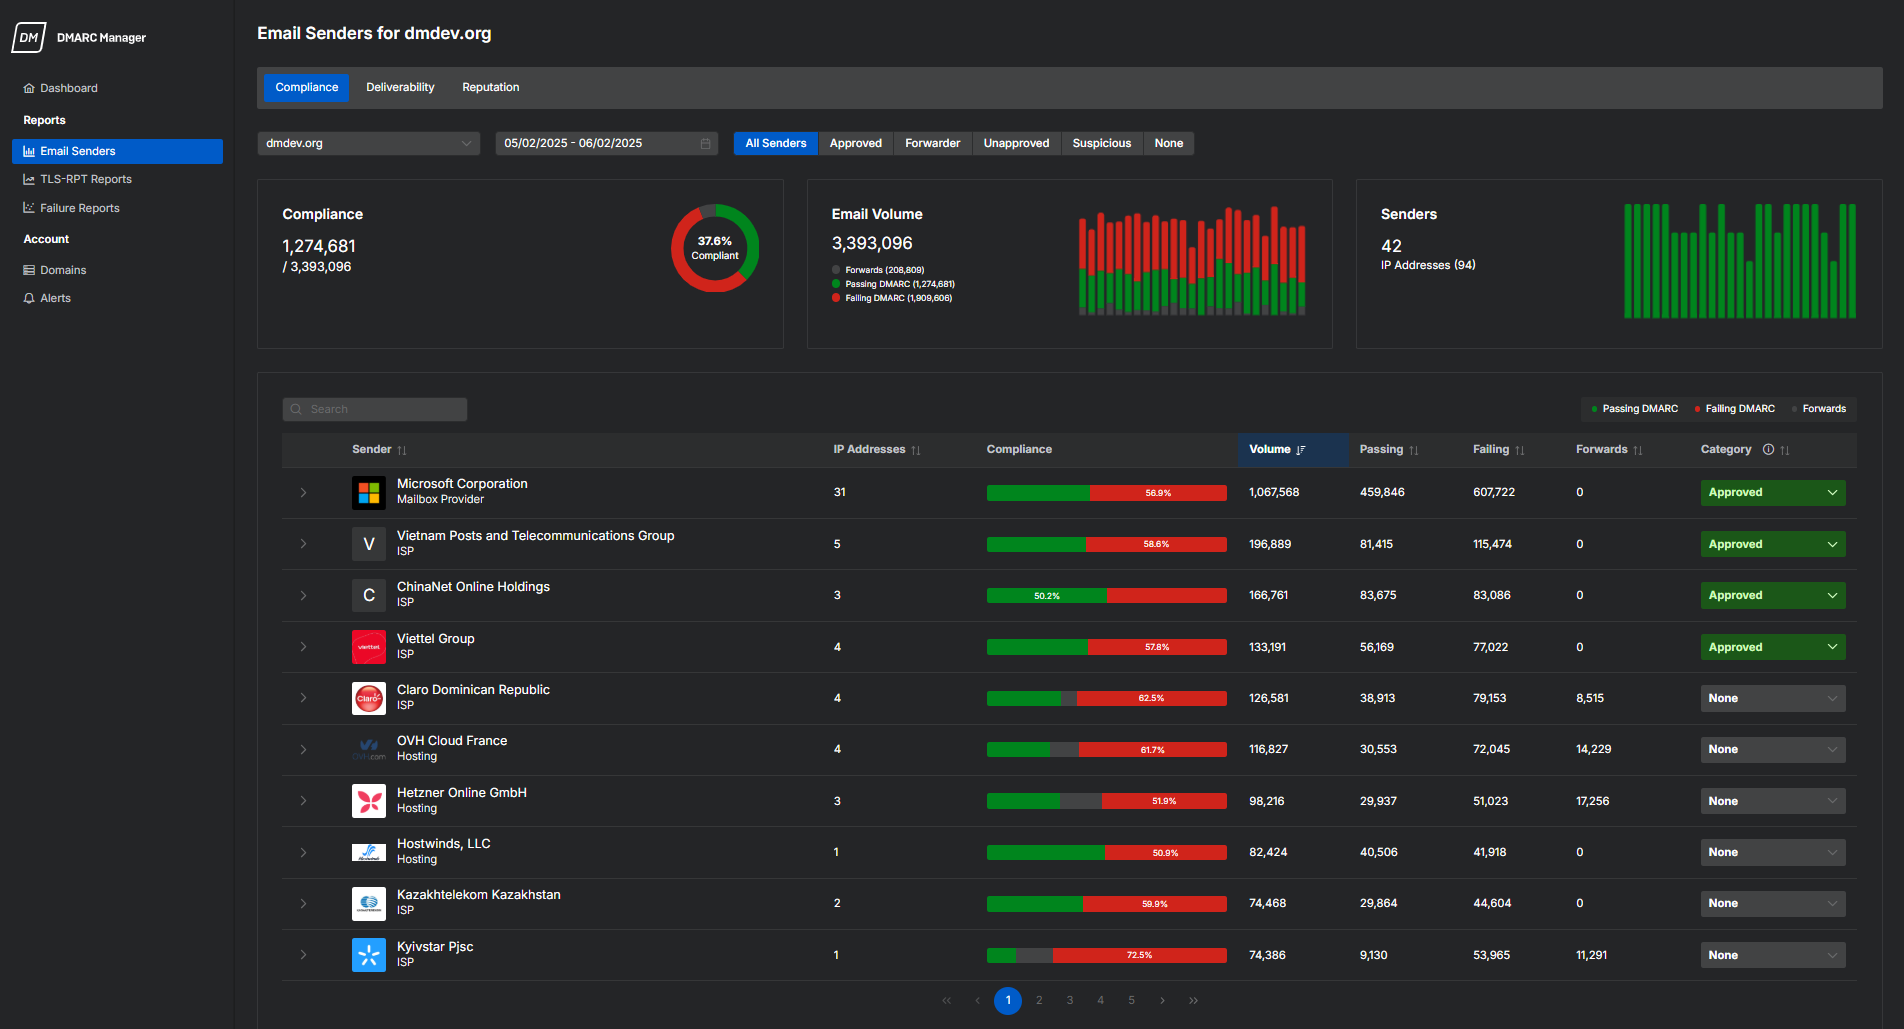
Email Senders
The Email Senders report provides a comprehensive overview of the sources sending email on behalf of your domain. You can analyze sender behavior based on three key aspects: Compliance, Deliverability, and Reputation. The report helps you assess whether mail servers properly authenticate the messages, deliver them, and trust the sending sources.
For more information on this report, see Email Senders Report Overview.
In this report, you can do the following actions:
- View detailed sender data, including IPs, hostnames, volumes, and DMARC results.
-
Assign a category to each sender to help organize and filter reporting data.
For more information on the categories, see Email Sender Categories.
-
Identify misconfigurations, unauthorized sources, and risky behavior through compliance and delivery comparisons.
Compliance
The Compliance tab shows how senders are performing against DMARC policies. It shows whether emails pass or fail authentication checks and provides insights into compliance rates.
For more information, see Compliance Report.
Deliverability
The Deliverability tab shows whether your domain's emails are being delivered successfully or blocked due to policy enforcement.
For more information, see Deliverability Report.

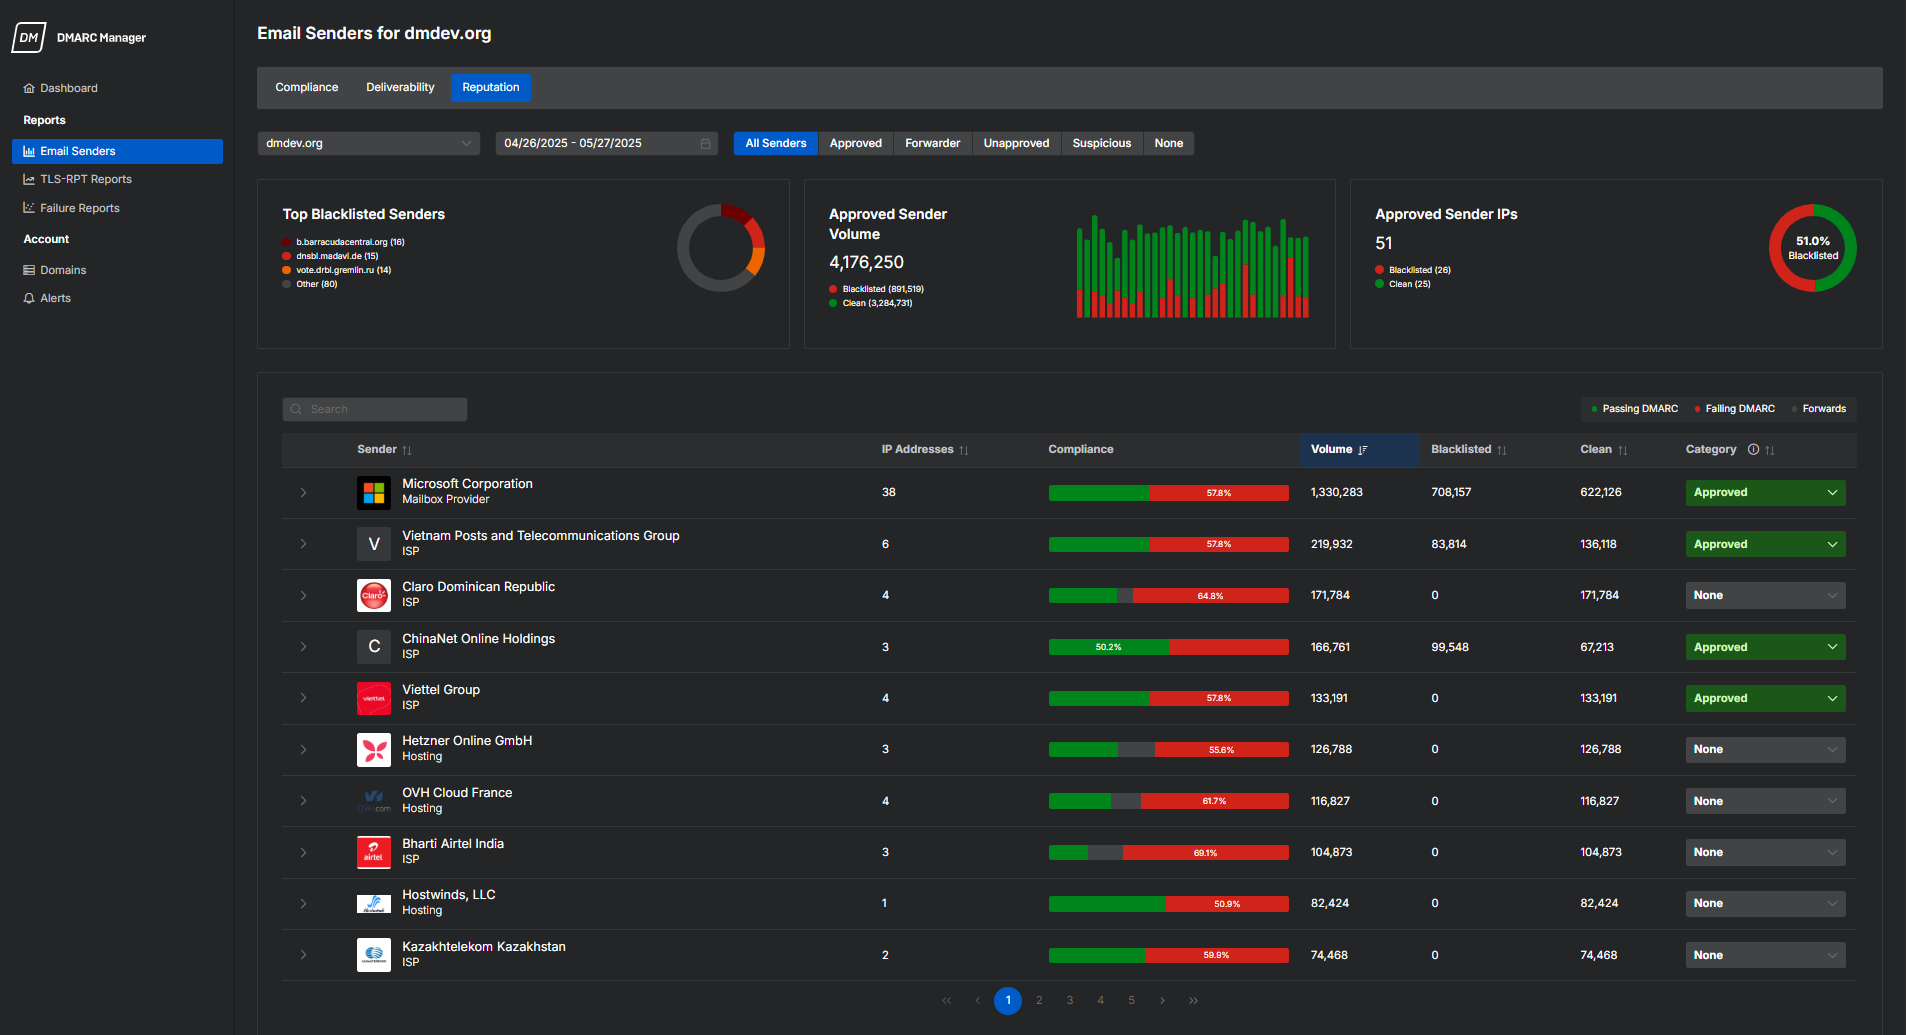
Reputation
The Reputation tab helps you assess the trustworthiness of senders. It shows which senders have been classified as untrustworthy and whether their emails are clean or flagged. This view helps prioritize remediation efforts and maintain a strong domain reputation.
For more information, see Reputation Report.
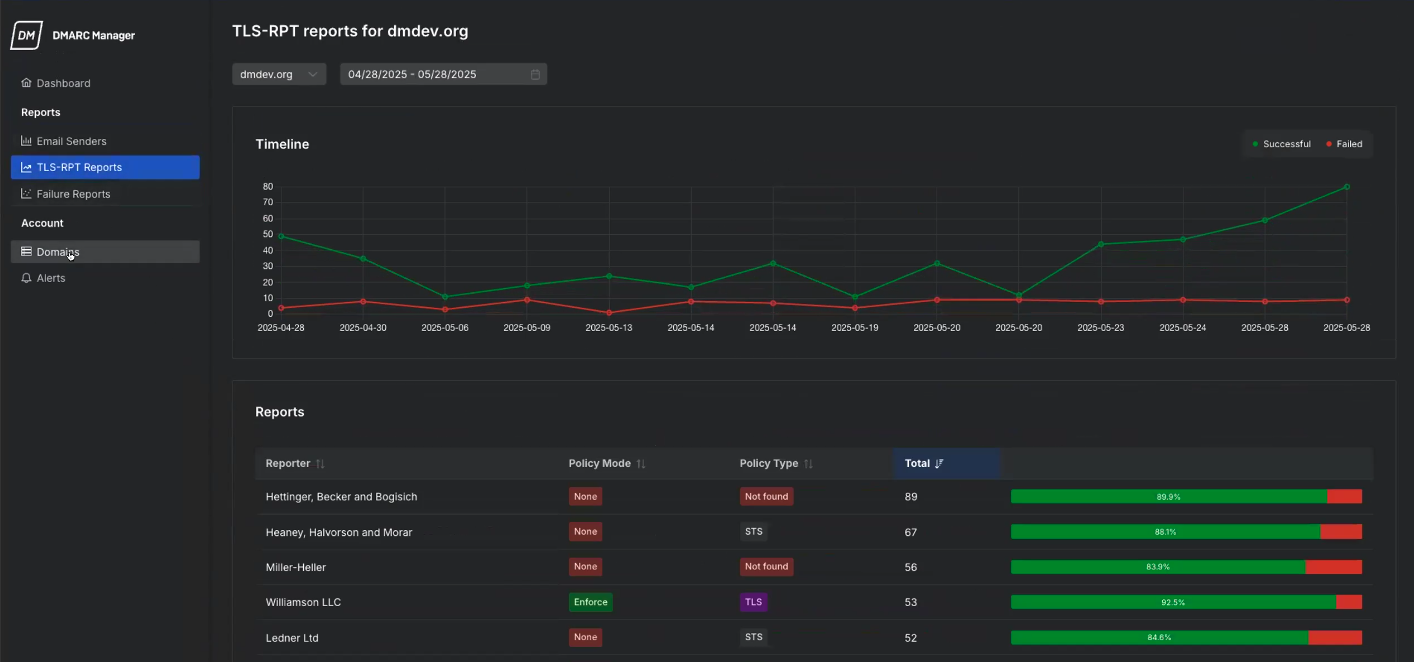
TLS-RPT Reports
The TLS-RPT Reports dashboard shows how successfully email servers establish secure connections using TLS when sending email to your domain. These reports help you monitor encryption issues that could affect message confidentiality or delivery.
In this report, you can do the following actions:
- View trends of successful and failed TLS connections over time.
- See which reporting organizations are experiencing issues.
- Check each sender's policy mode and type to identify configuration issues.
- Use insights to find TLS or MTA-STS gaps and improve security.
For more information on this report, see TLS-RPT Reports Overview.
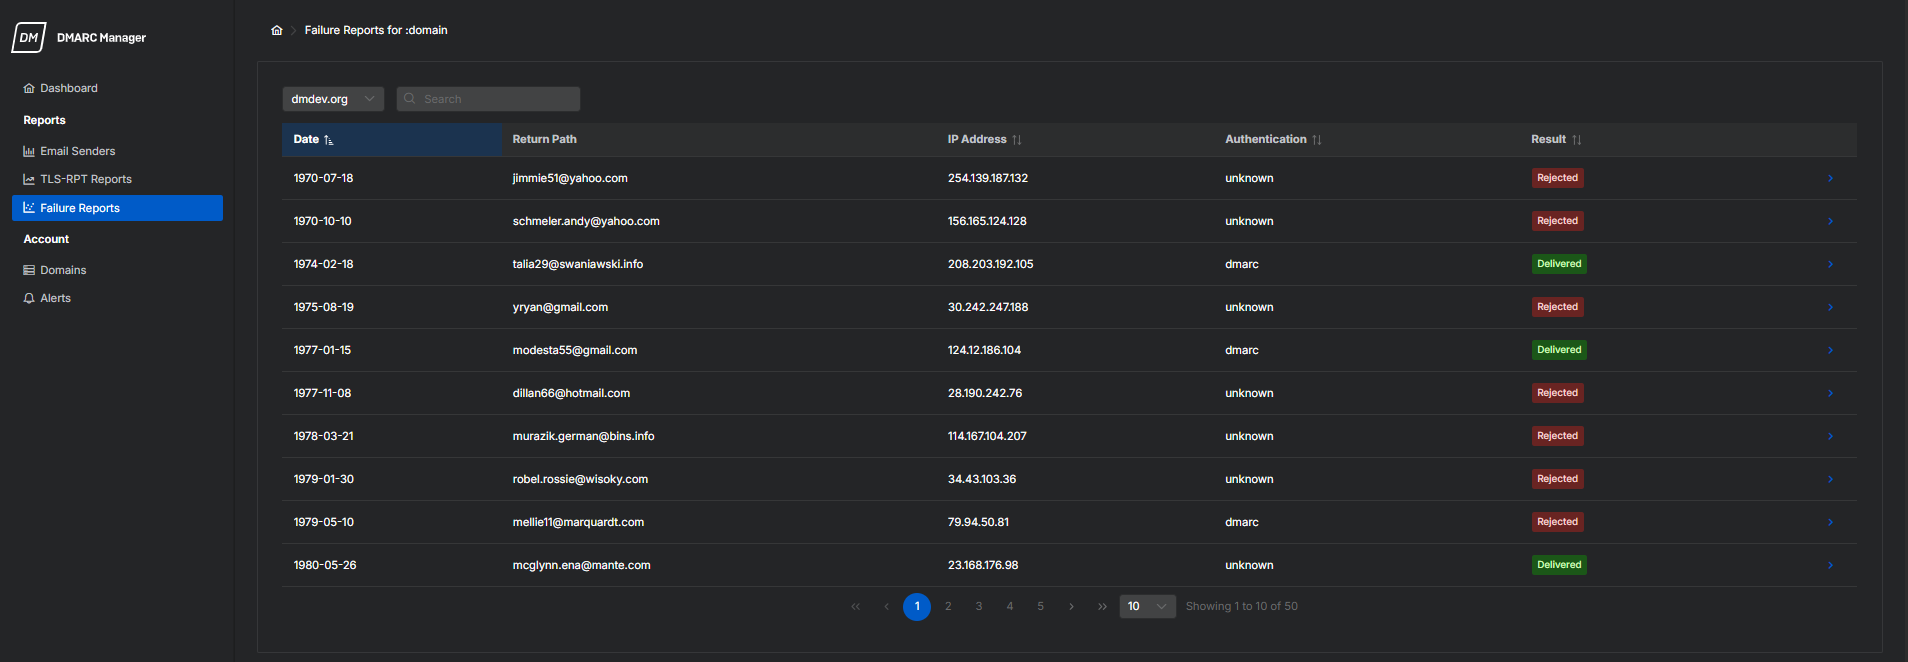
Failure Reports
The Failure Reports dashboard shows detailed forensic data for individual email messages that failed DMARC authentication. These reports help you investigate suspicious or unauthorized sending activity.
In this report, you can do the following actions:
- See message-level details, including return path, IP address, and authentication results.
- Identify the type of failure and whether the message was delivered or rejected.
- View detailed info like feedback type, source domain, and incident count.
- Download the report for further investigation or recordkeeping.
For more information on this report, see Failure Reports Overview.
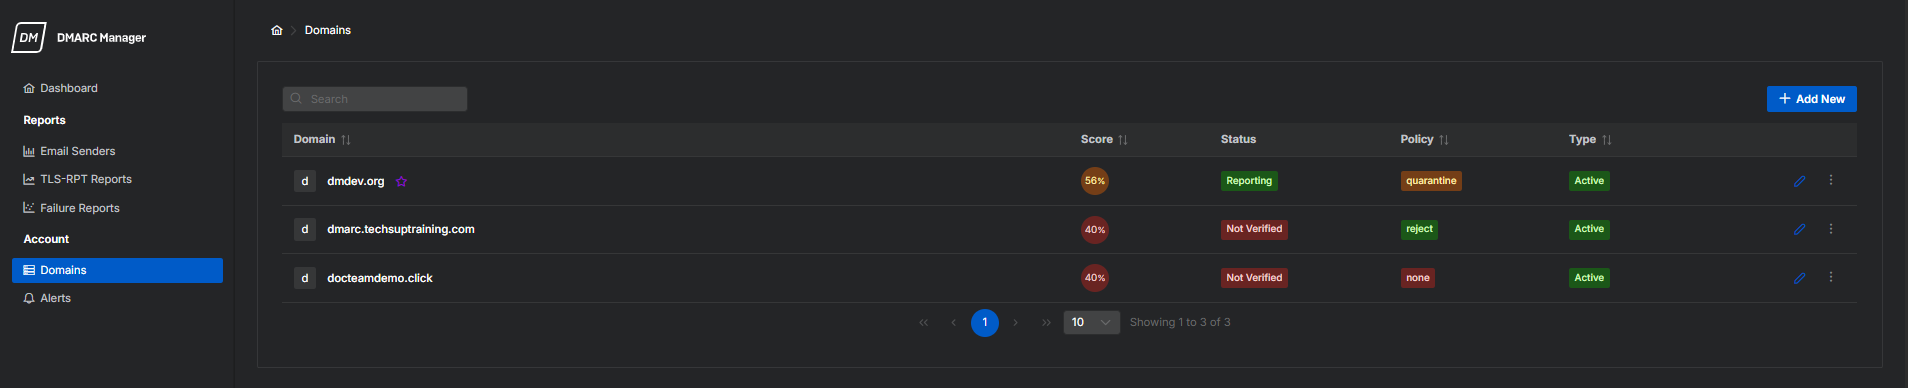
Domain configuration
The Domains page shows the domains you've added to DMARC Manager. It provides key details like DMARC score, verification status, policy enforcement level, and domain type.
On this page, you can do the following actions:
- View each domain's DMARC configuration and compliance score at a glance.
- Check verification status and policy mode such as none, quarantine, or reject.
- Set a domain as primary, mark it as parked, or access detailed reports and logs.
- Add and manage domains directly from this page.
For an overview of the Domains page, see Domain Management.
Configuring domains requires setting up records and adding them to your DNS. DMARC Manager supports both CNAME and TXT records. CNAME allows the system to manage DNS changes automatically, while TXT requires manual updates.
You can also use Entri integration to manage your DNS records directly. With Entri, you can create and update records without leaving DMARC Manager. This makes DNS setup faster and easier. For more information about Entri, see Entri.
Note
Before making changes to DNS records, make sure that you create a zone backup. If issues occur, you'll be able to restore or roll back to the previous records.
Warning
If you're using Cloudflare, make sure you turn off the DNS proxy when configuring a new CNAME record. The proxy is turned on by default, and leaving it on might break the DNS validation or resolution process. For more information, see Proxy status.
Go to the tab to configure the DNS records and reporting settings for your selected domain.
To learn more about DMARC and how it works, see DMARC Overview.
To configure your DMARC record, do as follows:
- In the DMARC Manager portal, go to Accounts > Domains.
- Click the Edit Settings icon
 for the domain you want to configure.
 - Select the DMARC tab.
-
In Policy Settings, set your policy preferences:
- If this is your first time setting up DMARC, set DMARC Policy to None for initial monitoring.
- If you’ve onboarded your domain, sent emails for at least two weeks, and are satisfied with the adjustments, set DMARC Policy to Quarantine or Reject.
-
In Aggregate Reports, under Reports Will Be Sent To, enter any additional recipients of aggregate and failure reports. If you're unsure of what to enter, leave this field blank.
-
In Failure Reports, do as follows:
- In Report Processing, select Enabled to receive failure reports for future investigations.
- In Report Options, select when to receive failure reports.
-
In Alignment Settings, select Strict or Relaxed. If you're unsure of what to select, keep the default values. For information, see Alignment Settings.
- Click Save to apply your changes.
-
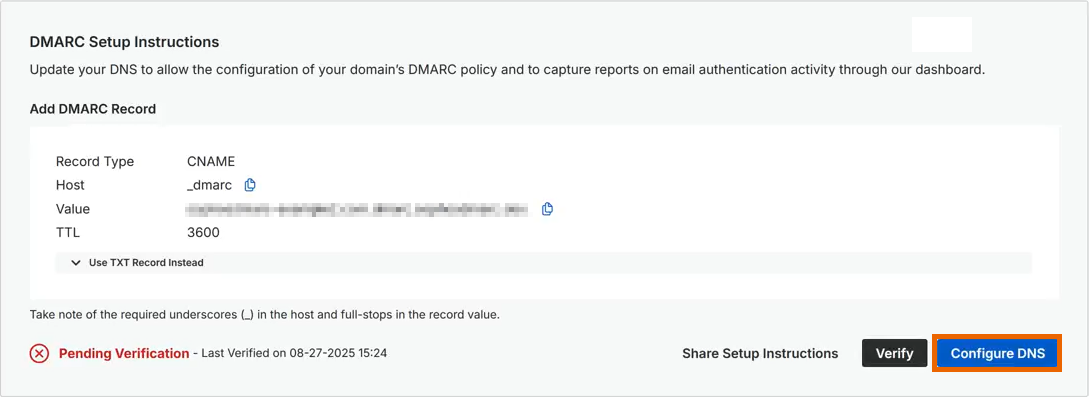
To publish your DMARC record, do as follows:
DNS delegation allows our service to update and manage your DNS records directly from the DMARC Manager portal.
- Click View Setup Instructions.
-
Select one of the following methods:
- Entri integration (recommended, if supported): See Entri integration.
- Manual integration: See Manual integration.
-
Click Verify to confirm your record.
Tip
DNS changes can take time to propagate. If verification fails, wait a few minutes and try again.
-
After verification, click Save to finalize the configuration.
You've configured your DMARC record for the initial stage. After making further adjustments, you can set your policy to Quarantine or Reject.
For help, see DMARC Configuration Settings & Setup.
To learn more about SPF and how it works, see SPF Overview.
To configure SPF, do as follows:
- In the DMARC Manager portal, go to Accounts > Domains.
- Click the Edit Settings icon for the domain you want to configure.
- Select the SPF tab.
-
Click Add New SPF Directive, then add all your known and existing SPF directives.
- If you're unsure of which SPF directives to add, review your existing SPF record as a reference.
- Use this opportunity to remove stale and unnecessary entries.
-
If you're using Sophos Email in gateway mode, create an Include type directive and add the Sophos SPF record relevant to the region where your Sophos Email is hosted. For information, see Sophos SPF domains.
Region SPF Record United States (West) _spf_uswest2.prod.hydra.sophos.comUnited States (East) _spf_useast2.prod.hydra.sophos.comGermany _spf_eucentral1.prod.hydra.sophos.comIreland _spf_euwest1.prod.hydra.sophos.comCanada _spf.eml100yul.ctr.sophos.comAustralia _spf.eml100syd.ctr.sophos.comJapan _spf.eml100hnd.ctr.sophos.comIndia _spf.eml100bom.ctr.sophos.comBrazil _spf.eml100gru.ctr.sophos.com -
If you're using Sophos Email in mailflow mode or if your outbound email doesn't go through Sophos, add the SPF record from your email provider instead.
-
Add SPF records for any other third-party services that send email on behalf of your domain but don't go through Sophos.
Examples include newsletters, ticketing systems, or printing services.
-
(Optional) After you add all SPF directives, you can turn on SPF Flattening to reduce DNS lookups and keep them within the RFC limit of 10.
- Click Save to apply your changes.
-
To publish your SPF record, do as follows:
DNS delegation allows our service to update and manage your DNS records directly from the DMARC Manager portal.
- Click View Setup Instructions.
-
Select one of the following methods:
- Entri integration (recommended, if supported): See Entri integration.
- Manual integration: See Manual integration.
Note
If you already have an SPF record, remove it before you add the new SPF record.
-
Click Verify to confirm your record.
Tip
DNS changes can take time to propagate. If verification fails, wait a few minutes and try again.
-
In Top Level Record Qualifier, select your preferred action.
For information, see Top Level SPF Record Qualifier.
-
After verification, click Save to finalize the configuration.
You've configured your SPF record for the initial stage.
For help, see SPF Settings.
To learn more about DKIM and how it works, see DKIM Overview.
To configure DKIM, do as follows:
- In the DMARC Manager portal, go to Accounts > Domains.
- Click the Edit Settings icon for the domain you want to configure.
- Select the DKIM tab.
- In the DKIM tab, click Enable DKIM Management.
- If prompted, click Enable DKIM Management.
-
Click Add New Public Key and add any existing DKIM keys or selectors with their public keys.
- If you're signing outbound emails with Sophos, click the Global Settings icon
 . Go to Products and Services > Email, and click Gateway Domains. Select a domain, then select the DKIM key in Active Selector. Copy the values and paste them into the DMARC Manager portal.
 - If you're using third-party systems, add other known DKIM keys that may not flow through Sophos Email.
- If you haven't generated a DKIM key before, create one. See Add a DKIM key.
- If you're signing outbound emails with Sophos, click the Global Settings icon
-
Configure your policy settings.
- If all outbound emails are signed with DKIM, set Outbound Signing Policy to All Emails. Otherwise, select Some Emails.
- During your initial onboarding, set Testing Policy to Enabled. When your initial monitoring phases have completed, select Disabled.
- Click Save to apply your changes.
-
To publish your DKIM record, do as follows:
DNS delegation allows our service to update and manage your DNS records directly from the DMARC Manager portal.
- Click View Setup Instructions.
-
Select one of the following methods:
- Entri integration (recommended, if supported): See Entri integration.
- Manual integration: See Manual integration.
Note
Some DNS providers don't let you update NameServers. You can only use DKIM delegation if your provider adds this capability or you move to a different DNS manager.
-
Click Verify to confirm your records.
Tip
DNS changes can take time to propagate. If verification fails, wait a few minutes and try again.
-
After verification, click Save to finalize the configuration.
You've configured your DKIM record for the initial stage.
For help, see DKIM Settings.
To learn more about BIMI and how it works, see BIMI Overview.
To configure BIMI, do as follows:
- In the DMARC Manager portal, go to Accounts > Domains.
- Click the Edit Settings icon for the domain you want to configure.
- Select the BIMI tab.
- In the BIMI tab, click Enable BIMI Record Hosting.
- If prompted, click Enable BIMI Record Hosting.
-
In BIMI Logo, click Add Files and upload your BIMI logo.
- The logo must be in SVG format.
- The logo must be formatted using a square aspect ratio, not rectangular.
-
(Optional) If you have a Verified Mark Certificate (VMC), go to the BIMI Verified Mark Certificate section, click Add Files, and upload your VMC. Your certificate must be in PEM format.
If you don't have a VMC, you must get one from a third-party provider.
Note
You don't need a VMC to set up BIMI, but having one helps your logo appear in more email clients that support VMC validation. A VMC adds an extra layer of trust by confirming your brand identity through a verified certificate.
-
Click Save to apply your changes.
-
To publish your BIMI record, do as follows:
DNS delegation allows our service to update and manage your DNS records directly from the DMARC Manager portal.
- Click View Setup Instructions.
-
Select one of the following methods:
- Entri integration (recommended, if supported): See Entri integration.
- Manual integration: See Manual integration.
-
Click Verify to confirm your record.
Tip
DNS changes can take time to propagate. If verification fails, wait a few minutes and try again.
-
After verification, click Save to finalize the configuration.
You've configured your BIMI record for the initial stage.
For help, see BIMI Settings.
To learn more about TLS-RPT and how it works, see TLS-RPT Overview.
To configure TLS-RPT, do as follows:
- In the DMARC Manager portal, go to Accounts > Domains.
- Click the Edit Settings icon for the domain you want to configure.
- Select the TLS-RPT tab.
- Click Enable TLS-RPT Reporting.
- If prompted, click Enable TLS-RPT Reporting.
- (Optional) To send TLS-RPT data to other services, enter the email address where mail servers send the reports.
-
To publish your TLS-RPT record, do as follows:
DNS delegation allows our service to update and manage your DNS records directly from the DMARC Manager portal.
- Click View Setup Instructions.
-
Select one of the following methods:
- Entri integration (recommended, if supported): See Entri integration.
- Manual integration: See Manual integration.
-
Click Verify to confirm your record.
Tip
DNS changes can take time to propagate. If verification fails, wait a few minutes and try again.
-
After verification, click Save to finalize the configuration.
You've configured your TLS-RPT record for the initial stage.
For help, see TLS-RPT Settings.
To learn more about MTA-STS and how it works, see MTA-STS Overview.
To configure MTA-STS, do as follows:
- In the DMARC Manager portal, go to Accounts > Domains.
- Click the Edit Settings icon for the domain you want to configure.
- Select the TLS-RPT tab.
- Click Enable MTA-STS Hosting.
- If prompted, click Enable MTA-STS Hosting.
-
To publish your MTA policy or MTA record, do as follows:
DNS delegation allows our service to update and manage your DNS records directly from the DMARC Manager portal.
- Click View Setup Instructions.
-
Select one of the following methods:
- Entri integration (recommended, if supported): See Entri integration.
- Manual integration: See Manual integration.
-
Click Verify to confirm your record.
Note
The setup process is the same for both the MTA-STS policy and record. You must configure and verify each separately.
Tip
DNS changes can take time to propagate. If verification fails, wait a few minutes and try again.
-
In Policy Enforcement Level, select In Testing.
- After verification, click Save to finalize the configuration.
You've configured your MTA-STS record for the initial stage.
For help, see MTA-STS Record & Policy Hosting.
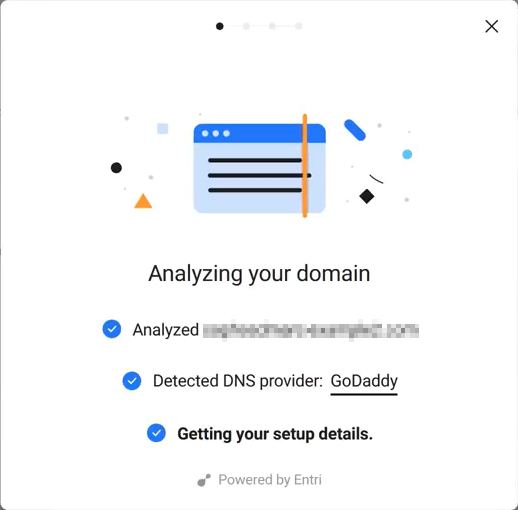
Entri integration
If your DNS provider supports Entri integration, use this method for a faster and simpler setup.
Use Entri to connect directly to your DNS provider. This integration lets you add the required records automatically from DMARC Manager without leaving the portal.
To publish your record using Entri integration, do as follows:
-
Click Configure DNS.
-
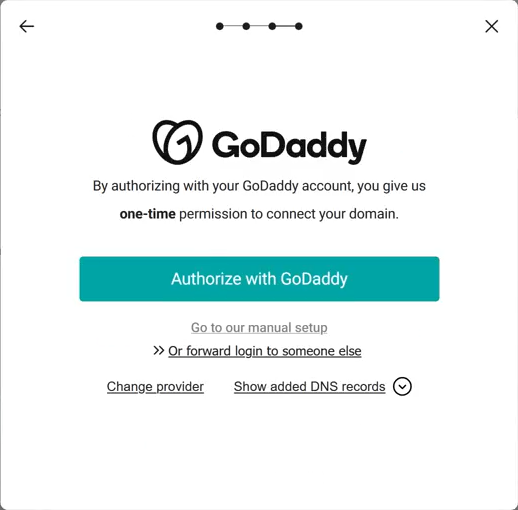
In the pop-up dialog, click Continue.
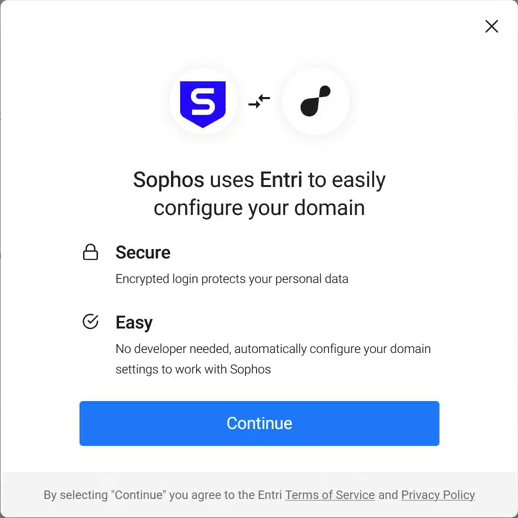
Sophos uses Entri to securely configure your domain. In this example, GoDaddy is used.
Note
If your DNS provider isn't automatically detected, review the list of supported providers and select the relevant one.
-
Authorize your DNS provider. You can also forward the login to someone else.
Note
You can click Change provider to select and authorize another supported DNS provider.
Entri analyzes your domain and detects the DNS provider.
-
Click Connect.
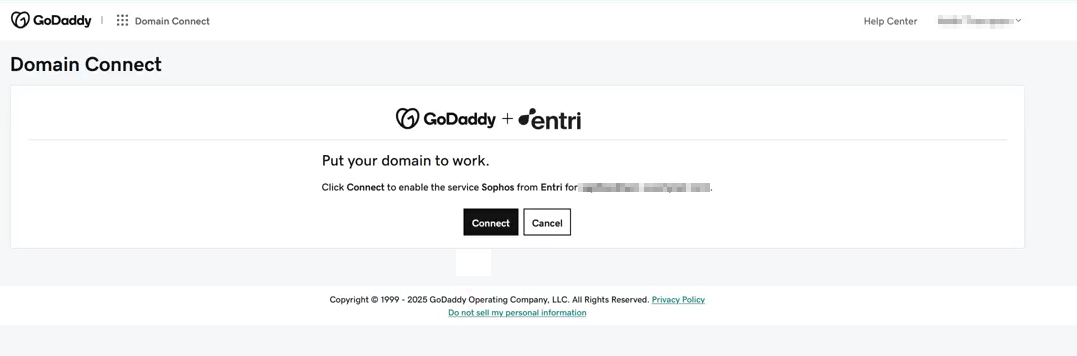
Sophos connects to your DNS provider and applies the required records.
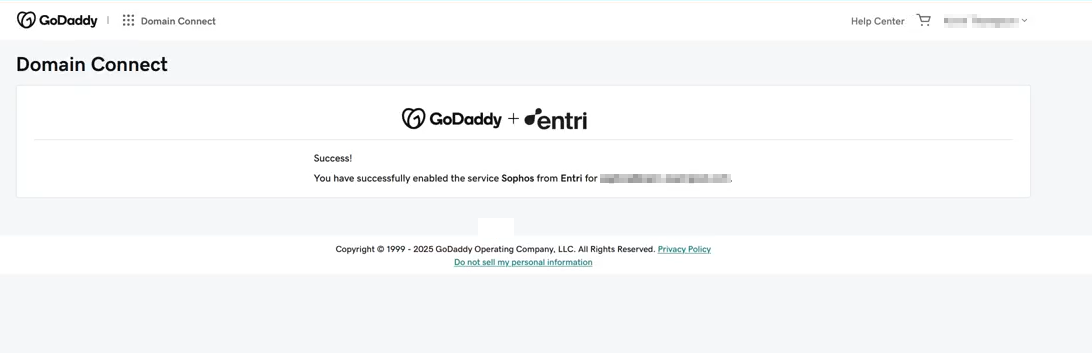
-
Click Done.
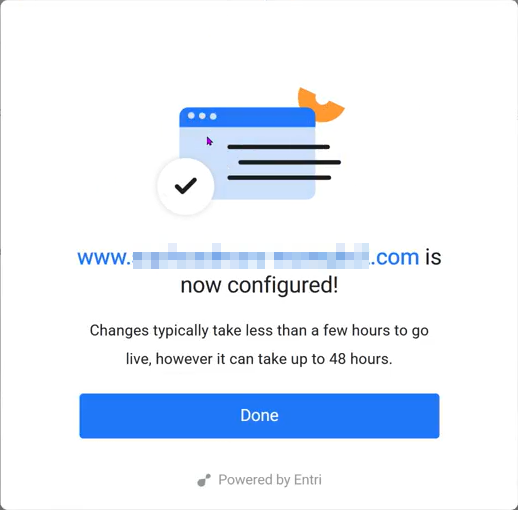
The required DNS records and values have been added to your provider.
-
Complete your remaining domain configuration. See Domain configuration.
Manual integration
If your DNS provider doesn't support Entri, you can add the records manually. Copy the required values (CNAME, TXT, or NS) from the setup instructions and publish them in your DNS settings.
To add the records manually, do as follows:
- Open your DNS settings.
-
Add the required CNAME, TXT, or NS record using the values shown in the setup instructions:
- Host
- Value
- TTL
Note
For DMARC, SPF, and BIMI configurations, you can also use a TXT record in your DNS. To do this, expand Use TXT Record Instead, copy the provided values, and publish them as a TXT record.
If you use this method, you must republish the TXT record each time your settings change.
-
Save the record in your DNS provider.
The required DNS records and values have been added to your provider.
-
Complete your remaining domain configuration. See Domain configuration.
How the score is calculated
Your Domain Score shows how well your DNS records protect your domain against impersonation, privacy threats, and branding issues. It reflects the strength of your DNS-based email authentication and security records. For information, see Domain Score.
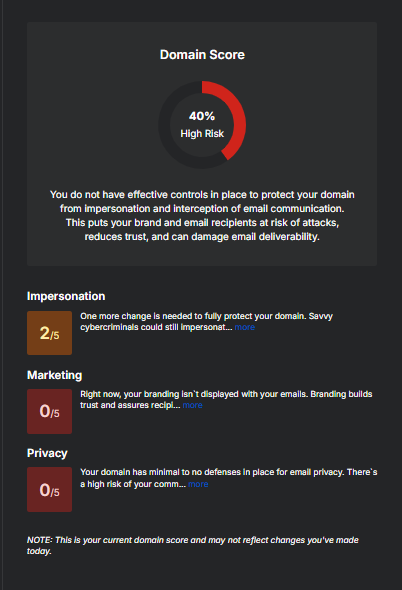
The score is broken down into three weighted categories.
| Category | Weighting | Contribution details |
|---|---|---|
| Impersonation | 80% | Based on DMARC, SPF, and DKIM |
| Branding | 5% | Based on BIMI |
| Privacy | 15% | Based on TLS-RPT and MTA-STS |
To learn more about how your score is calculated, see the sections below.
Impersonation (80%)
Impersonation evaluates how well your domain's email authentication methods protect it from spoofing and phishing attacks. DMARC has the highest impact on this score.
- If DMARC is missing, misconfigured, or set to None, you'll receive a low score.
- If DMARC is set to Quarantine, you'll receive a moderate score.
- If DMARC is set to Reject, you'll receive a high score.
- If SPF and DKIM aren't properly configured or don't align with your DMARC policy, your score might be reduced.
Branding (5%)
Branding assesses how your domain supports brand recognition through email.
- If you don't have a BIMI record, you'll receive a score of 0.
- If you have a valid BIMI record with a Verified Mark Certificate (VMC), you'll receive a score of 5.
The score reflects your domain's current configuration and might not include recent DNS changes.
Privacy (15%)
Privacy measures the level of encryption and security applied to email delivery.
- If TLS-RPT or MTA-STS is missing, you'll receive a score of 0.
- If one record is missing or values are incomplete, you'll receive a score between 1 and 3.
- If both records are present and MTA-STS is set to In Testing, you'll receive a score of 4.
- If both records are present and MTA-STS is set to Enforced, you'll receive a score of 5.
Alerts
The Alerts page lets you create and manage notifications for important domain activities and changes. You can choose from various alert types, such as compliance score changes, DNS verification issues, and newly detected senders.
On this page, you can do the following actions:
- Set up alerts for specific events such as compliance drops or DNS setup failures.
- Specify how frequently alerts are sent.
- Define email recipients for each alert.
Note
If you're missing an alert, make sure to check your junk or spam folder for emails from alert@sophosdmarc.com.
For more information on the Alerts page, see Alerts.
