Configure Endpoint DNS Protection policy
To configure the Endpoint DNS Protection policy, you must add the devices you want to protect, turn DNS Protection on, and specify additional settings, such as domain exclusions and block pages.
Requirements
You must meet the following requirements to configure this policy:
-
Upgrade to the Sophos Endpoint package for DNS Protection as follows:
Note
This is a temporary requirement. DNS Protection currently requires that you use the software package mentioned below. You can use the Recommended package once this requirement no longer applies.
- Go to My Products > Endpoint > Policies.
- Under Update Management, click Base Policy - Update Management.
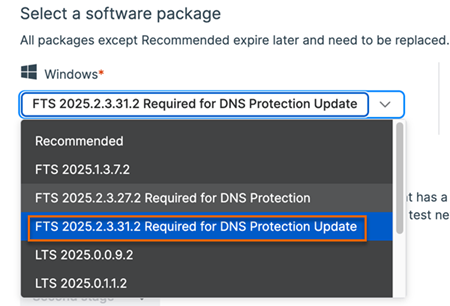
- On the Settings tab, go to Select a software package.
-
Under Windows, select FTS 2025.2.3.31.2 Required for DNS Protection Update.
-
Make sure you've installed the Endpoint agent on all the devices you want to protect. See Endpoint.
Turn DNS Protection on in the Endpoint agent
To turn DNS Protection on in the Endpoint agent, do as follows:
- Go to My Products > Endpoint > Computers.
-
Select the computers you want to protect and click Manage Endpoint Software.
Note
You can only add Windows endpoints. Windows Server and macOS endpoints aren't supported at this time.
-
Under DNS, select Install.
Note
You will see DNS & ZTNA instead of DNS if you have a ZTNA license.
-
Click Save.
Create an Endpoint DNS Protection policy
To create an Endpoint DNS Protection policy, do as follows:
- Go to My Products > Endpoint > Policies and click Add policy.
- Under Type, select Device.
- In Feature, select Endpoint DNS Protection and click Continue.
-
Add computers or computer groups you want to protect.
Note
You can only add Windows endpoints. Windows Server and macOS endpoints aren't supported at this time.
-
Click Policy Active and make sure Policy is Active is turned on. It's turned on by default.
- Click Settings to set up DNS Protection.
Settings
You can turn DNS Protection on, add domain exclusions, and specify settings to show block pages.
Turn DNS Protection on
To turn DNS Protection on, do as follows:
- Turn Use Sophos DNS Protection on.
-
Select the location to which you want to assign the devices. You can select the Default location, or configure a new location in DNS Protection and then select it from this list. See Add a location.
Note
If you create a new location in DNS Protection, make sure you select Secure DNS as the connection method.
Domain exclusions
You can specify the domains that you don't want Sophos Endpoint to redirect, allowing them to be resolved by your local or network DNS server.
- Domains: Add the domains you want to exclude from DNS Protection. All subdomains of these domains are automatically excluded.
- Retry with system- or application-configured DNS services when DNS Protection returns NXDOMAIN: DNS Protection returns an
NXDOMAINresponse if the queried domain name can't be resolved from public DNS records. For example, if your organization uses private DNS zones hosted by an internal DNS server for local network resources. Select this option to retry these requests without redirecting them to DNS Protection.
Tip
For best performance, we recommend that you add the domain names of internal zones to the domain exclusion list, instead of relying on the retry option.
Show block pages
Turn Automatically deploy the DNS Protection signing certificate to devices to show block pages on.
DNS Protection shows block pages for the domains you've blocked. Block pages show a message explaining why these domains are blocked. To ensure your users see these block pages, you must install the DNS Protection root certificate on users' devices.
Turn this option on to automatically install the root certificate in users' devices.