Investigation Console
The NDR investigation console lets you access all the data on your NDR sensors, not just the data that goes into our Data Lake. You can use this data for threat hunting.
You set up the console from Sophos Central but run it on your local network. The console gets data from an NDR integration appliance and lets you monitor or query it.
This page tells you how to create and manage an investigation console.
Create an investigation console
We assume you've already set up an NDR integration that collects data from NDR. If you haven't, see Sophos integrations.
The key steps in creating a console are as follows:
- Configure a console. This creates an image you'll deploy on your virtual network.
- Download the image and deploy it.
- Assign an NDR integration appliance to the console. This sends NDR data to the console.
Configure a console
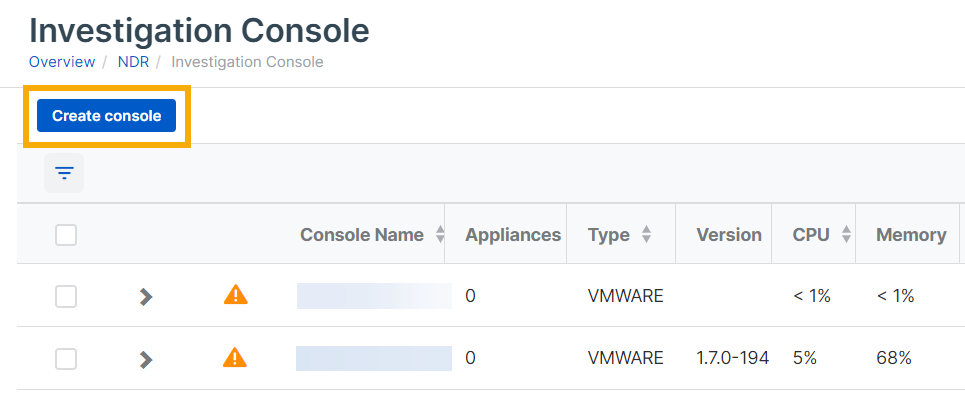
- Go to My Products > NDR > Investigation Console.
-
Click Create console.
-
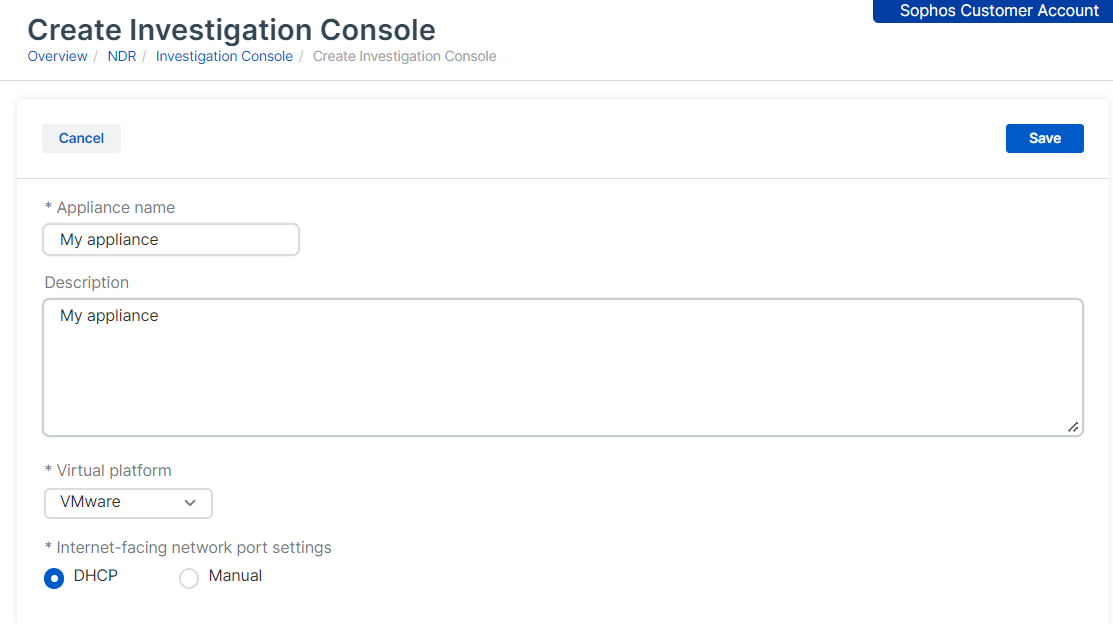
Configure the console as follows:
- Enter a Name and Description.
- Select the Virtual platform. The investigation console is only supported on VMware ESXi or Microsoft Hyper-V.
-
Specify the Internet facing network port settings. This sets up the management interface.
-
Select DHCP to assign the IP address automatically.
Note
If you select DHCP, you must reserve the IP address.
-
Select Manual to specify network settings.
-
-
Click Save.
-
An Appliance Credentials pop-up is shown. You need the credentials to access the appliance that hosts the console.
The username is
zadminand the password is shown in the message. Store the password safely. It's only shown once.Click Ok.
-
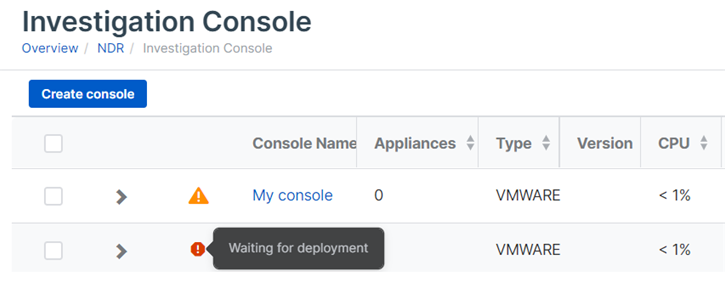
On the Investigation Console page, the new console is shown in the list. If you hover over the name, you see "Waiting for deployment".
Wait for an image to be created. This can take five minutes.
-
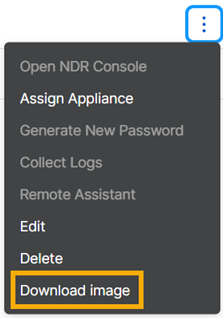
In the rightmost column, click the three dots and select Download image.
Deploy the image
Deploy the image in your environment.
Deployment depends on whether you're using VMware ESXi or Hyper-V. Click the relevant tab below for instructions.
Restriction
If you're using ESXi, the OVA file is verified with Sophos Central, so it can only be used once. If you have to deploy a new VM, you must create the OVA file again in Sophos Central.
On your ESXi host, do as follows:
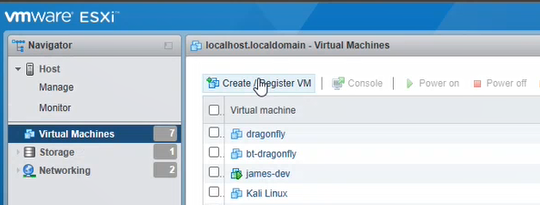
- Select Virtual Machines.
-
Click Create/Register VM.
-
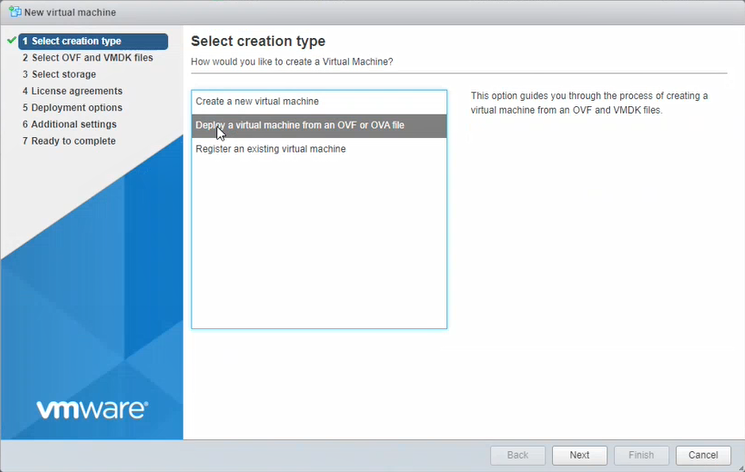
In Select creation type, select Deploy a virtual machine from an OVF or OVA file. Click Next.
-
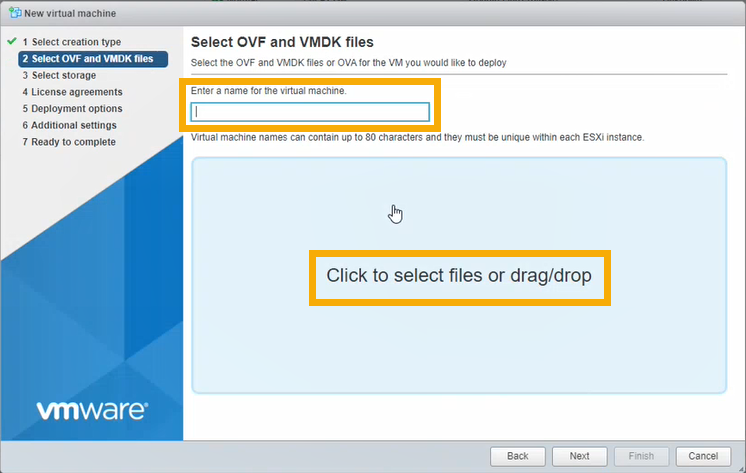
In Select OVF and VMDK files, do as follows:
- Enter the VM name.
- Click the screen where it says "Click to select files ..." and select the OVA file you've downloaded.
- Click Next.
-
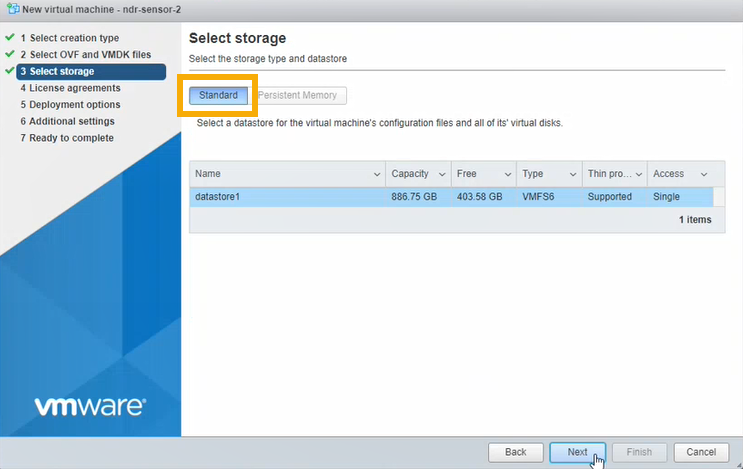
In Select storage, select Standard storage. Then select the datastore where you want to put your VM. Click Next.
-
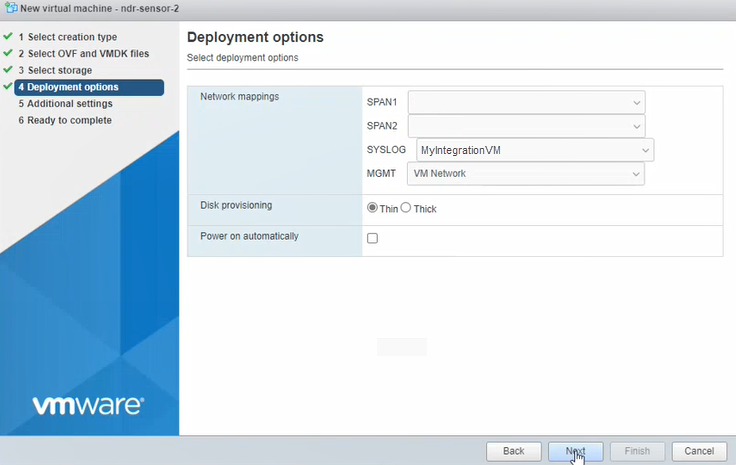
In Deployment options, enter the settings as follows:
-
In MGMT, select the management interface for the appliance.
You set up this interface earlier in Sophos Central in Internet-facing network port settings.
If you selected DHCP during setup, make sure the VM can get an IP address via DHCP.
-
In Disk Provisioning, make sure Thin is selected.
- Make sure Power on automatically is selected.
- Click Next.
-
-
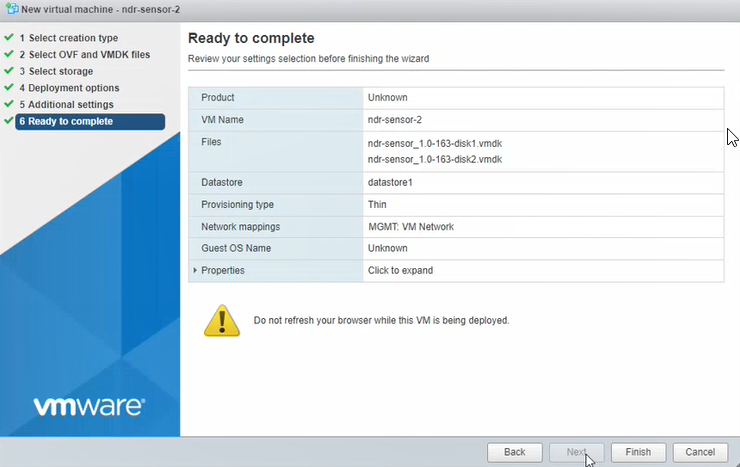
Skip the Additional settings step.
-
Click Finish. Wait for the new VM to appear in the VMs list. This can take a few minutes.
-
Start the VM and wait for installation to complete.
The VM boots for the first time and checks that it can connect to the correct port groups and to the internet. Then it reboots. This can take up to 10 minutes.
The zip file you downloaded in Sophos Central contains the files you need to deploy your VM: virtual drives, a seed.iso file, and a PowerShell script.
To deploy the VM, do as follows:
- Extract the zip file to a folder on your hard drive.
- Go to the folder, right-click the
ndr-sensor.ps1file, and select Run with PowerShell. -
If you see a Security Warning message, click Open to allow the file to run.
You're prompted to answer a series of questions.
-
Give the VM a name.
- The script shows the folder where the VM files will be stored. This is a new folder in your default installation location for virtual drives. Enter
Cto allow the script to create it. - Enter the number of processors (CPUs) to use for the VM.
- Enter the amount of memory to use in gigabytes (GB).
-
The script shows a numbered list of all your current vSwitches.
Choose the vSwitch you want to attach the management interface to and enter its number. You set up this interface earlier in Sophos Central in Internet-facing network port settings.
If you selected DHCP during setup, make sure the VM can get an IP address via DHCP.
-
You don't need to specify vSwitches for capturing network traffic. These settings are only relevant if you have Sophos NDR. Select any vSwitch as a placeholder and disconnect it in the VM settings later.
The PowerShell script sets up the VM in Hyper-V. You'll see an Installation Completed Successfully message.
-
Press any key to exit.
-
Open the Hyper-V Manager to see the VM added to the list of virtual machines. You can edit your settings if needed. Then start the VM.
The VM boots for the first time and checks that it can connect to the correct vSwitches and the internet. Then it reboots. This can take up to 10 minutes.
-
In Sophos Central, go to NDR > Investigation console. The status icon shows Connected.
Assign an NDR appliance
Now you assign an NDR appliance or appliances.
You can't assign an NDR appliance until your console has registered with Sophos Central and shows "green" status.
-
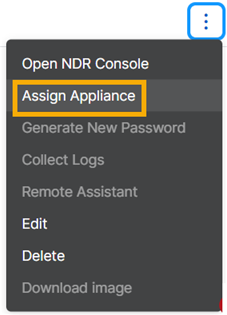
On the Investigation Console page, select the new console in the list. In the rightmost column, click the three dots, and select Assign Appliance.
-
Select the appliance you want to assign and click Save.
Open an investigation console
To open an investigation console, do as follows:
- Go to My Products > NDR > Investigation Console.
- Find your console in the list.
-
In the rightmost column, click the three dots
 and select Open NDR Console.
You see a warning that you're leaving Sophos Central.
If you've forgotten your password, click the words "reset it" to reset it.
-
Enter your username and password and click Open Console.
View investigation consoles
The Investigation Console page lists your consoles with configuration and performance details.
- Console name
- Appliances: The number of NDR integration appliances assigned to the console.
- Type: The virtual platform the console is on, for example VMWare.
- Version: Version of the platform.
- CPU: CPU usage.
- Memory: Memory usage.
- IP Address
View assigned appliances
On the Investigation Console page, in the list of consoles, click the arrow next to a console name to see details of the NDR integration appliances assigned to it.
- Appliance name
- Integrations: Number of integrations using the appliance.
- Memory: Memory usage.
- Storage
- Type: Virtual platform hosting the appliance.
- Version: Version of the virtual platform.
- Management IP: Management interface.
- Syslog IP: Syslog interface.
Generate new password
You can reset the password you use to access investigation console.
- On the Investigation Console page, select the console.
-
In the rightmost column, click the three dots
 and select Generate New Password.
Copy the password and store it safely. It's shown once only. You can't retrieve it later.
-
Click Reset.
Collect Logs
To collect logs of console activity, do as follows:
- On the Investigation Console page, select the console.
- In the rightmost column, click the three dots
 and select Collect Logs.
Remote Assistant
Sophos Support can help to troubleshoot Sophos appliances that host an investigation console.
In some cases, Sophos Support need to access the appliance remotely. You can give them access for up to 24 hours as follows.
The appliance must be online.
-
Go to the Investigation Console page.
-
Find the appliance. In the rightmost column, click the three dots
 and select Remote Assistant.
 -
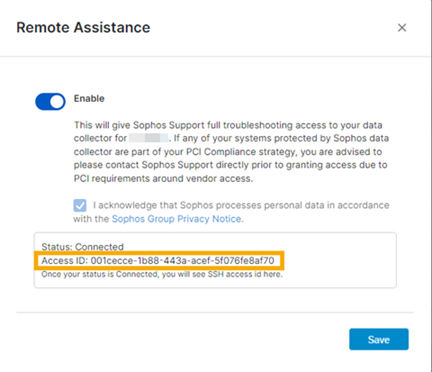
In the Remote Assistance dialog, do as follows:
- Select Enable.
- Select the checkbox to acknowledge the Sophos Group Privacy Notice.
- Click Save.
Sophos Central requests an Access ID from the appliance. When it's available, it's shown in the dialog.
-
Copy the Access ID and send it to Sophos Support. They use it to access your appliance.
Remote assistance turns off automatically after 24 hours. To turn it off manually, go back to the Remote assistance dialog and turn off Enable.
