Stack management
A stack is a group of switches logically combined into a single unit that lets you manage all the switches as if they were one. The Stack management page shows the settings for all the switches in the stack and lets you change the configuration.
We recommend that you add switches to a stack only if they're physically connected to each other or will have identical configurations. Otherwise, add them to a site instead. See Site management.
This video shows you how to manage Switch stacking in Sophos Central.

To manage a stack, go to My Products > Switches > Switches and click the name of the stack you want to manage.
The Stack management page shows the following details about the selected stack:
- Stack: The name of the stack.
- Parent: The name of the site the stack belongs to.
- Switches: The number of switches assigned to the stack.
- Sync pending: The number of switches with changes in Sophos Central that haven't synchronized yet.
- Sync failed: The number of switches that have failed to synchronize with Sophos Central.

Click Edit Stack to edit the stack details. You can change the parent site, name, location, and description and see the switches assigned to the stack. Click Save when finished.
Click Delete stack to delete a stack and move all its switches to the parent site. Configure the following options and click Delete stack to delete the stack:
- Clear the Sophos Central configuration for all switches in this stack when it's deleted: Clear the local switch settings for all the switches in the stack when it's deleted. When the local settings are cleared, the switches will inherit the settings from the parent site.
- Synchronize the settings to these switches immediately: This option immediately synchronizes the changes with the selected switches. You can choose which switches this applies to using the drop-down menu. Clear this option if you want to synchronize the settings later.
System details
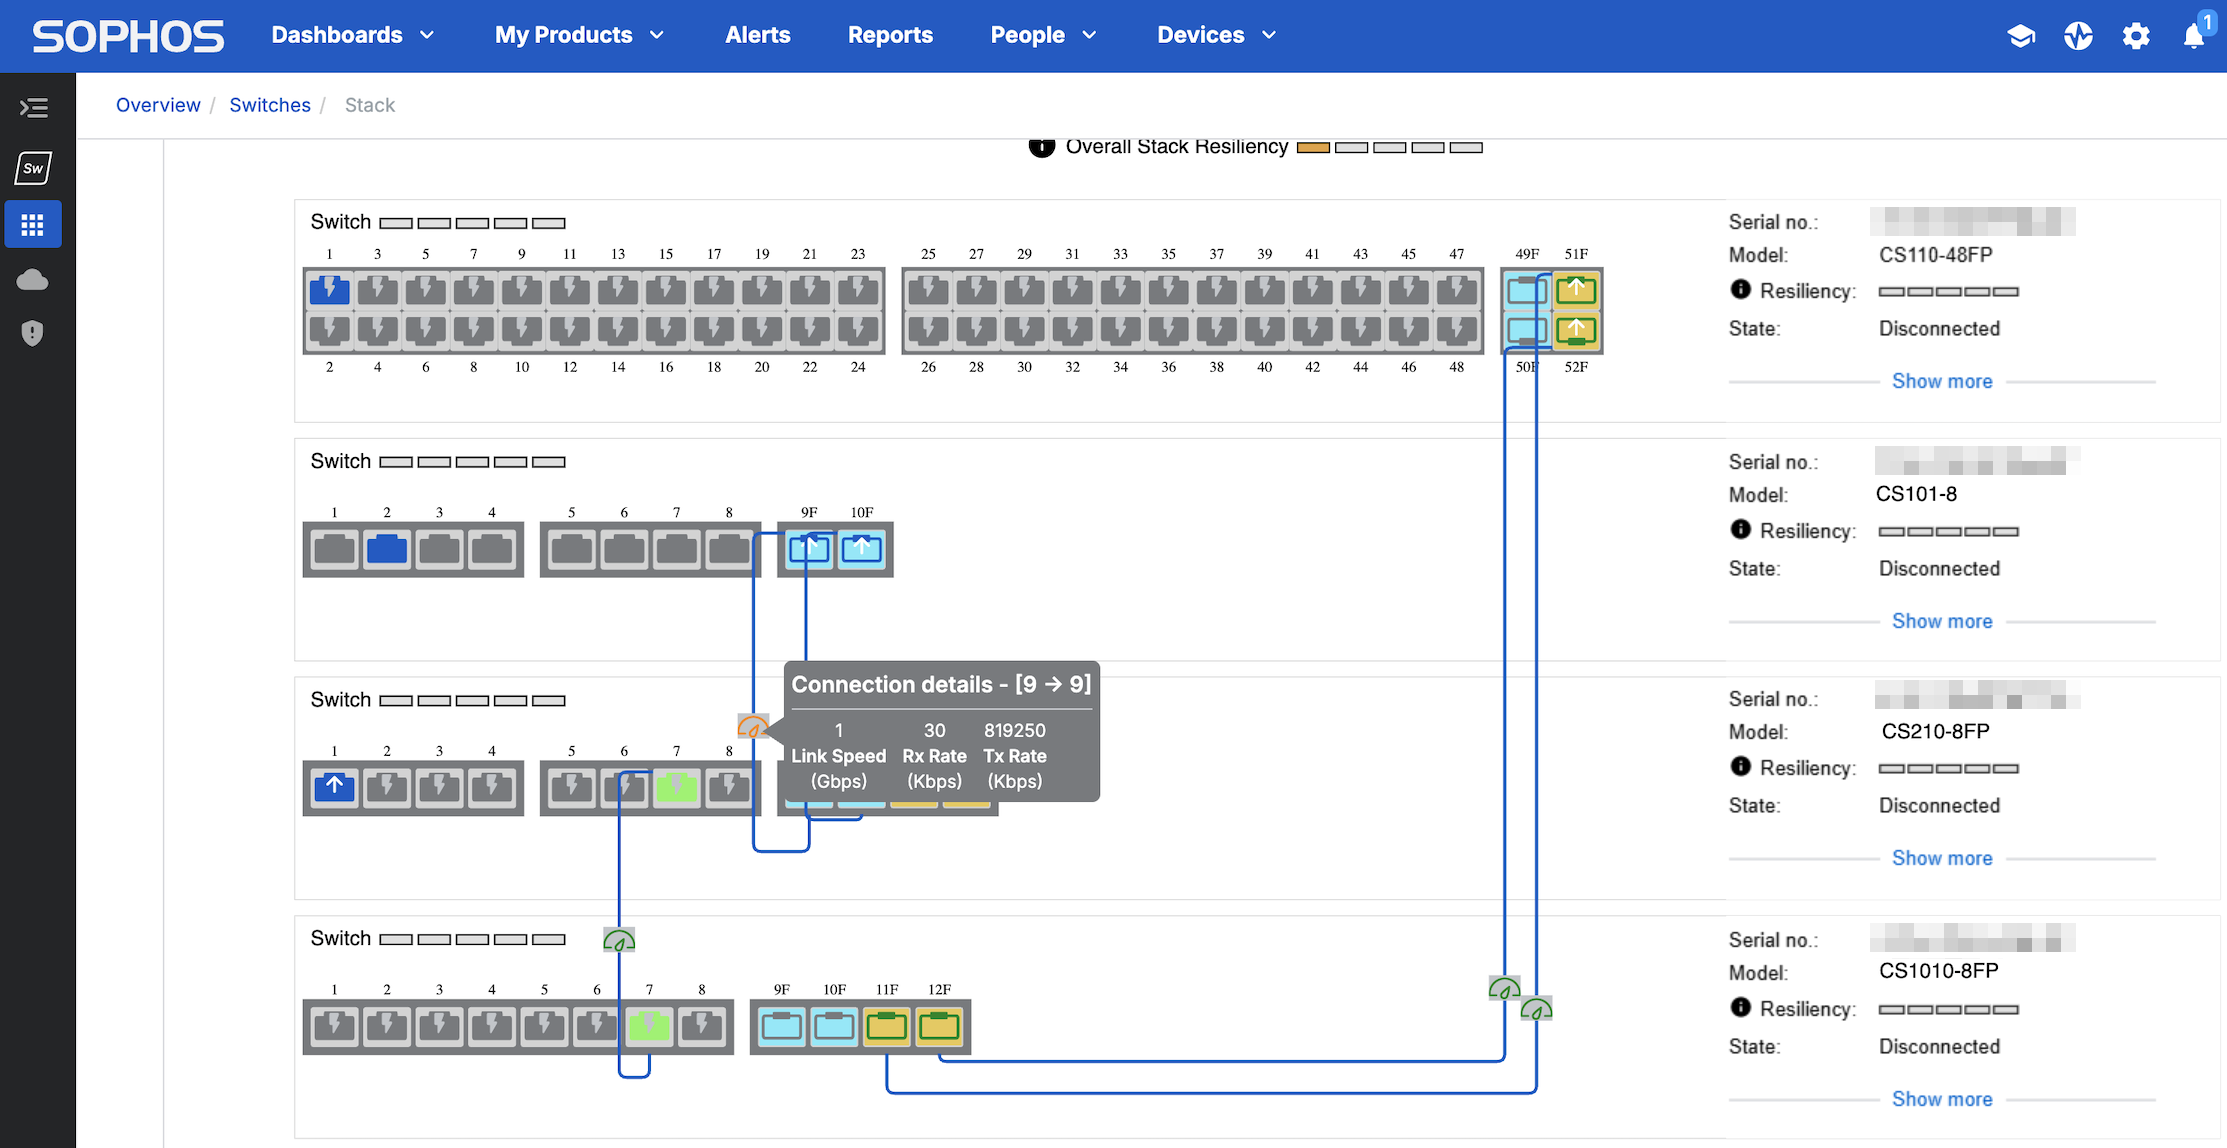
The System Details tab shows the port configuration for each switch in the stack and the Overall Stack Resiliency score. Sophos Central calculates this score based on the speed of the stack connections and whether LAG interfaces are used, the topology of the switch connections including loops and WAN reachability, and the minimum resiliency score for the switches in the stack.
Switches are shown based on their last known status, which updates every 90 seconds. If a switch is powered off or can't communicate with Sophos Central and you change its connection status, Sophos Central won't show the changes until the switch reconnects and communicates its new status.
You can click and drag the switches to move them and better visualize the connections.
You can see the connections for the switches if you turned on Turn on LLDP and STP to see switch connections in stack management when you created the stack. The connections between switches have a resiliency score that appears as a ![]() icon on the connection line between switches. Sophos Central calculates the score based on the link speed, Rx and Tx transfer rates, and port utilization for the switch connections in the stack. The icon is one of the following colors, depending on its score:
icon on the connection line between switches. Sophos Central calculates the score based on the link speed, Rx and Tx transfer rates, and port utilization for the switch connections in the stack. The icon is one of the following colors, depending on its score:
- Green: The connection is below 75% of its maximum capacity.
- Orange: The connection is between 75% and 90% of its maximum capacity.
- Red: The connection is over 90% capacity. You can create a LAG, use an SFP port, or use a port capable of higher throughput to increase the connection's capacity.
If you hover over the icon, you can see the connection details and scores for Link speed (Gbps), Rx Rate (Kbps), and Tx Rate (Kbps).
Tip
To understand how Sophos Central calculates resiliency scores, see Stack resiliency scores and calculation.
You can see the following details for each switch in the stack:
- Serial no.: The serial number of the switch.
- Model: The model of the switch.
- Resiliency: The resiliency score of the switch. Sophos Central calculates this score based on the switch's connectivity with Sophos Central and firmware availability status.
- State: The connection status of the switch.
Click Show more to see the following switch details:
- MAC address: The MAC address of the switch.
- IP address: The IP address of the switch.
- Firmware version: The switch's firmware version.
- Tags: The tags assigned to the switch.
- Powered on: The last time the switch was powered on.
- Location: The location of the switch.
Stack configuration
One advantage of assigning your switches to stacks is that you can configure options for all of the switches in the stack simultaneously. When configuring switches at the stack level, you're given the following options for many of the settings:
-
Select the same ports on all switches: This setting configures the settings on the same ports on every switch in the stack. For example, assigning a VLAN to ports 1 to 4 will assign that VLAN to ports 1 to 4 for every switch in the stack.
The configuration list contains 48 ports (1 to 48) and 4 SFP ports (49(F1) to 52(F4)) because stacks can contain 8, 24, and 48-port switches. Switches only accept configuration for the ports they have. Here are some examples:
Port configuration
Configuring a setting on port 7 applies to all switches on a site, regardless of how many ports they have, but configuring a setting on port 37 only applies to 48-port switches.
SFP configuration
Configuring a setting on port 49(F1) configures that setting on port 9(F1) on 8-port switches, port 25(F1) on 24-port switches, and port 49(F1) on 48-port switches simultaneously.
-
Select individual ports on each switch: This lets you choose individual ports from each switch in the stack when assigning setting. For example, you can simultaneously assign a VLAN to ports 1 to 4 on an 8-port switch and assign the same VLAN to ports 21 to 24 on a 24-port switch.
From the Stack Management page, you can configure the following settings for all the switches in the stack: