Integrate Palo Alto PAN-OS
-
Palo Alto PAN-OS 11
Palo Alto no longer supports CEF (Common Event Format) configuration for PAN-OS releases after PAN-OS 10.0.
Configurations based on PAN-OS 10.0 still work, but Palo Alto no longer supports them because ArcSight, the original author of the CEF format, has ended maintenance.
You can still follow the steps shown on this page to configure the syslog format your PAN-OS integration uses. Palo Alto's removal of support only affects newer fields and features that the Sophos integration doesn't currently use. Existing mappings are still valid.
MSP Flex customers must have the Firewall integrations license pack to use this feature.
You can integrate Palo Alto PAN-OS network security products with Sophos Central so that they send data to Sophos for analysis.
This integration uses a log collector hosted on a virtual machine (VM). Together they're called an integration appliance. The appliance receives third-party data and sends it to the Sophos Data Lake.
This page describes integration using an appliance on ESXi or Hyper-V. If you want to integrate using an appliance on AWS, see Add integrations on AWS.
Key steps
The key steps in an integration are as follows:
- Add an integration for this product. In this step, you create an image of the appliance.
- Download and deploy the image on your VM. This becomes your appliance.
- Configure PAN-OS to send data to the appliance.
Requirements
Appliances have system and network access requirements. To check that you meet them, see Appliance requirements.
Add an integration
To add the integration, do as follows:
- Sign in to Sophos Central.
- In Sophos Central, go to Threat Analysis Center > Integrations > Marketplace.
-
Click Palo Alto PAN-OS.
The Palo Alto PAN-OS page opens. You can add integrations here and see a list of any you've already added.
-
In Data Ingest (Security Alerts), click Add Configuration.
Note
If this is the first integration you've added, we'll ask for details about your internal domains and IPs. See Provide your domain and IP details.
Integration setup steps appears.
Configure the appliance
In Integration setup steps, you can configure a new appliance or use an existing one.
We assume here that you configure a new appliance. To do this, create an image as follows:
- Enter an integration name and description.
- Click Create new appliance.
-
Enter a name and description for the appliance.
If you've already set up a Sophos appliance, you can choose it from a list.
-
Select the virtual platform. Currently we support VMware ESXi 6.7 Update 3 or later and Microsoft Hyper-V 6.0.6001.18016 (Windows Server 2016) or later.
-
Specify the IP settings for the Internet-facing network ports. This sets up the management interface for the appliance.
-
Select DHCP to assign the IP address automatically.
Note
If you select DHCP, you must reserve the IP address.
-
Select Manual to specify network settings.
-
-
Select the Syslog IP version and enter the Syslog IP address.
You'll need this syslog IP address later, when you configure PAN-OS to send data to your appliance.
-
Select a Protocol. Currently, we only support UDP.
When you configure PAN-OS to send data to your appliance, you must set the same protocol.
-
Click Save.
We create the integration and it appears in your list.
In the integration details, you can see the port number for the appliance. You'll need this later when you configure PAN-OS to send data to it.
It might take a few minutes for the appliance image to be ready.
Deploy the appliance
Restriction
If you're using ESXi, the OVA file is verified with Sophos Central, so it can only be used once. If you have to deploy another VM, you must create an OVA file again in Sophos Central.
Use the image to deploy the appliance as follows:
- In the list of integrations, in Actions, click the download action for your platform, for example Download OVA for ESXi.
- When the image download finishes, deploy it on your VM. See Deploy appliances.
Configure PAN-OS
Now you configure PAN-OS to send data to the Sophos appliance on the VM.
Note
You can configure multiple Palo Alto PAN-OS firewalls to send data to Sophos via the same appliance. After you finish integration, repeat the steps in this section for your other Palo Alto PAN-OS firewalls. You don't need to repeat the steps in Sophos Central.
Note
The following information is based on PAN-OS 9.1. Guides for other versions are similar, but we provide equivalent links wherever available.
There are general configuration guides by Palo Alto. See Configure Log Forwarding.
The key steps in configuring PAN-OS are as follows:
-
Configure a syslog server profile. This defines where the alerts are sent.
You must enter the same settings you entered in Sophos Central when you added the integration.
-
Configure the format of the syslog message. This defines the format the alerts are sent in.
- Configure log forwarding. This defines which logs are sent and what triggers them.
- Commit changes. This deploys the configuration changes to the firewalls.
Note
Traffic, Threat, WildFire Submission, and Global Protect logs, which are equivalent to alerts, are sent to the Sophos appliance in CEF format.
Configure a syslog server profile
To configure a profile, which defines where alerts are sent, do as follows:
- Select Device > Server Profiles > Syslog.
- Click Add and enter a Name for the profile, for example "Sophos appliance".
- If the firewall has more than one virtual system (vsys), select the Location (
vsysorShared) where this profile is available. - In Syslog Server Profile, click Add.
- Enter a Name for the server profile.
-
In Servers, enter the following information about your Sophos appliance:
- NAME: A unique name for this server, for example
Sophos appliance. - SYSLOG SERVER: The IP address of your appliance. This must be the same as syslog IP address you entered in Sophos Central.
- TRANSPORT: Select the same transport protocol you set in Sophos Central.
- PORT: The port number you set in Sophos Central.
- FORMAT: Select BSD (equivalent to RFC3164).
- FACILITY: Select a syslog standard value to calculate the priority (PRI) of the syslog message. We don't use this value so we recommend choosing the default LOG_USER.
- NAME: A unique name for this server, for example
Don't click OK yet. Continue to the next section.
This video takes you through configuring a syslog server profile.
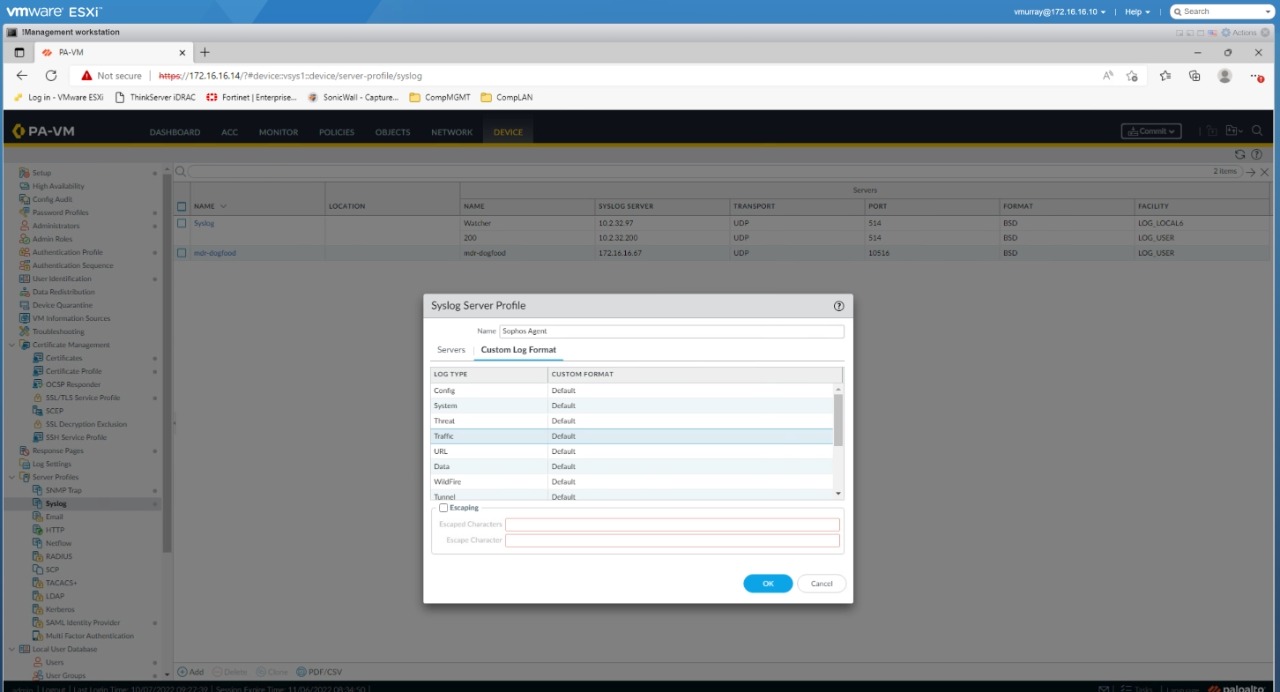
Configure the syslog message format
Warning
The following steps provide an example for formatting alerts as CEF in Palo Alto PAN-OS version 9.1. The templates provided below may not be suitable for other versions. For CEF alert templates for specific versions of PAN-OS, see Palo Alto Common Event Format Configuration Guides.
To configure the message format do as follows:
- Select the Custom Log Format tab.
-
Select Traffic and paste the following into the Threat Log Format text box, then click OK:
CEF:0|Palo Alto Networks|PAN-OS|$sender_sw_version|$subtype|$type|1|rt=$cef-formatted-receive_time deviceExternalId=$serial src=$src dst=$dst sourceTranslatedAddress=$natsrc destinationTranslatedAddress=$natdst cs1Label=Rule cs1=$rule suser=$srcuser duser=$dstuser app=$app cs3Label=Virtual System cs3=$vsys cs4Label=Source Zone cs4=$from cs5Label=Destination Zone cs5=$to deviceInboundInterface=$inbound_if deviceOutboundInterface=$outbound_if cs6Label=LogProfile cs6=$logset cn1Label=SessionID cn1=$sessionid cnt=$repeatcnt spt=$sport dpt=$dport sourceTranslatedPort=$natsport destinationTranslatedPort=$natdport flexString1Label=Flags flexString1=$flags proto=$proto act=$action flexNumber1Label=Total bytes flexNumber1=$bytes in=$bytes_sent out=$bytes_received cn2Label=Packets cn2=$packets PanOSPacketsReceived=$pkts_received PanOSPacketsSent=$pkts_sent start=$cef-formatted-time_generated cn3Label=Elapsed time in seconds cn3=$elapsed cs2Label=URL Category cs2=$category externalId=$seqno reason=$session_end_reason PanOSDGl1=$dg_hier_level_1 PanOSDGl2=$dg_hier_level_2 PanOSDGl3=$dg_hier_level_3 PanOSDGl4=$dg_hier_level_4 PanOSVsysName=$vsys_name dvchost=$device_name cat=$action_source PanOSActionFlags=$actionflags PanOSSrcUUID=$src_uuid PanOSDstUUID=$dst_uuid PanOSTunnelID=$tunnelid PanOSMonitorTag=$monitortag PanOSParentSessionID=$parent_session_id PanOSParentStartTime=$parent_start_time PanOSTunnelType=$tunnel PanOSSCTPAssocID=$assoc_id PanOSSCTPChunks=$chunks PanOSSCTPChunkSent=$chunks_sent PanOSSCTPChunksRcv=$chunks_received PanOSRuleUUID=$rule_uuid PanOSHTTP2Con=$http2_connection PanLinkChange=$link_change_count PanPolicyID=$policy_id PanLinkDetail=$link_switches PanSDWANCluster=$sdwan_cluster PanSDWANDevice=$sdwan_device_type PanSDWANClustype=$sdwan_cluster_type PanSDWANSite=$sdwan_site PanDynamicUsrgrp=$dynusergroup_name -
Select Threat, paste the following into the Threat Log Format text box, and click OK:
CEF:0|Palo Alto Networks|PAN-OS|$sender_sw_version|$threatid|$type|$number-of-severity|rt=$cef-formatted-receive_time deviceExternalId=$serial src=$src dst=$dst sourceTranslatedAddress=$natsrc destinationTranslatedAddress=$natdst cs1Label=Rule cs1=$rule suser=$srcuser duser=$dstuser app=$app cs3Label=Virtual System cs3=$vsys cs4Label=Source Zone cs4=$from cs5Label=Destination Zone cs5=$to deviceInboundInterface=$inbound_if deviceOutboundInterface=$outbound_if cs6Label=LogProfile cs6=$logset cn1Label=SessionID cn1=$sessionid cnt=$repeatcnt spt=$sport dpt=$dport sourceTranslatedPort=$natsport destinationTranslatedPort=$natdport flexString1Label=Flags flexString1=$flags proto=$proto act=$action request=$misc cs2Label=URL Category cs2=$category flexString2Label=Direction flexString2=$direction PanOSActionFlags=$actionflags externalId=$seqno cat=$threatid fileId=$pcap_id PanOSDGl1=$dg_hier_level_1 PanOSDGl2=$dg_hier_level_2 PanOSDGl3=$dg_hier_level_3 PanOSDGl4=$dg_hier_level_4 PanOSVsysName=$vsys_name dvchost=$device_name PanOSSrcUUID=$src_uuid PanOSDstUUID=$dst_uuid PanOSTunnelID=$tunnelid PanOSMonitorTag=$monitortag PanOSParentSessionID=$parent_session_id PanOSParentStartTime=$parent_start_time PanOSTunnelType=$tunnel PanOSThreatCategory=$thr_category PanOSContentVer=$contentver PanOSAssocID=$assoc_id PanOSPPID=$ppid PanOSHTTPHeader=$http_headers PanOSURLCatList=$url_category_list PanOSRuleUUID=$rule_uuid PanOSHTTP2Con=$http2_connection PanDynamicUsrgrp=$dynusergroup_name -
Select Wildfire, paste the following into the Threat Log Format text box, and click OK:
CEF:0|Palo Alto Networks|PAN-OS|$sender_sw_version|$subtype|$type|$number-of-severity|rt=$cef-formatted-receive_time deviceExternalId=$serial src=$src dst=$dst sourceTranslatedAddress=$natsrc destinationTranslatedAddress=$natdst cs1Label=Rule cs1=$rule suser=$srcuser duser=$dstuser app=$app cs3Label=Virtual System cs3=$vsys cs4Label=Source Zone cs4=$from cs5Label=Destination Zone cs5=$to deviceInboundInterface=$inbound_if deviceOutboundInterface=$outbound_if cs6Label=LogProfile cs6=$logset cn1Label=SessionID cn1=$sessionid cnt=$repeatcnt spt=$sport dpt=$dport sourceTranslatedPort=$natsport destinationTranslatedPort=$natdport flexString1Label=Flags flexString1=$flags proto=$proto act=$action request=$misc cs2Label=URL Category cs2=$category flexString2Label=Direction flexString2=$direction PanOSActionFlags=$actionflags externalId=$seqno cat=$threatid filePath=$cloud fileId=$pcap_id fileHash=$filedigest fileType=$filetype suid=$sender msg=$subject duid=$recipient oldFileId=$reportid PanOSDGl1=$dg_hier_level_1 PanOSDGl2=$dg_hier_level_2 PanOSDGl3=$dg_hier_level_3 PanOSDGl4=$dg_hier_level_4 PanOSVsysName=$vsys_name dvchost=$device_name PanOSSrcUUID=$src_uuid PanOSDstUUID=$dst_uuid PanOSTunnelID=$tunnelid PanOSMonitorTag=$monitortag PanOSParentSessionID=$parent_session_id PanOSParentStartTime=$parent_start_time PanOSTunnelType=$tunnel PanOSThreatCategory=$thr_category PanOSContentVer=$contentver PanOSAssocID=$assoc_id PanOSPPID=$ppid PanOSHTTPHeader=$http_headers PanOSRuleUUID=$rule_uuid -
Select Global Protect, paste the following into the Threat Log Format text box, and click OK:
CEF:0|Palo Alto Networks|PAN-OS|$sender_sw_version|$type|$subtype|rt=$receive_time PanOSDeviceSN=$serial PanOSLogTimeStamp=$time_generated PanOSVirtualSystem=$vsys PanOSEventID=$eventid PanOSStage=$stage PanOSAuthMethod=$auth_method PanOSTunnelType=$tunnel_type PanOSSourceUserName=$srcuser PanOSSourceRegion=$srcregion PanOSEndpointDeviceName=$machinename PanOSPublicIPv4=$public_ip PanOSPublicIPv6=$public_ipv6 PanOSPrivateIPv4=$private_ip PanOSPrivateIPv6=$private_ipv6 PanOSHostID=$hostid PanOSDeviceSN=$serialnumber PanOSGlobalProtectClientVersion=$client_ver PanOSEndpointOSType=$client_os PanOSEndpointOSVersion=$client_os_ver PanOSCountOfRepeats=$repeatcnt PanOSQuarantineReason=$reason PanOSConnectionError=$error PanOSDescription=$opaque PanOSEventStatus=$status PanOSGPGatewayLocation=$location PanOSLoginDuration=$login_duration PanOSConnectionMethod=$connect_method PanOSConnectionErrorID=$error_code PanOSPortal=$portal PanOSSequenceNo=$seqno PanOSActionFlags=$actionflags -
Click OK to save the Syslog Server Profile.
This video takes you through configuring the syslog message format.
Configure Log Forwarding
You configure log forwarding in two steps:
- Configure the firewall to forward logs.
- Trigger log generation and forwarding.
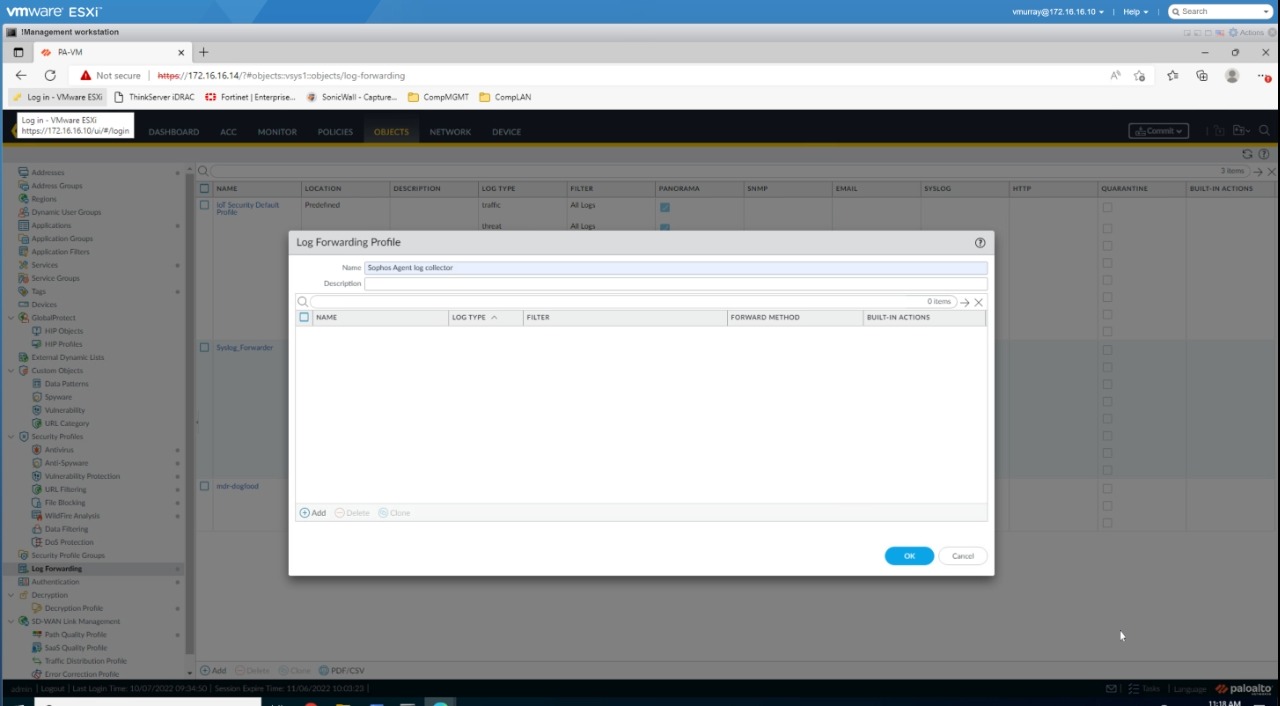
Configure the firewall to forward logs
To configure the firewall to forward logs, do as follows:
- Select Objects > Log Forwarding and click Add.
- In Log Forwarding Profile, enter a unique name, for example
Sophos appliance. - Click Add.
- In Log Forwarding Profile Match List, enter a name for the Log Type you're forwarding. The default is Traffic.
- Select SYSLOG, then select the server to send the log to. This is the name of the server you added. See Configure a syslog server profile.
- Click OK
-
Repeat these steps for each log type, severity level, and WildFire verdict you want to add. We recommend you add the following.
- Traffic (default)
- Threat
- Wildfire
- Global Protect
-
Click OK.
This video takes you through configuring the firewall to forward logs.
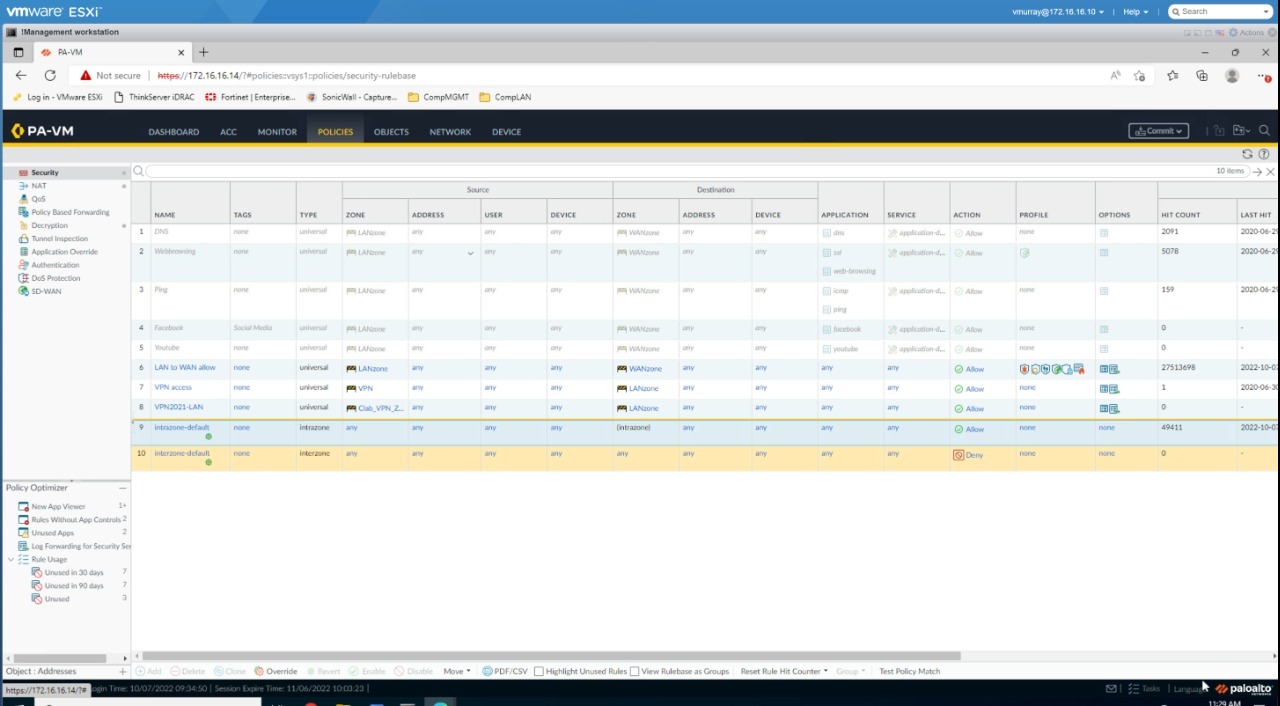
Configure log generation and forwarding
Next you assign the log forwarding profile to a security policy to trigger log generation and forwarding. This configures log generation and forwarding.
To do this, do as follows:
- Select Policies > Security and select the policy you want to use.
- In Security Policy Rule, select Actions.
- In Profile Setting, for Profile Type, select Profiles.
- Below Profile Type, choose the security profiles you want to monitor.
- In Log Setting, you can select Log at Session Start and Log At Session End. Your choice depends on your environment and the logs and alerts you want to forward to Sophos.
- In Log Forwarding, select the profile you created. See Configure Log Forwarding.
- Click OK.
This video takes you through configuring log generation and forwarding.
Commit Changes
When configuration is complete, click Commit. Your PAN-OS alerts should appear in the Sophos Data Lake after validation.
More information
For more information on configuring Palo Alto Panorama, see the following:
- Configure Log Forwarding
- Create a Log Forwarding Profile
- Assign the Log Forwarding profile to policy rules and network zones
- How to Forward Custom URL Logs to a Syslog Server
- Common Event Format (CEF) Configuration Guides
- Micro Focus Common Event Format Integration Guide
- Log Forwarding Options
- Threat Log Fields