Sophos NDR on Nutanix
You must have the Sophos Network Detection and Response integration license pack to use this feature.
You can set up Sophos NDR on Nutanix so that NDR can detect malicious behavior on your network.
Note
The instructions below apply to Nutanix version 6.8. If you're on an earlier or later version, there may be some differences.
Setup video
Watch the setup video to guide you through the setup process:
Set up NDR sensor in Nutanix AHV

Requirements
The VM that runs the appliance has system and network access requirements. For details, see Appliance requirements.
For details about the required CPU microarchitecture and CPU flags, see CPU requirements.
Note
If you use both SPAN interfaces, your virtual machine must have 8 CPU cores.
For information about resizing the VM for the best performance, see Sophos NDR appliance size guide.
Create an NDR appliance image
- In Sophos Central, go to Threat Analysis Center > Integrations > Marketplace.
- Find and click Sophos Network Detection and Response (NDR).
-
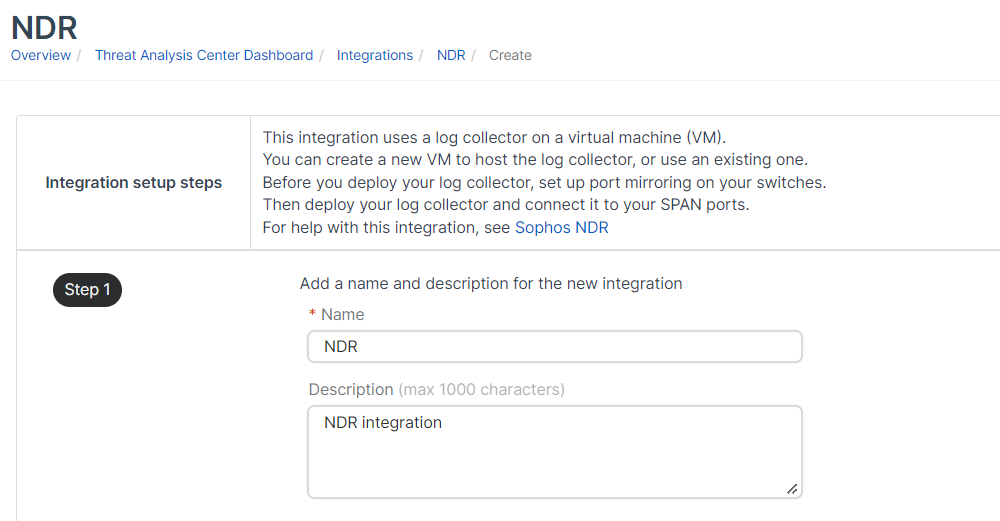
On the NDR page, in Data Ingest (Security Alerts), click Add Configuration.
Integration setup steps appears.
-
In Step 1, enter a name and description for the integration.
-
In Step 2, click Create new appliance.
-
To create the new appliance, do as follows:
- Enter the appliance name and description.
- In Virtual platform, select Nutanix.
-
Specify the internet-facing network ports.
-
Select DHCP to assign the IP address automatically.
Note
If you select DHCP, you must reserve the IP address.
-
Select Manual to specify network settings. For example:
- IP address:
10.0.252.5 - Subnet mask:
255.255.255.0 - Gateway address:
10.0.252.1 - DNS 1:
8.8.8.8 - DNS 2:
8.8.4.4
- IP address:
-
-
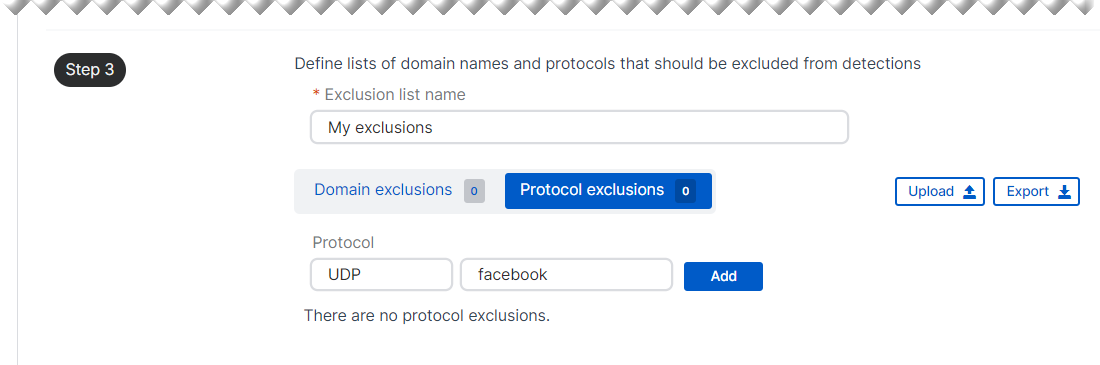
In Step 3, exclude specific domains and protocols from checking. For example, you might do this if you have a domain that causes false positives.
You can set up your exclusions later, but you must enter an exclusion list name now.
- Enter a name in Exclusion list name.
- To exclude a domain, click Domain exclusions. Enter the domain name, for example,
sophos.com, and click Add. -
To exclude a protocol, click Protocol exclusions.
You can enter information in either or both of the fields, as follows:
- In the first field, enter a top-level protocol. For example,
TCPorUDP. - In the second field, enter a sub-protocol (website). For example,
Facebook.
If you enter information in both fields, we assemble them into one string with a single dot separator.
We don't recommend excluding a top-level protocol completely. Only do this if a high-traffic protocol that isn't usually risky, like a routing protocol, generates too much data.
The screenshot shows example information.
- In the first field, enter a top-level protocol. For example,
-
Click Add.
You can export your exclusions as a JSON file. You can also upload exclusions from a JSON file you've exported previously to the list.
-
Go to the top of the page, and click Save.
You see your Appliance Credentials. Copy them, and store them securely.
Note
They're only shown once.
-
Click OK.
Your Nutanix installer is generated. This may take a few minutes.
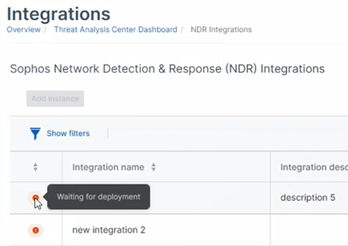
On the NDR page, under Configured NDR integrations, you see the new integration. If it doesn't show, click the Refresh icon. ![]()
Download the VM image
Now, you download the NDR image you need to deploy and power on the new VM.
-
Next to the new integration, click
 in the Actions column, and select Download image.
The Nutanix deployment file is a zip file that contains disk image files, a seed ISO containing the authorization key, and an installation script.
-
Unzip the file so the contents can be used.
-
(Optional) You can hover over the icon to the left of the integration name. You now see "Waiting for deployment".
Upload image files
To upload the disk image files and seed ISO to the Nutanix system, do as follows:
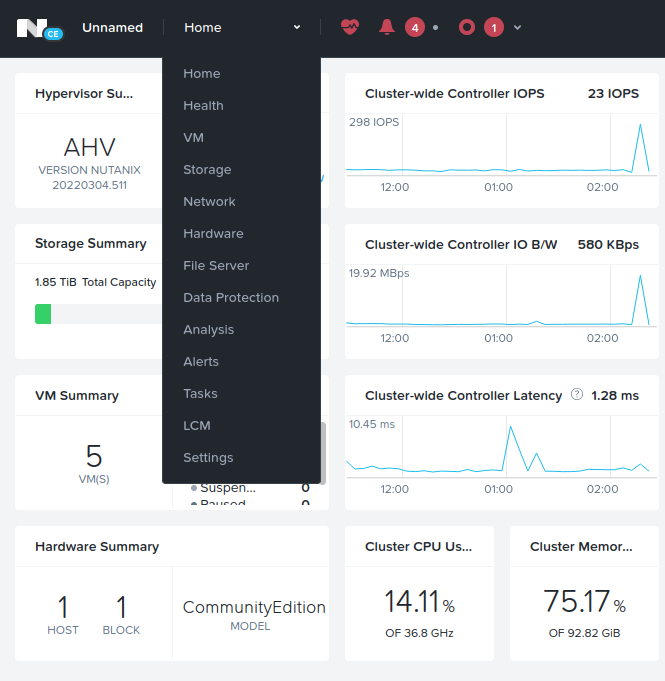
- From a web browser, sign in to the Nutanix web console on port 9440.
-
Go to Home > Settings.
-
Select Image Configuration.

Upload root image file
- Click Upload Image.
- Enter a name. We recommend that you include the word "root" in the name.
- (Optional) You can add an Annotation.
- For Image type, select DISK.
- Select Upload a file, click Browse, and select and open the
ndr-root.qcow2file. -
Click Save.
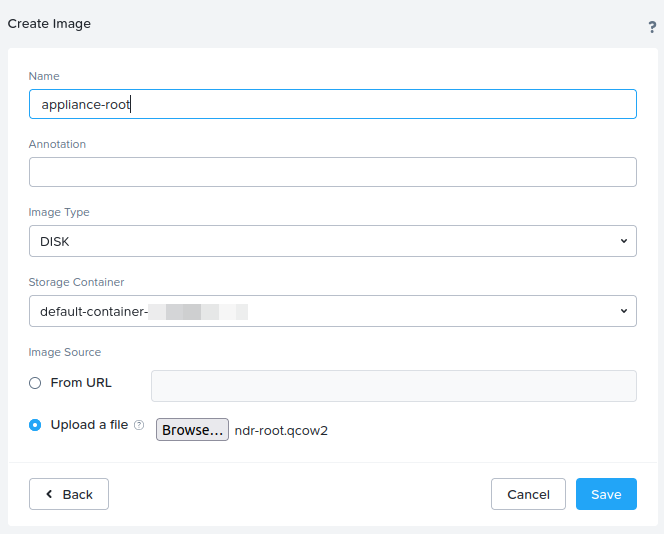
The file upload starts. This may take a few minutes. Wait for the upload to finish before you continue the setup.
Upload data image file
- Click Upload Image.
- Enter a name. We recommend that you include the word "data" in the name.
- (Optional) You can add an Annotation.
- For Image type, select DISK.
- Select Upload a file, click Browse, and select and open the
ndr-data.qcow2file. -
Click Save.
The file upload starts. This may take a few minutes. Wait for the upload to finish before you continue the setup.
Upload seed ISO image file
- Click Upload Image.
- Enter a name. We recommend that you include the word "ISO" in the name.
- (Optional) You can add an Annotation.
- For Image type, select ISO.
- Select Upload a file, click Browse, and select and open the
seed.isofile. -
Click Save.
The file upload starts. This may take a few minutes. Wait for the upload to finish before you continue the setup.
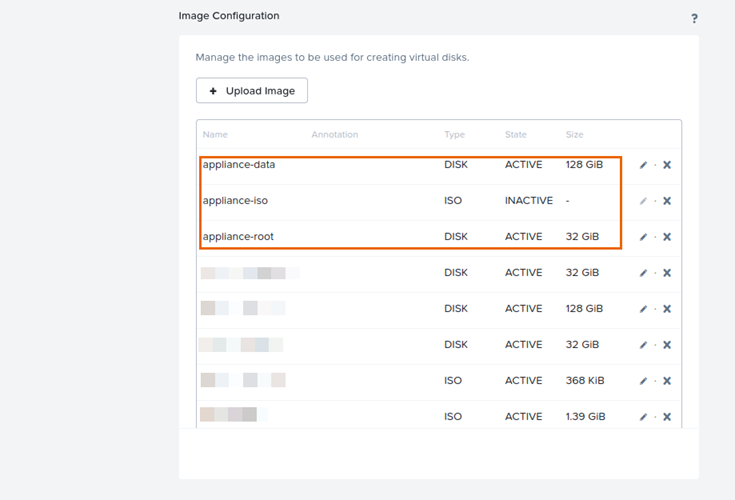
The three uploaded files appear on the Image Configuration page.
Upload the installation script
A script named ndr-sensor.sh is also included in the zip file. To upload the script to the Nutanix Controller VM (CVM), use Secure Copy Protocol (SCP), as follows:
- For Windows, open a command prompt. For macOS or Linux, open a terminal.
- Change to the directory where the unzipped files are located.
-
Run the following command:
scp ndr-sensor.sh admin@<ip-address>:~/.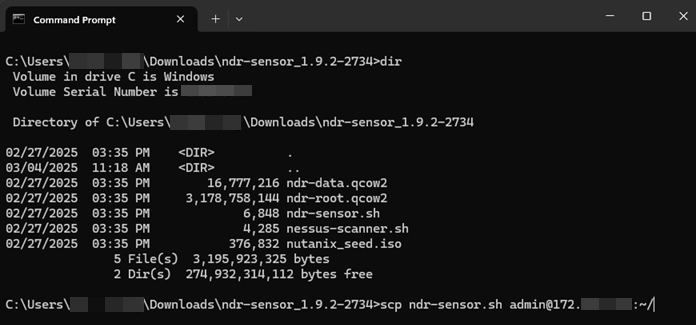
Note
If you're using an earlier version of Nutanix, you may need to add the
-Oflag to the command, as follows:scp -O ndr-sensor.sh admin@<ip-address>:~/ -
Enter the admin password.
The script is securely copied to the admin user's home folder on the Nutanix CVM.
Run the installation script
- Use the following command to sign in and connect to the Nutanix CVM via SSH:
ssh admin@<ip-address>. - Enter the admin password.
- To run the installation script, run the following command:
bash ndr-sensor.sh. -
Enter a name for the appliance VM. The default name is
ndr-sensor.
-
Enter the number of CPU cores and the amount of memory to use.
For items that list a default value, you can press Enter to accept the default value.
- Enter the number of CPU cores to assign to the VM. The default is
4. - Enter the amount of memory to assign to the VM. The default is
16(GB).
- Enter the number of CPU cores to assign to the VM. The default is
You'll see the following message: Created vm <name> UUID <UUID>.
Select the VM disk image files
Note
For all the disk selection steps, you can enter 'L' to list the images stored on the system.
To select the VM disk image files, do as follows:
-
Enter the image name for the seed ISO you uploaded.
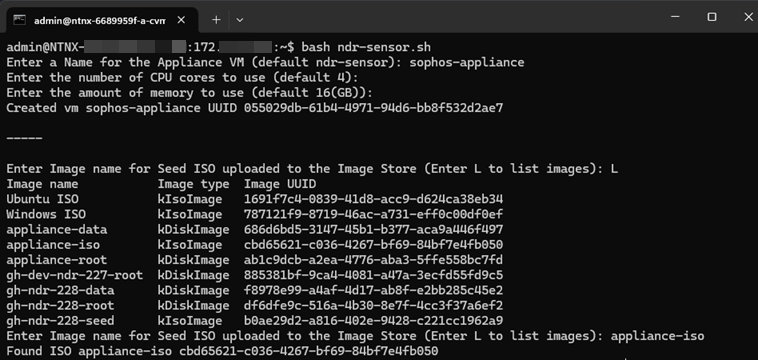
-
Enter the image name for the root disk image file you uploaded.
- Enter the image name for the data disk image file you uploaded.
Network Configuration
The script creates the following network interfaces for the VM:
- Management network
- Syslog network
- ERSPAN for tunneled capture data
- SPAN for the mirrored network to receive capture data from other VMs on this VM server
The script will list the available virtual subnets that can be used by the management, syslog, and tunneled Remote Switched Port Analyzer (RSPAN) capture data.
A single subnet can be used for all three networks.
To assign subnets to the networks, do as follows:
-
Enter the number corresponding to the subnet to use for the management network.
-
Enter the number corresponding to the virtual subnet to use for the syslog reception network.
- The configuration for the SPAN network is automatically created using the configuration parameters. The type is set as
type=kSpanDestinationNic. -
Enter the number corresponding to the virtual subnet to use for the tunneled ERSPAN capture network.
When the script has completed, it provides some example
aclicommands to enable a Nutanix SPAN session. The MAC address listed in the example commands is the MAC address of the SPAN interface created by the script.The traffic mirroring examples shown are for the following scenarios:
- To enable traffic mirroring for all VMs located on a host
- To enable traffic mirroring for one NIC on a specific VM

-
Copy the example commands. You'll need them later.
For more information, see Traffic Mirroring on AHV Hosts.
Edit example command
- Use the following command to list your host UUIDs:
acli host.list. - Copy your host UUID.
-
Replace the host UUID placeholder in the "Enable traffic mirror for all VMs located on a host" command with your host UUID.
The
identifieris the network interface that will be monitored. In the example command, it'sbr0-up, which is two physical interfaces connected with a bridge, such as an active-active or active-passive configuration. -
(Optional) If needed, replace the
identifierwith a different network interface, such aseth0.
Enable CPU passthrough
These steps are only needed for Nutanix version 6.8 and later.
-
Check whether
cpu-passthroughis enabled, as follows:- Use the
acli vm.listcommand to list your VMs. - Copy the UUID for the VM you created.
- Enter
acli vm.get <UUID>to see information about the VM. - Scroll up, and check whether
cpu-passthroughis shown asTrueorFalse.
- Use the
-
If
cpu-passthroughisFalse, do as follows:- Run the following command:
acli vm.update <UUID> cpu-passthrough=true. - Enter
acli vm.get <UUID>to see information about the VM. - Scroll up, and check whether
cpu-passthroughis now shown asTrue.
- Run the following command:
Start the VM
- On the Nutanix web console, click Settings, then click VM.
-
Right-click the VM name, then click Power on.
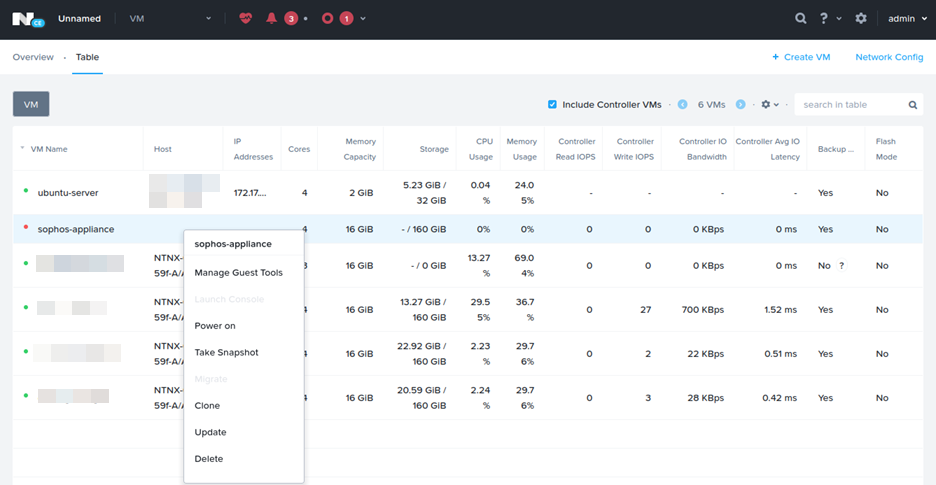
-
Right-click the VM name, then click Launch Console.
You can monitor the progress of the first boot process.
Note
This process can take up to ten minutes.
-
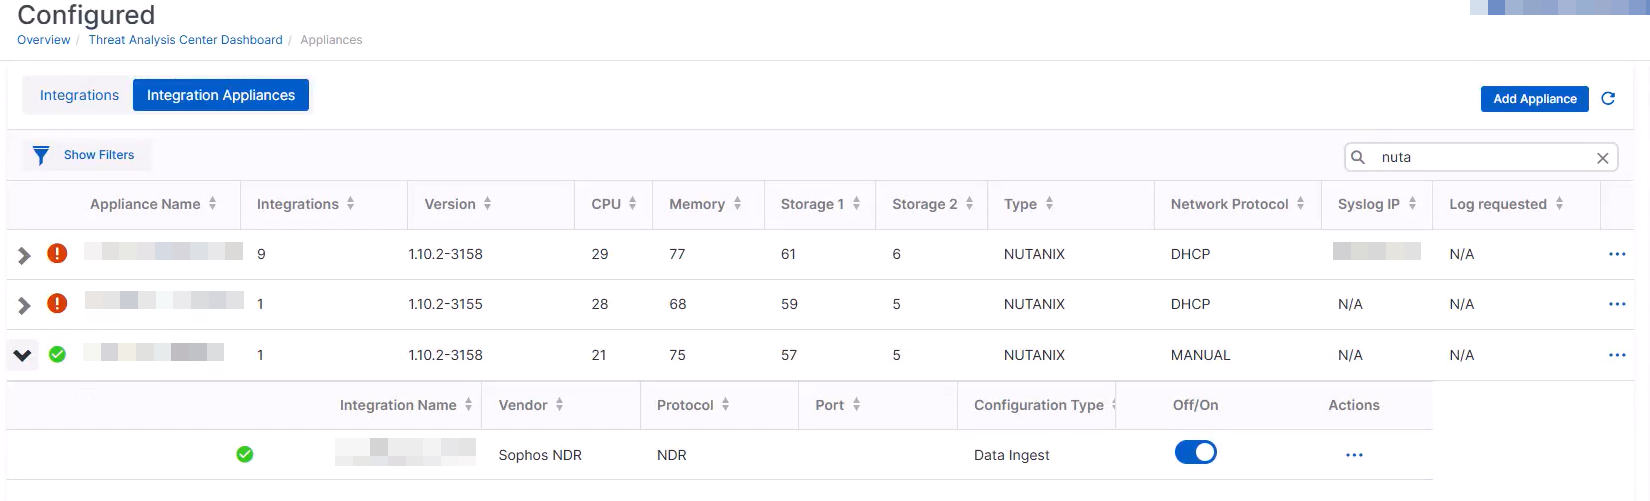
In Sophos Central, click Threat Analysis Center, and under Integrations, go to Configured > Integration Appliances.
The VM's status is now Connected.
Enable traffic mirror for all VMs located on a host
-
Go back to the command prompt that's running the Nutanix host's command-line interface, and paste and run the command you edited earlier.
The SPAN session is created.
Test the traffic flow
- Open an SSH session in an SSH client, such as PuTTY.
- Connect to the IP address of the NDR appliance, and log in as the
zadminuser with the password you saved earlier from Sophos Central. See Create an NDR appliance image. - Run the following command:
sudo kubectl logs -f deploy/dragonfly. -
Enter the
zadminpassword.Check that the SPAN interface is being monitored by checking the packets for the SPAN interface.
-
Type
exit.
Set up ERSPAN
To monitor traffic from the rest of the network outside of the Nutanix environment, you must use ERSPAN.
To set up ERSPAN, see the "Encapsulated Remote SPAN traffic section" in Sophos Appliance Manager for MDR and NDR: SPAN.
When the changes are applied, the VM will restart, and you're signed out of the appliance manager. You can monitor the progress from the console.
Note
Make sure that ERSPAN is set up on the network device from which you're sending the traffic, and that you're using the same settings you configured in the appliance manager.
Test the traffic flow
- Open an SSH session in an SSH client, such as PuTTY.
- Connect to the IP address of the NDR appliance, and log in as the
zadminuser with the password you saved earlier from Sophos Central. See Create an NDR appliance image. - Run the following command:
sudo kubectl logs -f deploy/dragonfly. - Check that the SPAN interface is being monitored by checking the packets for the SPAN interfaces.
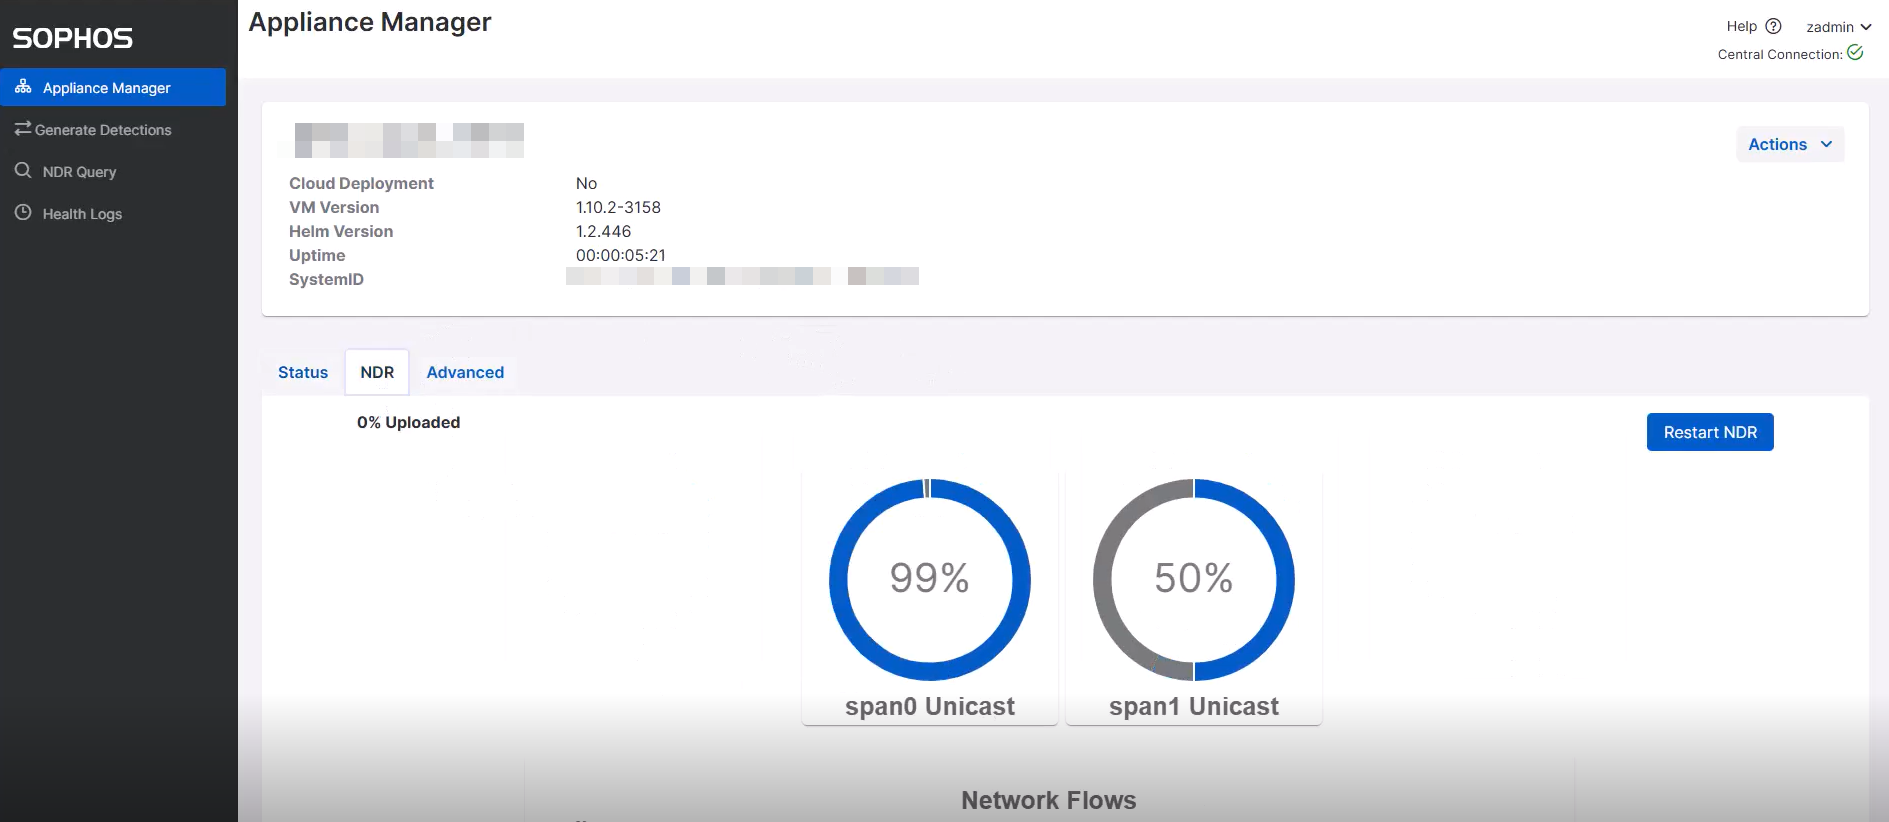
View appliance details
-
In Sophos Central, go back to Integration Appliances, and expand the arrow on the left of your appliance name. In the example below, the appliance is connected and healthy.
-
Click the three dots on the right-hand side of your appliance information
 , and click Open Appliance Manager.
 - Click Open.
- On the warnings page, accept the warning for the self-signed certificate.
-
Sign in with the
zadminusername and password.In the example below, you can see that traffic is received on each interface.