Sophos NDR on VMware ESXi and vSphere
You can deploy a Sophos NDR virtual appliance directly on a VMware ESXi host or through VMware vSphere.
The main steps are as follows:
- Check the requirements.
- Create and download the appliance in Sophos Fusion.
- Configure your switches so Sophos NDR can see traffic.
- Deploy the appliance on VMware ESXi or vSphere.
- Set up and register the appliance.
- Verify the appliance status in Sophos Fusion.
Requirements
You must have an active Sophos NDR product license. For IDS/IPS capabilities, you must also have the appliance-level IDS/IPS license.
Sophos NDR supports VMware ESXi 6.7 and later.
The VM that runs the appliance must meet the minimum system and network access requirements. For details, see Virtual appliance requirements.
Add appliance
To add an appliance, do as follows:
- Sign in to Sophos Fusion as an Admin or Super Admin.
- Go to My Products > NDR > NDR Appliances.
-
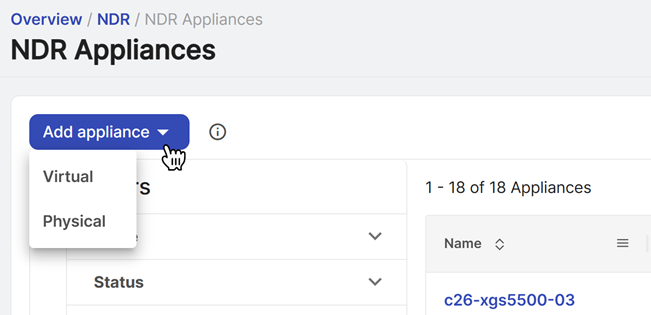
Click Add appliance.
-
Select Virtual.
-
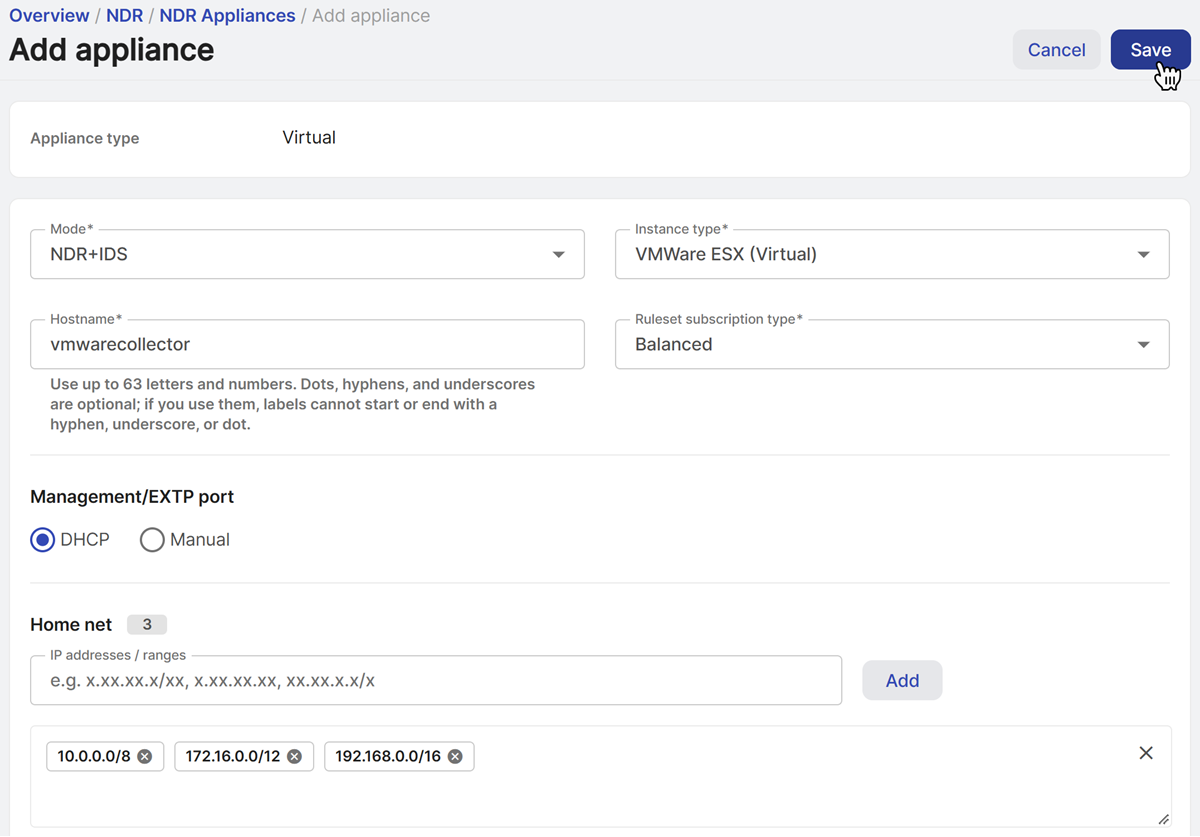
Select a Mode. See Mode.
Virtual appliances support NDR, NDR+IDS, and IDS modes, all of which use a sniffer deployment.
NDR mode is available to all customers. NDR+IDS and IDS require an appliance-level IDS/IPS license.
-
Select VMware ESX (Virtual) from the Instance type menu.
- Enter a hostname for the appliance.
- If you selected a mode that includes IDS, select the rule set you want from the Rule set subscription type menu. For more information about each rule set, see Appliance rule set.
-
Specify the Management/EXTP port setting:
-
Select DHCP to assign the IP address automatically.
Note
If you select DHCP, you must reserve the IP address.
-
Select Manual to specify network settings.
Example
- IP address:
192.168.12.25 -
Subnet mask:
192.168.12.0/24You must enter the subnet mask in IPv4 CIDR notation.
-
Gateway:
192.168.12.1
- IP address:
Note
Only IPv4 is supported.
-
-
In Home net, enter the IP addresses or ranges that determine which traffic Sophos NDR inspects. For details, see Home net.
You can add a single IP address or a range of addresses defined in CIDR notation, such as
192.168.0.0/16. After you enter an address or range, click Add and then repeat as needed.Tip
To include private IPv4 address ranges in the home net, add these ranges:
10.0.0.0/8172.16.0.0/12192.168.0.0/16
-
Verify that all settings are correct, then click Save.
The new appliance appears on the NDR Appliances page with an unregistered status. You'll register it in a later step.
Note
The downloaded appliance image doesn't contain the network settings or registration information you entered in Sophos Fusion. You'll enter this information again when you set up the VM.
Download appliance
To download the appliance package, do as follows:
- On the NDR Appliances page, click the name of the appliance you just created.
-
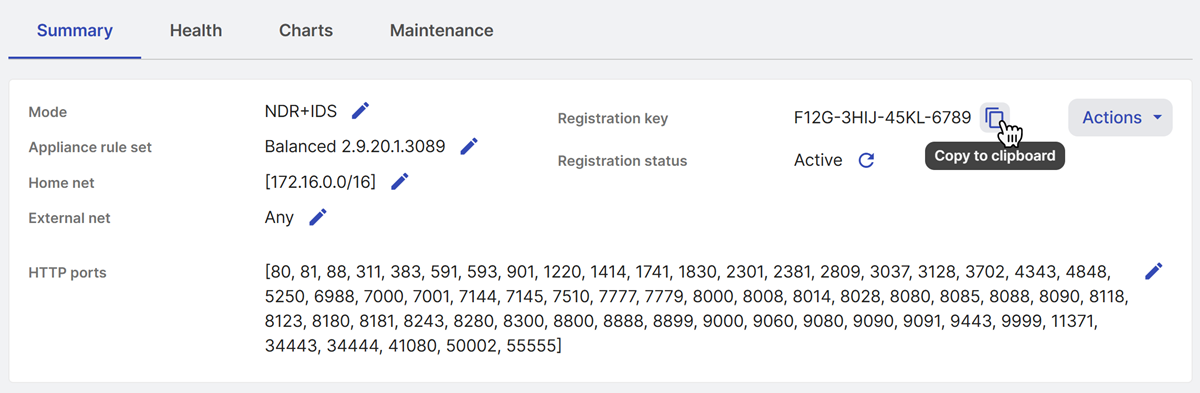
Copy the registration key on the Summary tab. You'll need it when you register the appliance.
-
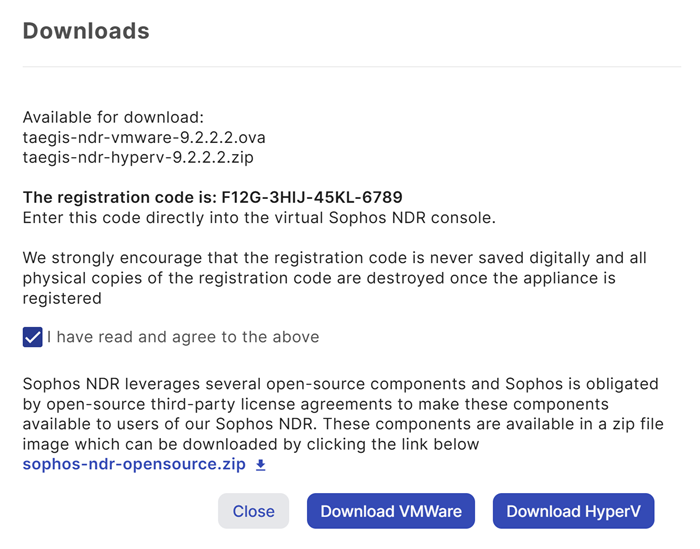
Click Actions, then select Downloads.
- Select I have read and agree to the above.
-
Click Download VMware.
Configure your switches
Before you deploy the Sophos NDR VM, configure traffic mirroring for the virtual and physical network traffic that you want Sophos NDR to monitor.
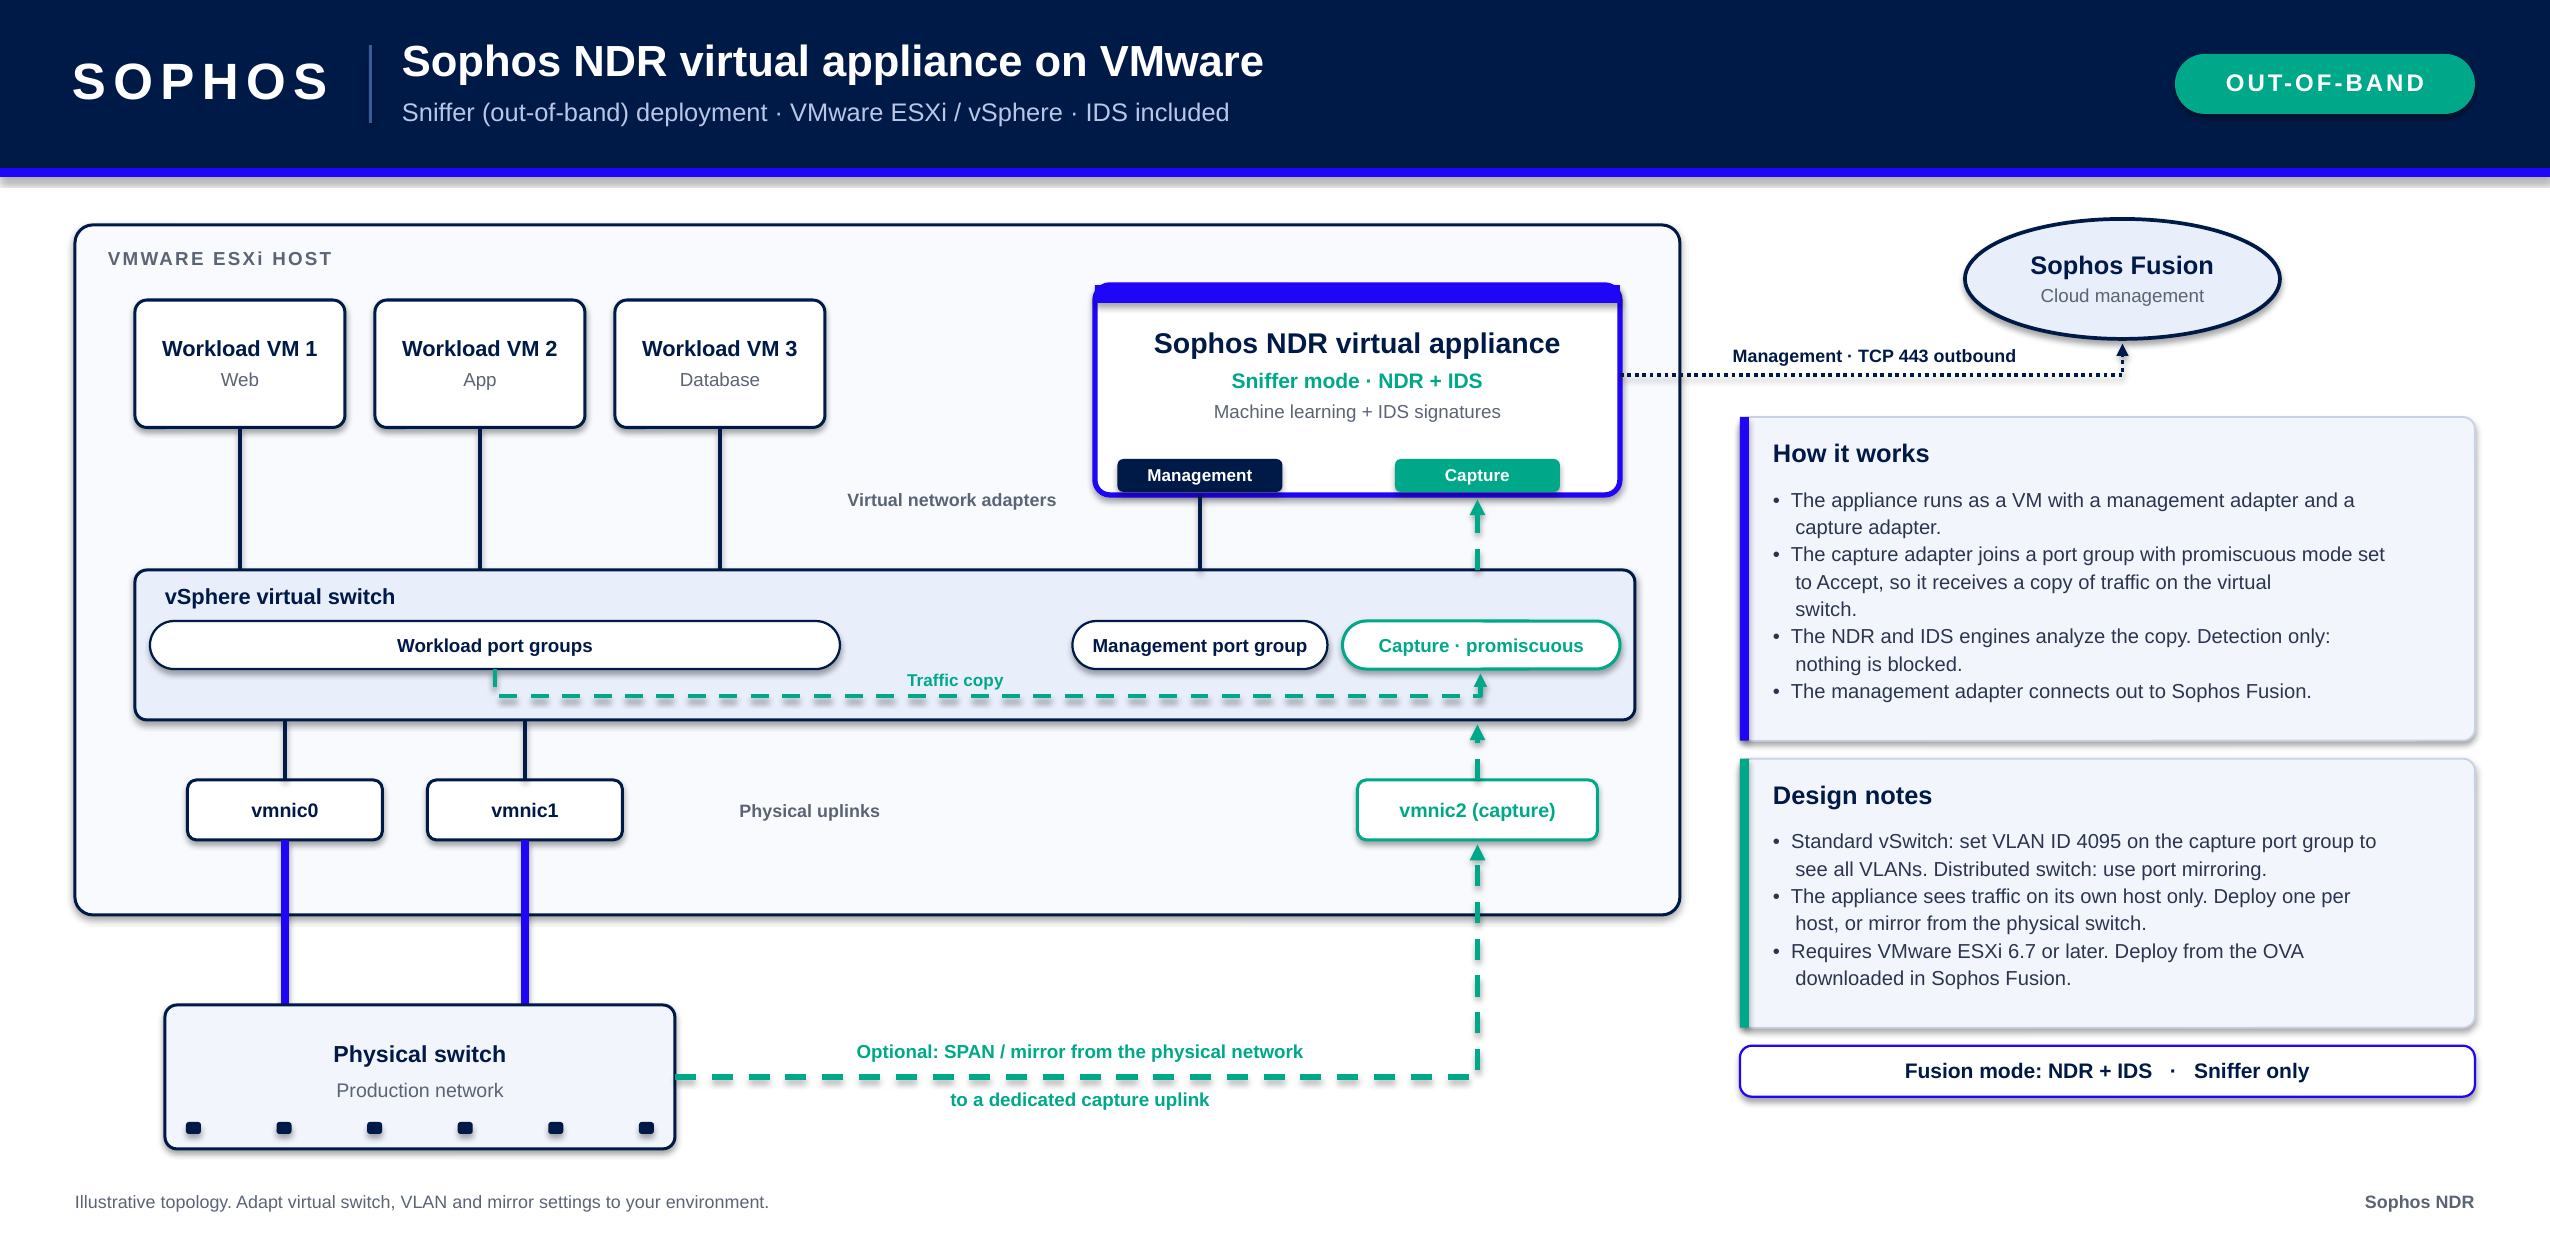
The NDR virtual appliance operates out of band. On a standard vSwitch, the NDR capture adapter connects to a port group configured to receive a copy of network traffic. The appliance inspects the copied traffic but isn't in the production traffic path.
The following example shows a VMware deployment that monitors traffic from workload VMs. The NDR capture adapter connects to a capture port group with promiscuous mode enabled. The example also shows an optional SPAN or mirror connection from a physical switch through a dedicated physical uplink.
Keep these requirements in mind when you configure traffic mirroring:
- For a standard vSwitch, configure the capture port group with VLAN ID 4095 so that it can receive traffic from all VLANs on the vSwitch.
- Set Promiscuous mode to Accept on the capture port group.
- To monitor traffic from the physical network, you can send SPAN or mirrored traffic from the physical switch through a dedicated physical uplink to the capture port group.
- The NDR appliance can inspect only the traffic available to its capture interfaces.
When you deploy the NDR VM, you'll connect its capture interfaces to the port groups that receive the mirrored traffic.
Note
When using a standard SPAN session from a physical switch in a VMware environment with vMotion enabled, the appliance must remain locked to the ESXi host that receives the SPAN traffic from the physical network connection.
In ESXi, configure port mirroring as follows:
- Configure virtual switches.
- Configure a physical switch.
Configure virtual switches
To set up port mirroring for virtual internal switches, do as follows:
-
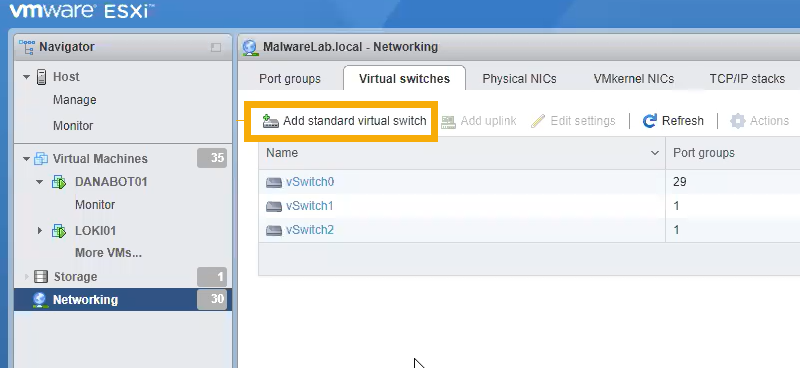
In ESXi, go to Networking. On the Virtual switches tab, select a switch to use for port mirroring.
If you don't already have a switch to use, click Add standard virtual switch to add a new one and add port groups to it.
-
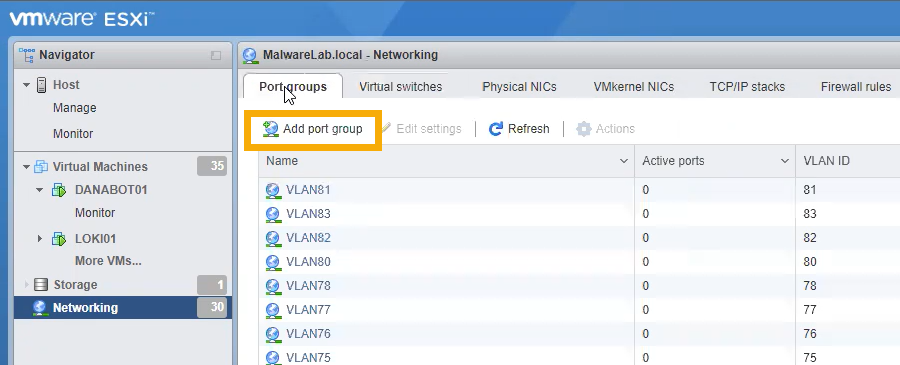
On the Port groups tab, click Add port group.
-
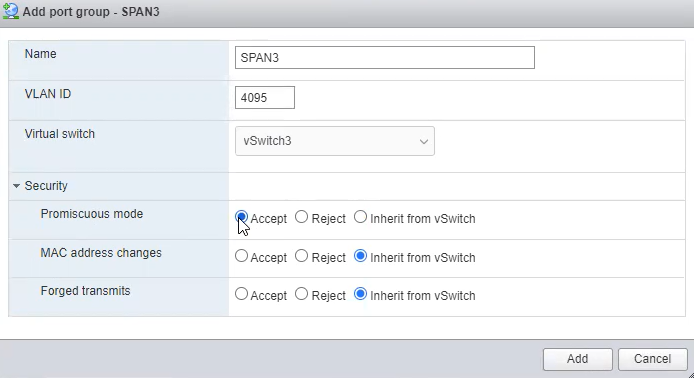
In the settings for the new port group, do as follows:
- Enter a name.
- Set the VLAN ID to 4095. This allows all other port groups already on the switch to forward traffic to the new port group.
- Click Security and set Promiscuous mode to Accept.
- Click Add.
You've set up forwarding for your virtual internal network traffic. Next, set up forwarding for physical external traffic.
-
In ESXi, select or create another virtual switch that will handle physical external traffic sent to it by a physical switch on your network.
-
Configure the switch as follows:
- Go to Port groups and click Add port group.
- Enter a name.
- Set VLAN ID to 4095.
- Click Security and set Promiscuous mode to Accept.
Next you connect your virtual switch to your physical network so that it can receive external traffic.
-
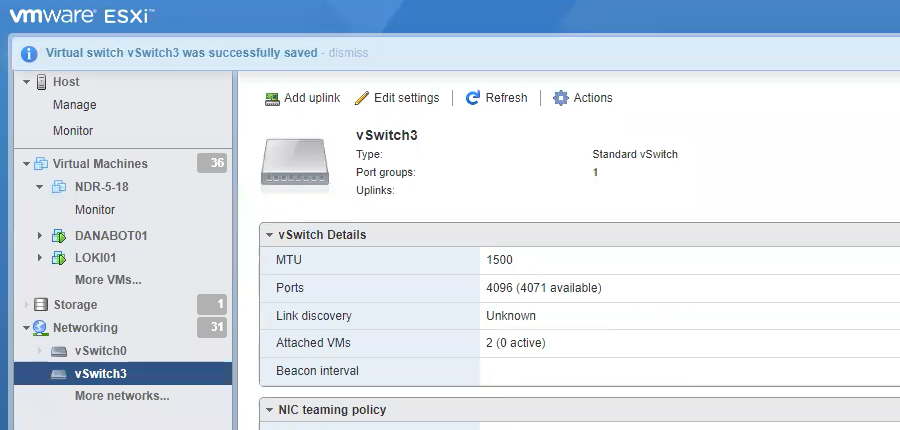
In the ESXi left menu, go to Networking and select the switch you want to use for external traffic.
-
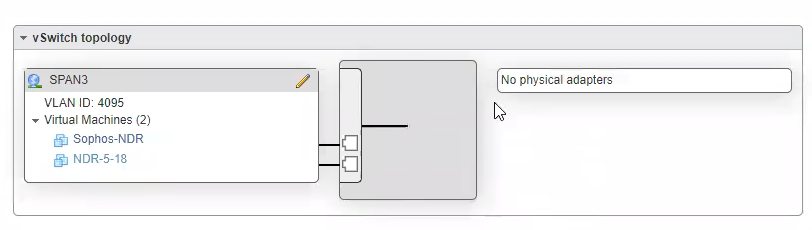
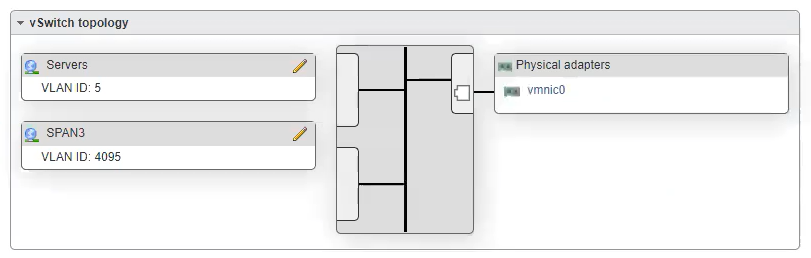
In the switch details, the vSwitch topology shows No physical adapters.
-
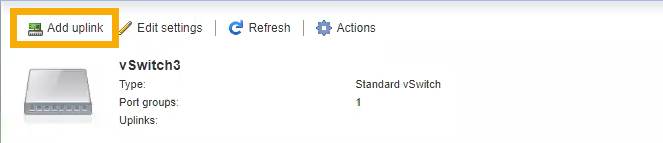
Click Add uplink.
-
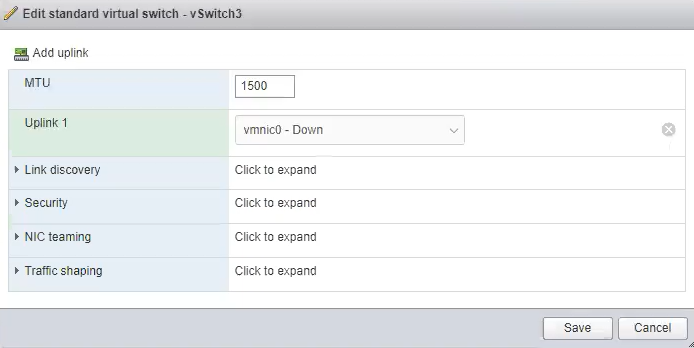
In Uplink 1, select an available network interface card.
This connects the virtual switch to a port on your ESXi server.
-
In Network topology, check that you can see a physical adapter connected.
-
Go to your physical switch and use a cable to connect directly to the port on your ESXi server.
Next you need to set up mirroring on your physical switch.
Configure a physical switch
This section describes setting up port mirroring on a Sophos switch. The steps for other switches differ.
To set up mirroring, do as follows:
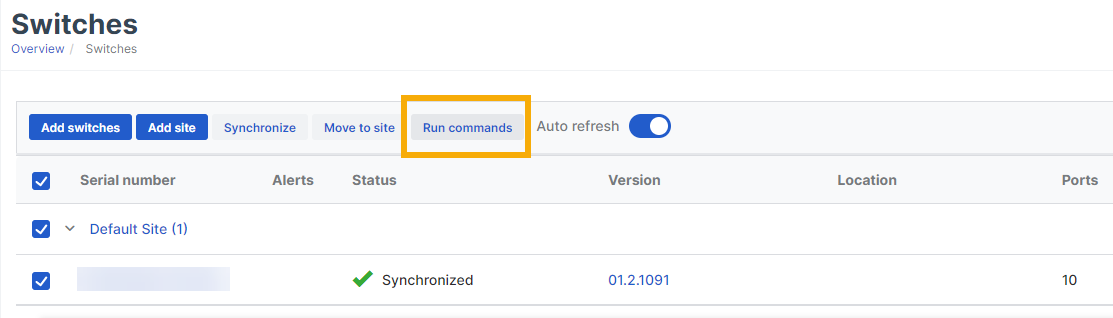
- In Sophos Fusion, go to Switches.
-
Select the switch you want to configure and click Run commands.
-
In the Run switch commands console, enter the commands to mirror all traffic. In this example, the commands mirror all incoming and outgoing traffic on ports 1 to 4 and send it out on port 8.
configure terminal
monitor session 1 destination interface gigabitethernet 0/8 allow-ingress
monitor session 1 source interface gigabitethernet 0/1 both
monitor session 1 source interface gigabitethernet 0/2 both
monitor session 1 source interface gigabitethernet 0/3 both
monitor session 1 source interface gigabitethernet 0/4 both
save
end
show monitor session 1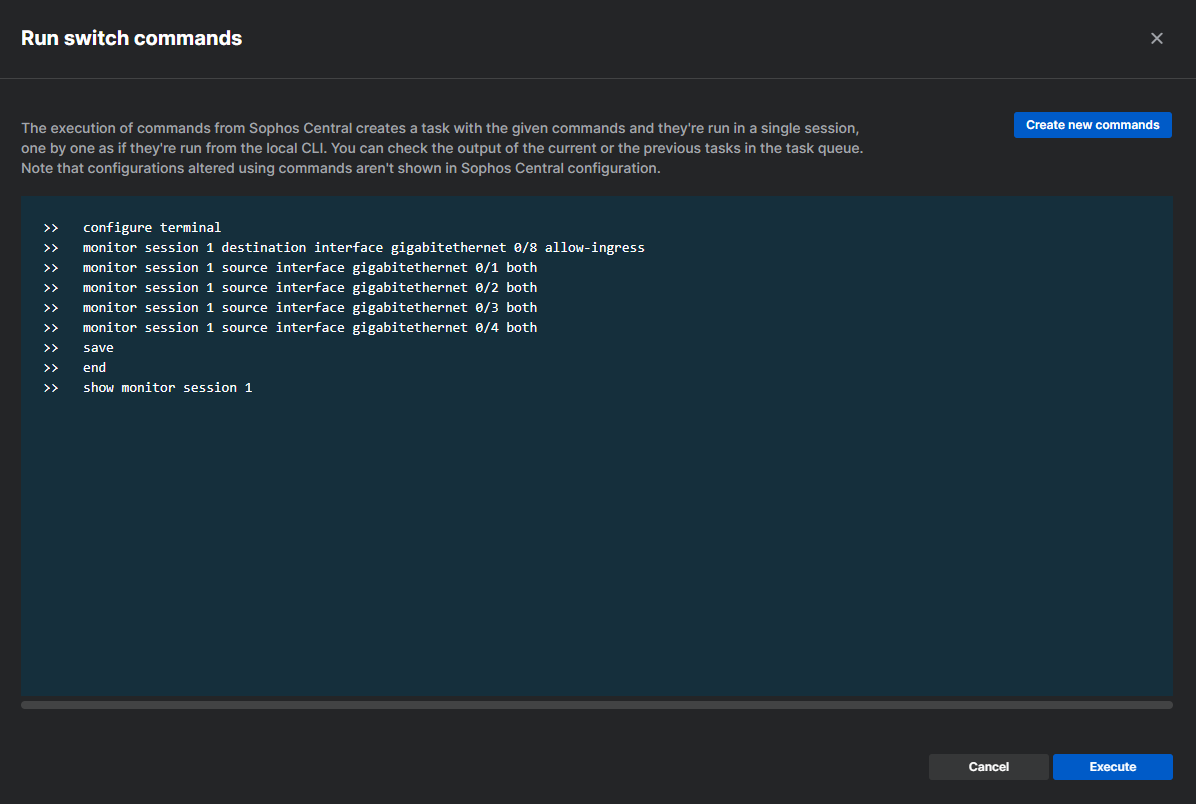
-
Click Execute.
-
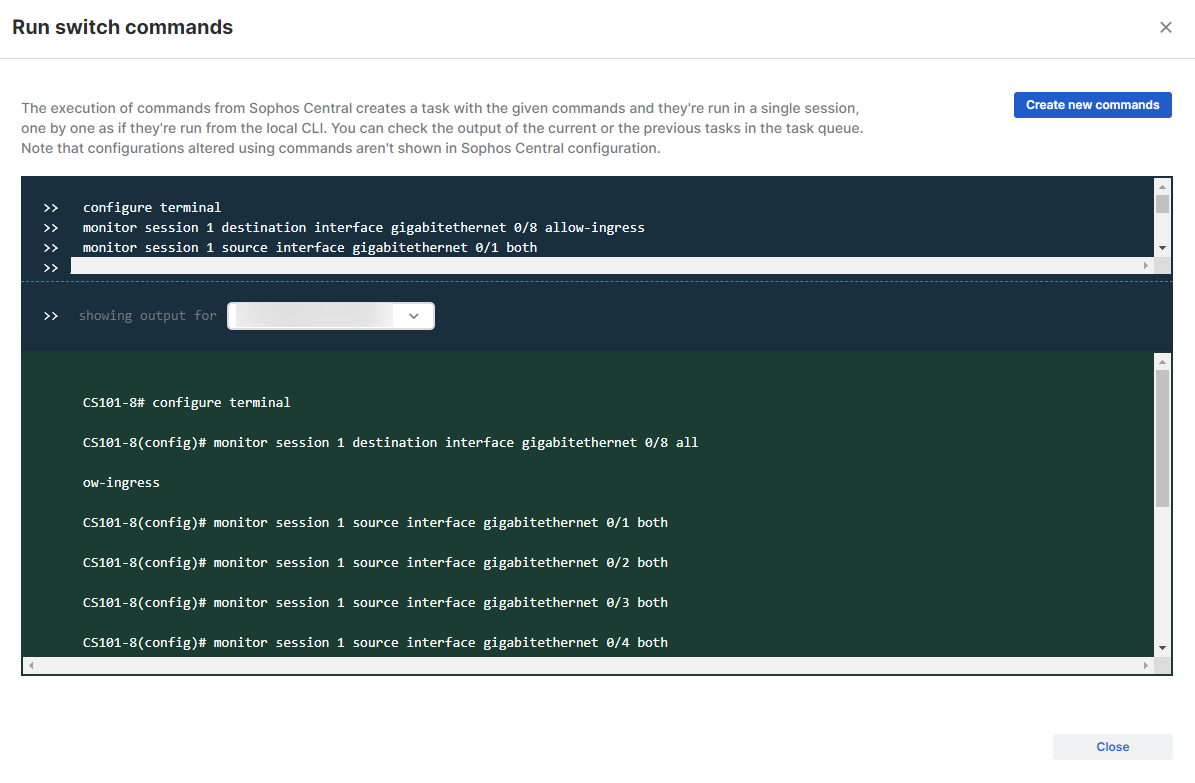
When the last command finishes, the completed configuration appears in the console. Click Close.
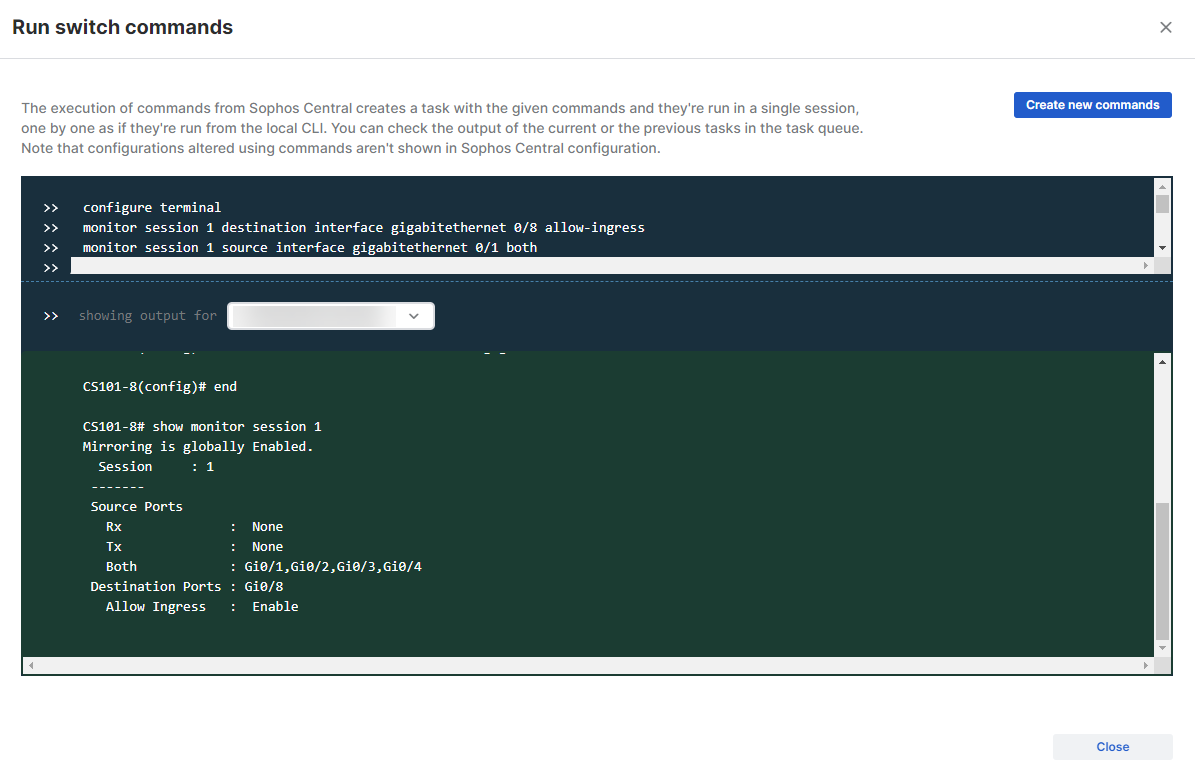
You've finished setting up forwarding of traffic to SPAN ports. Later you'll configure Sophos NDR to monitor that traffic.
Deploy the VM
Click the tab for your platform to see the instructions.
To create and deploy the VM in ESXi, do as follows:
- Sign in to the VMware ESXi Host Client.
- Select Virtual Machines and click Create/Register VM.
-
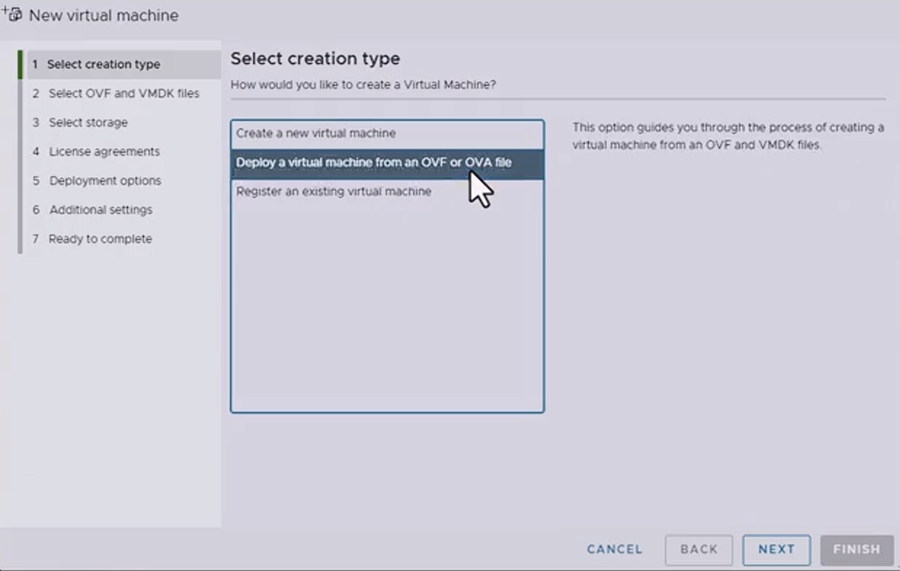
In Select creation type, select Deploy a virtual machine from an OVF or OVA file.
-
Click Next.
- In Select OVF and VMDK files, enter a VM name, and upload the OVA file you downloaded from Sophos Fusion.
- Click Next.
-
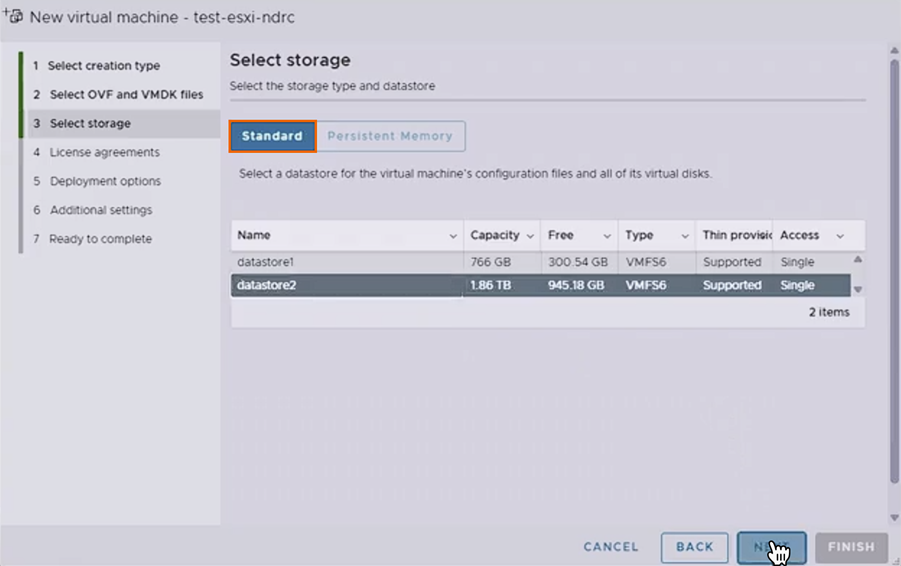
In Select storage, select Standard storage and then select the datastore where you want to put your VM.
-
Click Next.
-
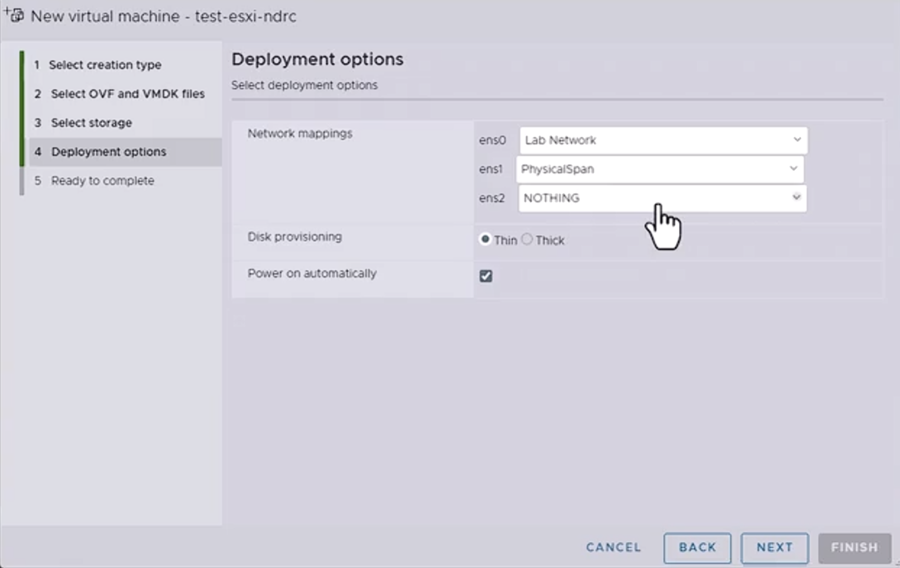
In Deployment options, enter settings as follows.
- ens0: Select a port group for your management network.
- ens1: Select a port group that will receive SPAN traffic.
- ens2: (Optional) Select a second port group that will receive SPAN traffic.
- Disk provisioning: Select Thin.
- Power on automatically: Leave unchecked if you need to make a configuration change after import before powering on.
-
Click Next.
Note
You may see the A required disk image was missing warning. You can ignore it.
-
Click Finish.
Wait for the new VM to appear in the VMs list. This can take a few minutes.
To create and deploy the VM in vSphere, do as follows:
- Sign in to vSphere Client.
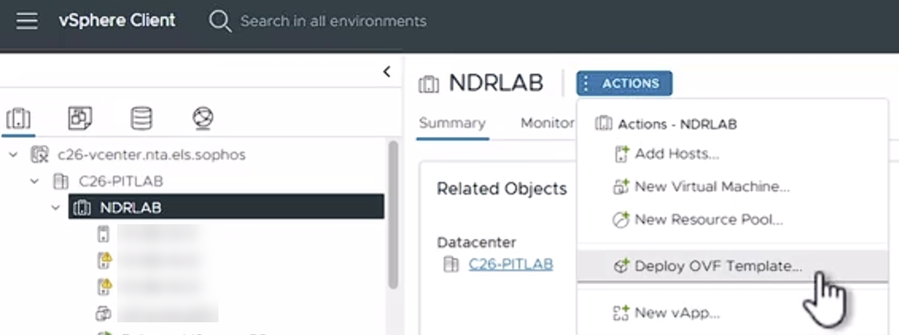
- Select the cluster where you want to install the VM.
- Click Actions next to the cluster name.
-
Select Deploy OVF Template.
-
In Select an OVF template, select Local file, and then upload the OVA file you downloaded from Sophos Fusion.
- Click Next.
- In Select a name and folder, enter a VM name and select a location.
- Click Next.
-
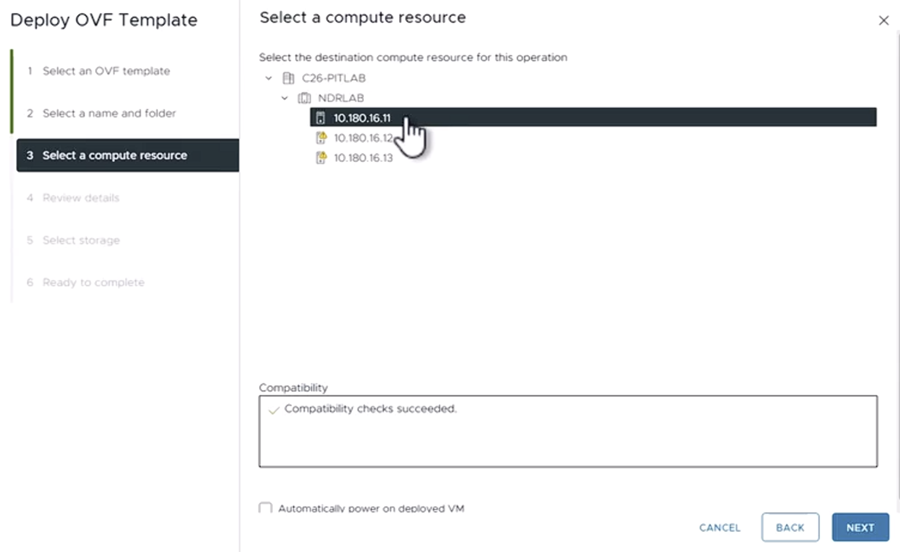
In Select a compute resource, select the host where you want to install the VM.
-
Click Next.
-
Review the details, then click Next.
Note
You may see the OVF package contains advanced configuration options warning. You can ignore it.
-
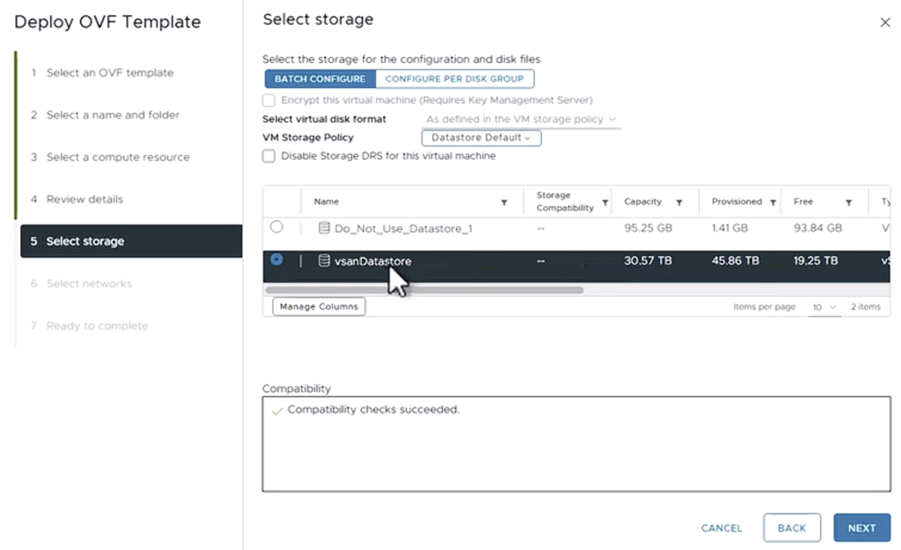
In Select storage, select the datastore for the configuration and disk files, then click Next.
-
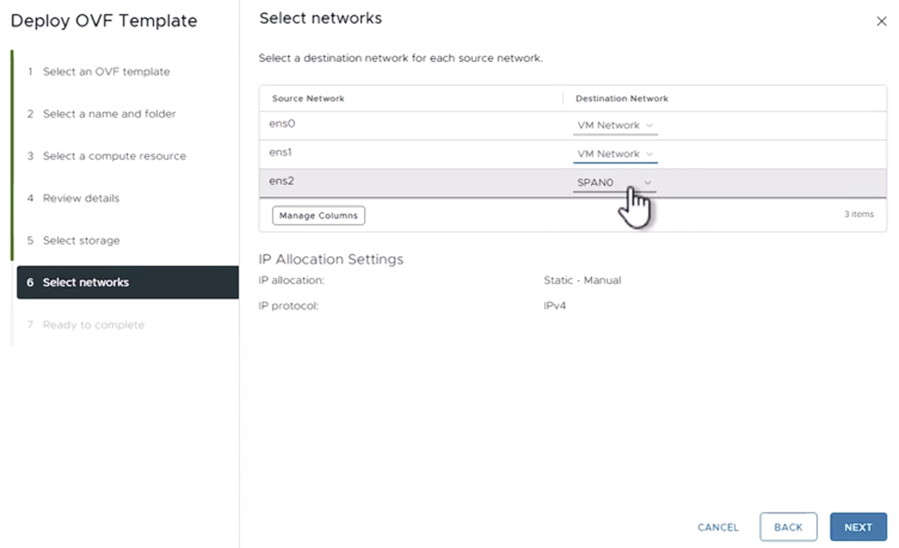
In Select networks, enter settings as follows.
- ens0: Select a port group for your management network.
- ens1: Select a port group that will receive SPAN traffic.
- ens2: (Optional) Select a second port group that will receive SPAN traffic.
-
Click Next.
- Review your selections, then click Finish.
Wait for the new VM to appear in the VMs list. This can take a few minutes.
Power on the VM
Click the tab for your platform below to see the instructions.
- Click the new VM in the list to open its details.
- Click Power on.
-
Click the console to open a browser console to the VM.
The NDR Installation OS starts automatically.
- Click the new VM in the list to open its details.
- Click the Play icon next to the VM name to power on the VM.
-
Click Launch Web Console.
The NDR Installation OS starts automatically.
Set up and register the VM
To set up and register the VM, do as follows:
-
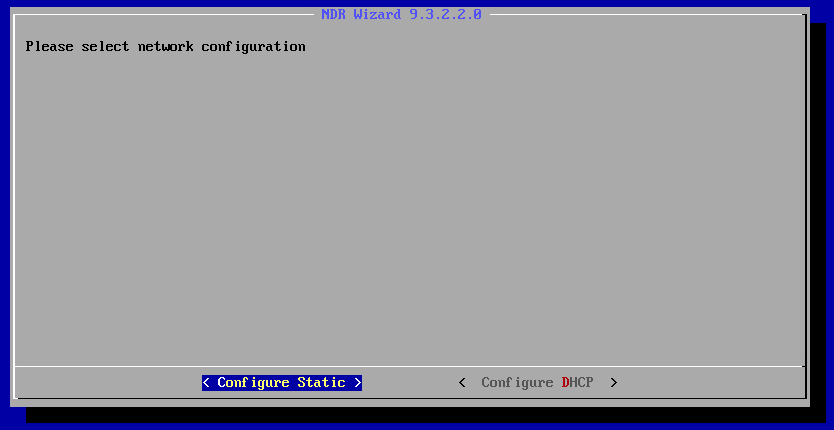
Select the network configuration you specified for the appliance in Sophos Fusion.
This setting doesn't carry over from Sophos Fusion.
- Configure Static: Enter your IP, netmask, and gateway information.
- Configure DHCP: DHCP assigns the IP address and gateway.
-
Enter the registration key you copied from Sophos Fusion.
The key is case-sensitive. Including the dashes in the key is optional.
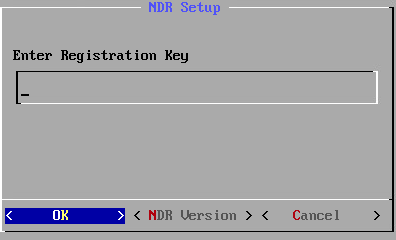
After the appliance accepts the key, it downloads and installs the latest image. This typically takes under 10 minutes but can take longer, depending on your internet speed.
The VM restarts when installation completes and the Sophos NDR OS starts automatically.
Verify status
To verify the appliance status, do as follows:
- In Sophos Fusion, refresh the appliance details page.
- Select the Summary tab and check that Registration status is Complete.
The Status in the header may show as Warning because the appliance hasn't sent health checks or other health data yet.
Health status and charts typically take about 30 minutes to update, but may take longer.