Classic iSensor virtual deployment guide
Classic Taegis NDR iSensor is being replaced by Sophos NDR.
For migration options, see Migrate to Sophos NDR.
The classic iSensor is installed on your network where it monitors all network traffic, leverages our latest threat intelligence to detect network-level threats, and sends detections to Sophos XDR when malicious traffic is detected.
The following features are supported:
- Inline and passive deep packet inspection
- Integration of Sophos Counter Threat Unit™ (CTU) threat intelligence
- Ability to block malicious traffic on the network
Data provided by this integration
Data provided by the classic iSensor gets normalized to the following schemas:
netflownids
For more information about using schemas in Data Lake Search, see Schemas.
Requirements
Review the following requirements prior to implementation.
Connectivity requirements
| Source | Destination | Port/Protocol |
|---|---|---|
| Classic iSensor (mgmt IP) | 206.55.100.0/22 216.9.204.0/22 208.89.40.0/21 | TCP/443 (unproxied) |
TCP/443 traffic must be excluded from any web content filtering devices. Without an exclusion, the TCP/443 traffic will be inspected and dropped by most web content filtering devices as malformed HTTPS traffic.
Deployment mode
Prior to deploying the virtual classic iSensor, an in-depth understanding of your virtual environment is required. You are responsible for configuring your virtual network so the classic iSensor may inspect network traffic. For example configurations, see Virtual classic iSensor deployment scenarios.
Maximum transmission unit (MTU)
Packets that will traverse the virtual classic iSensor should have an MTU of 1518 or less. Anything higher will lead to packet loss and have a negative impact on network connectivity.
System specifications
We provide a single base image for the virtual classic iSensor. Provided below are the default system specifications for the image.
| Item | Classic iSensor VM specifications |
|---|---|
| CPU | 8 cores |
| Memory | 16 GB |
| Storage | 60 GB |
| Inspection throughput | 1000 Mbps |
| Sockets | 1 |
| Cores per socket | 8 |
| Required features | x86 CPU, AVX + AVX2, 1G Hugepages, Virtualization Extensions in CPU Enabled |
Note
The system specifications may need adjustment from the default settings, depending on the amount of inspected network traffic and sensor performance, but must not be set below these minimum values.
Classic iSensor deployment considerations
During the registration of your classic iSensor, you must determine the implementation that best serves your organization. To aid in making these decisions, review the following options and determine what will be needed prior to the registration process.
Traffic processing mode
You can place your classic iSensor in one of these traffic processing modes:
- Inline-active mode (IPS): The recommended mode for your classic iSensor. All traffic passes through the classic iSensor with network traffic being blocked if determined to be malicious by the signature set.
- Inline-passive mode (IDS): All traffic passes through the classic iSensor and is inspected for alerting. The device will only alert to malicious traffic but won't block it. This is also known as inline-sniffing.
- Sniffer mode (IDS) (non-inline monitor): The network segments to be monitored are spanned to the classic iSensor for inspection, but no traffic is blocked.
Note
The virtual classic iSensor is dependent on the underlying physical network interface card to provide fail-open support for inline deployments. We strongly recommend using inline mode only when a fail-open card is present.
Home net
The home net is a network or list of networks that are important to you, and that you wish to protect with the classic iSensor. The classic iSensor uses the defined home net to determine the traffic that will be inspected. These networks are stored as a variable on the classic iSensor called the $HOME_NET. Specifying the correct home net is extremely important to ensure proper coverage of your network.
External net
The external net is the network you want to protect the home net from. There are two general options when setting the external net on the classic iSensor:
!$HOME_NETspecifies networks not defined by the homenet, which is the traditional configuration.Anyspecifies all networks.
If there is a large amount of home net to home net traffic being seen by the classic iSensor, the external net should be set to !$HOME_NET to reduce false positives.
Setting the external net to !$HOME_NET doesn't limit the visibility of lateral movement. The Sophos Counter Threat Unit™ (CTU) writes all of our signatures with directionality in mind. Signatures that are written for vulnerabilities that can be used for lateral movement are written to look for any to HOME_NET traffic.
Proxy servers
Proxy servers must be accounted for during the classic iSensor deployment. We must know if you have any proxy servers in the monitored environment, if they are transparent or active (clients are forced through the proxy via browser configuration) proxies, what port number the client browsers connect to the proxy on if active, and the IP address of the proxy.
HTTP ports
After you define any proxy servers, if any are active, record the port number used by clients when proxying through the active proxy in the HTTP ports setting. This is used to instruct the classic iSensor that HTTP traffic is expected on the specified ports and to apply all HTTP signatures to the traffic. If you don't have any proxy servers in your environment, but you have HTTP traffic traversing your network on a port other than the default ports, ensure they are added to the HTTP ports setting for proper traffic inspection.
The default HTTP ports variable is:
[80,81,88,311,383,591,593,901,1220,1414,1741,1830,2301,2381,2809,3037,3128,3702,4343,4848,5250,6988,7000,7001,7144,7145,7510,7777,7779,8000,8008,8014,8028,8080,8085,8088,8090,8118,8123,8180,8181,8243,8280,8300,8800,8888,8899,9000,9060,9080, 9090,9091,9443,9999,11371,34443,34444,41080,50002,55555]
Signature sets
There are three signature set policies you can use with your classic iSensor.
Balanced
The balanced policy offers a mix of increased security coverage while still aiming to provide minimal impact to legitimate traffic.
-
Traffic dropped by the balanced policy includes but isn't limited to:
- Malware seen within the current threat landscape.
- Traffic aimed at exploiting high-severity vulnerabilities in both widespread and lesser-used software.
-
Traffic that generates detections, but isn't dropped, includes but isn't limited to:
- Traffic commonly associated with reconnaissance attempts/the noise of the internet.
- Traffic that triggers lower fidelity signatures.
- Traffic related to questionable activities, such as torrent use.
Security
The security policy provides the highest security coverage feasible, while aiming to limit impact to legitimate enterprise traffic. The security policy leans towards stronger security over connectivity, thus it accepts a higher false positive rate in order to provide increased coverage.
Traffic dropped by the security policy includes but isn't limited to:
- Malware seen within the current threat landscape.
- Traffic aimed at exploiting vulnerabilities in both widespread and lesser-used software for high- and medium-severity vulnerabilities.
- Traffic commonly associated with reconnaissance attempts/the noise of the internet.
- Generic signatures to prevent common attacks, such as SQL injection and Cross-Site Scripting attacks.
- Traffic related to questionable activities, such as torrent use.
Connectivity
The connectivity policy protects against the most severe threats, which have the highest risk within an enterprise environment. It provides minimal impact to legitimate traffic.
-
Traffic dropped by the connectivity policy includes but isn't limited to the following examples:
- Malware seen within the current threat landscape.
- High threat exploit attempts against known vulnerabilities in widespread software or software actively being exploited in the wild.
-
Traffic that generates detections, but isn't dropped, includes but isn't limited to the following examples:
- Threats identified by signatures that protect against a variety of medium threat events in lesser-used applications.
Signatures that generate more noise are disabled by default.
Virtual classic iSensor deployment scenarios
Prior to deploying the virtual classic iSensor, an in-depth understanding of your virtual environment is required. You are responsible for configuring your virtual network so the classic iSensor may inspect network traffic.
The following scenarios provide examples of possible deployments.
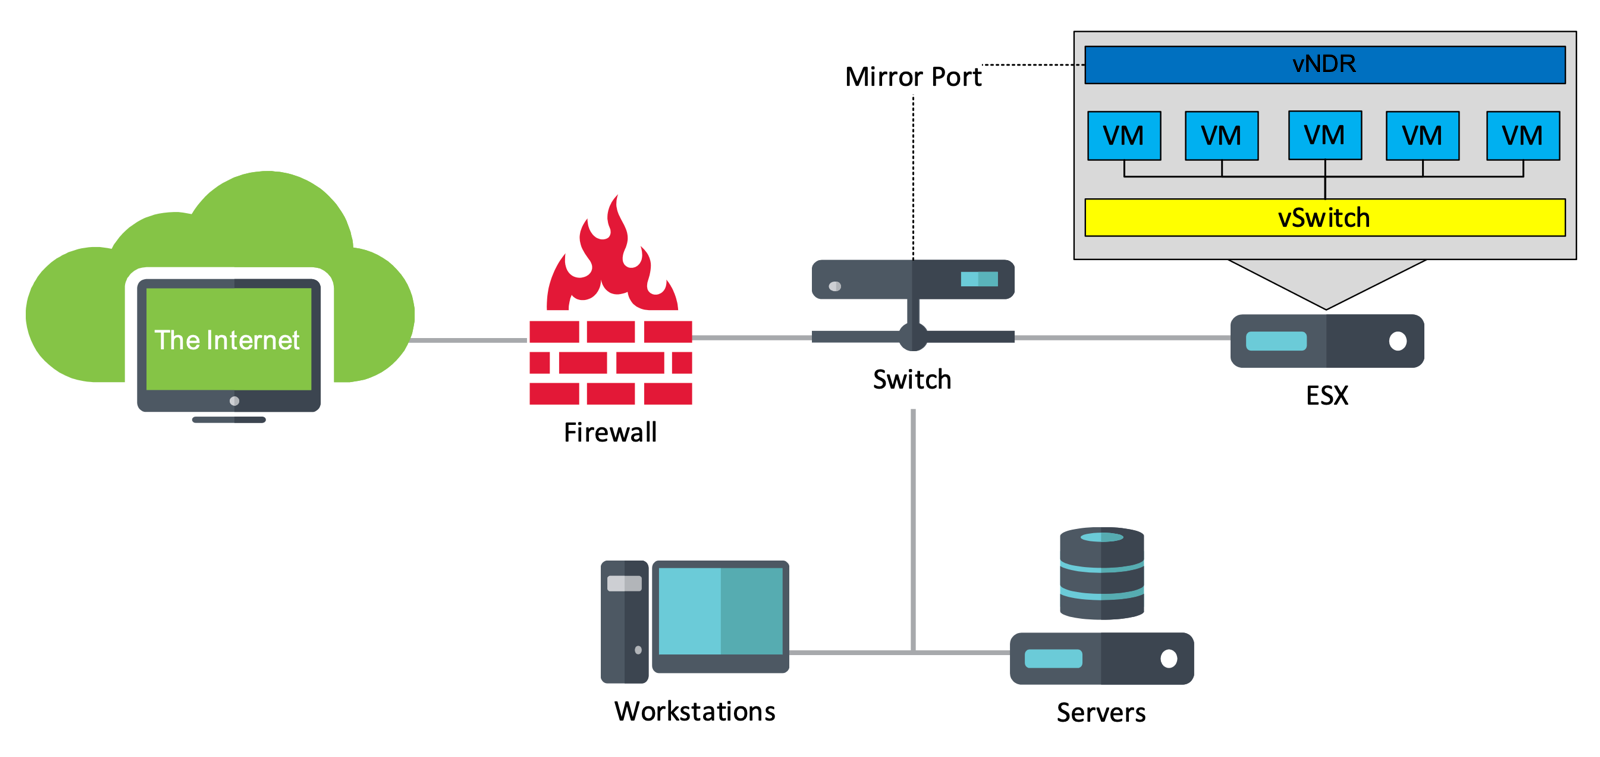
Sniffer: internal network traffic
This deployment example mimics a physical IDS sniffer deployment. An unused interface on the physical VMware chassis is required for this deployment example.
The virtual classic iSensor contains at least two virtual interfaces:
- Management traffic
-
Network monitoring traffic:
- A mirror port is configured on a core switch, which is then directly connected to a physical VMware interface.
- A virtual switch is created for the mirror port, with promiscuous traffic enabled.
- The virtual classic iSensor has a network monitoring interface configured to use the virtual switch containing the mirror port traffic.
Sniffer: virtual traffic only
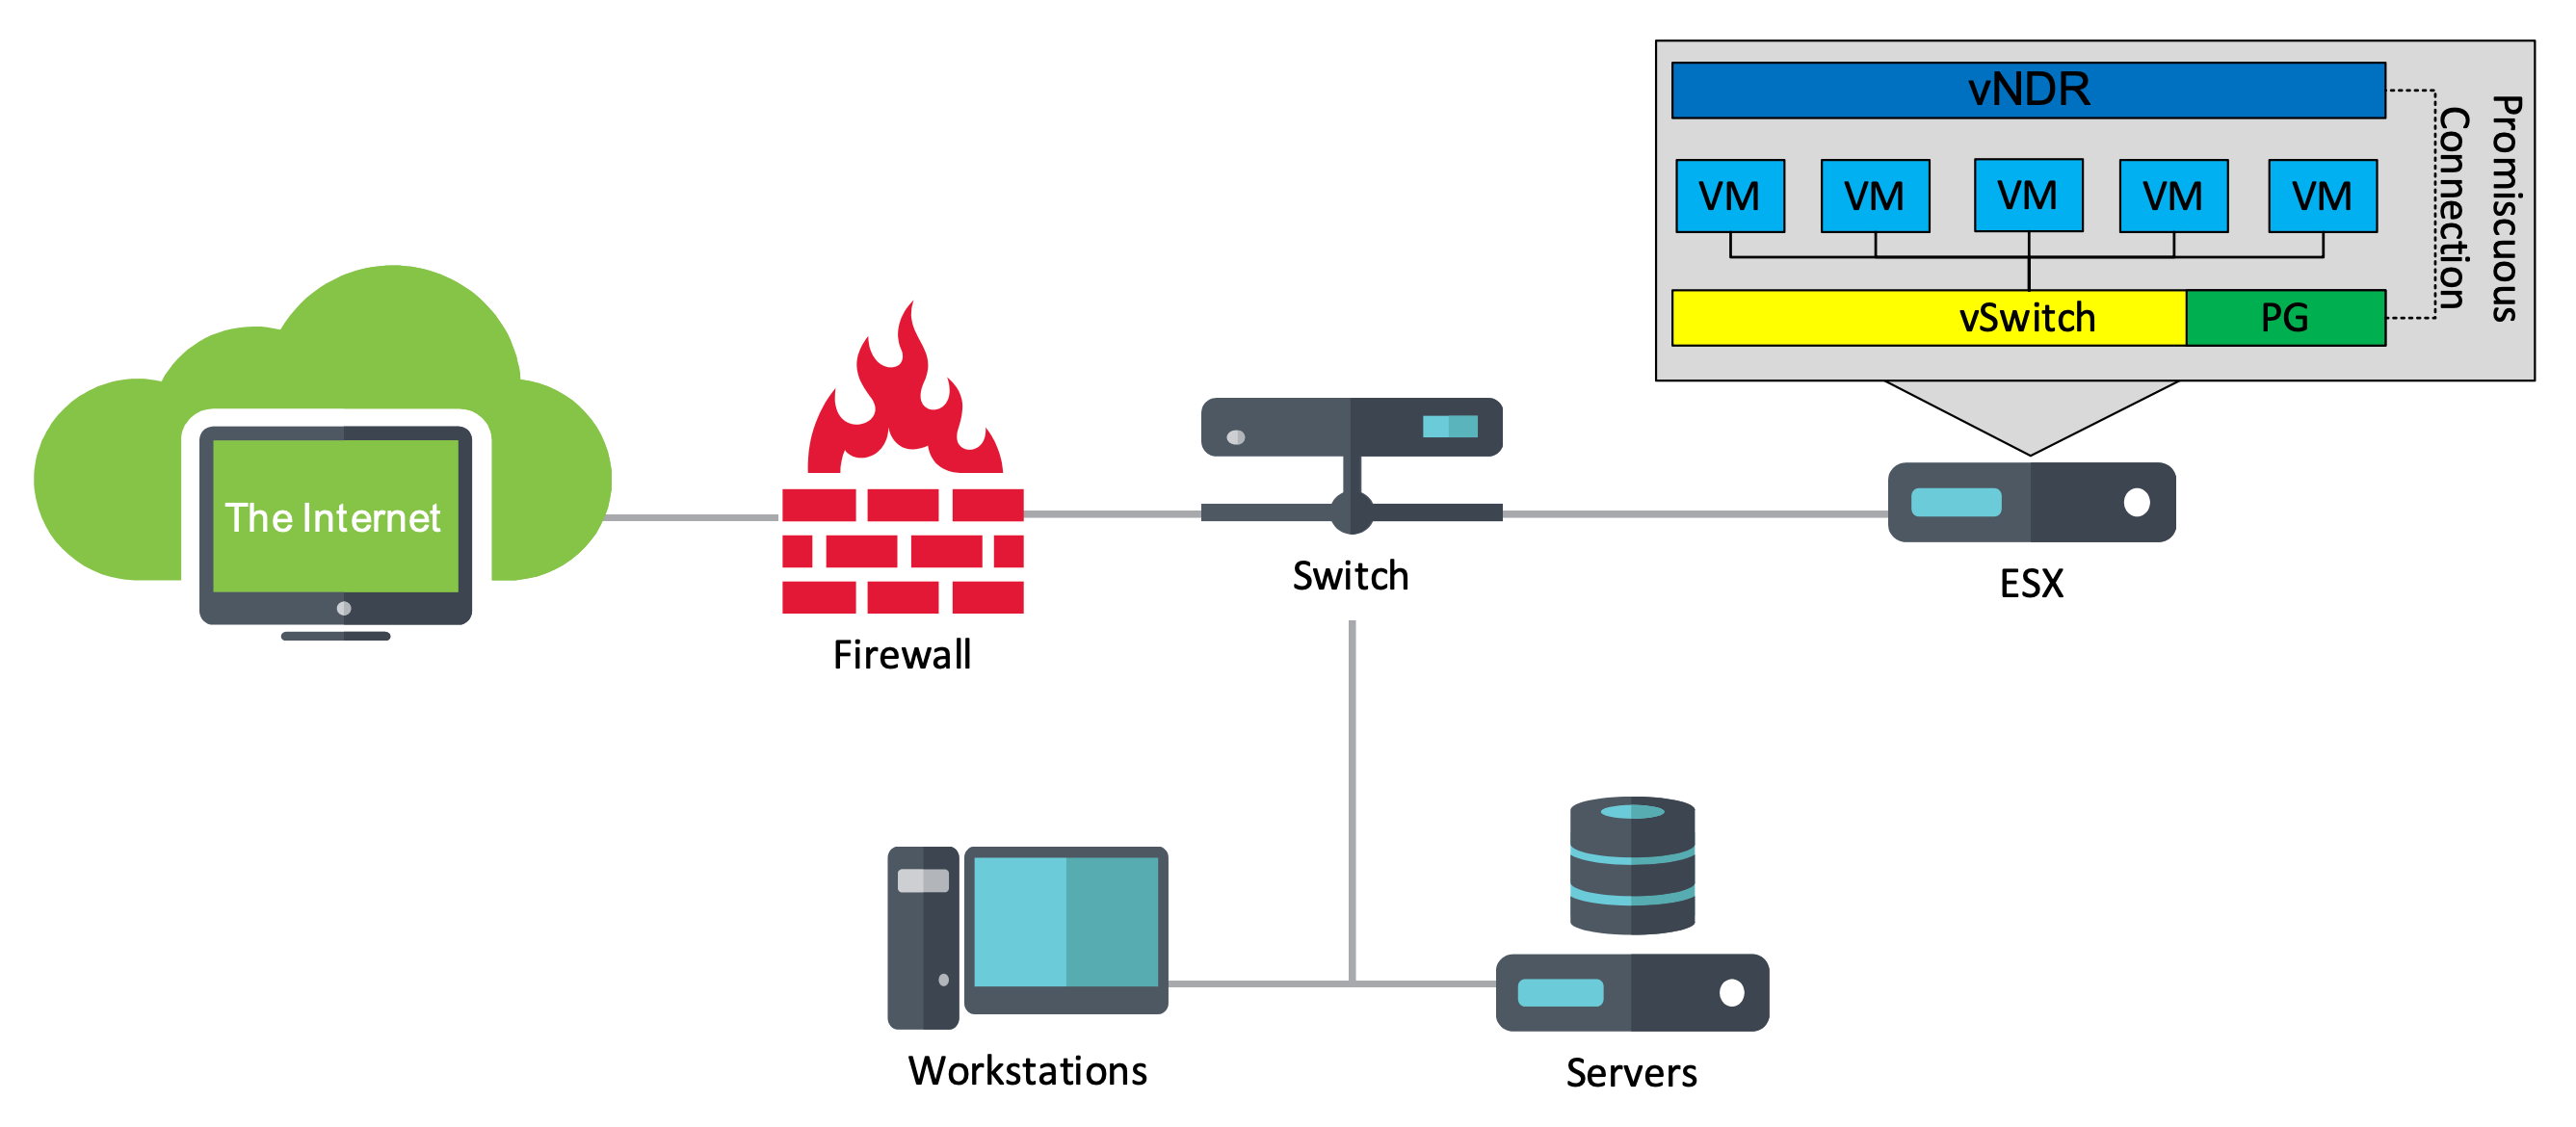
This deployment example provides a passive method for the virtual classic iSensor to inspect the virtual hosts residing within the ESXi server.
The virtual classic iSensor contains at least two virtual interfaces:
- Management traffic
-
Network monitoring traffic:
- Connected to a port group (with promiscuous mode enabled) that is part of the virtual switch the monitored virtual machines use for network communication.
- Depending on the amount of virtual switches, additional virtual network monitoring interfaces may be required on the virtual classic iSensor.
Inline: virtual traffic only, virtualized interfaces
Note
This virtual classic iSensor deployment won't fail-open. If the classic iSensor is restarted or is offline, network traffic will be interrupted.
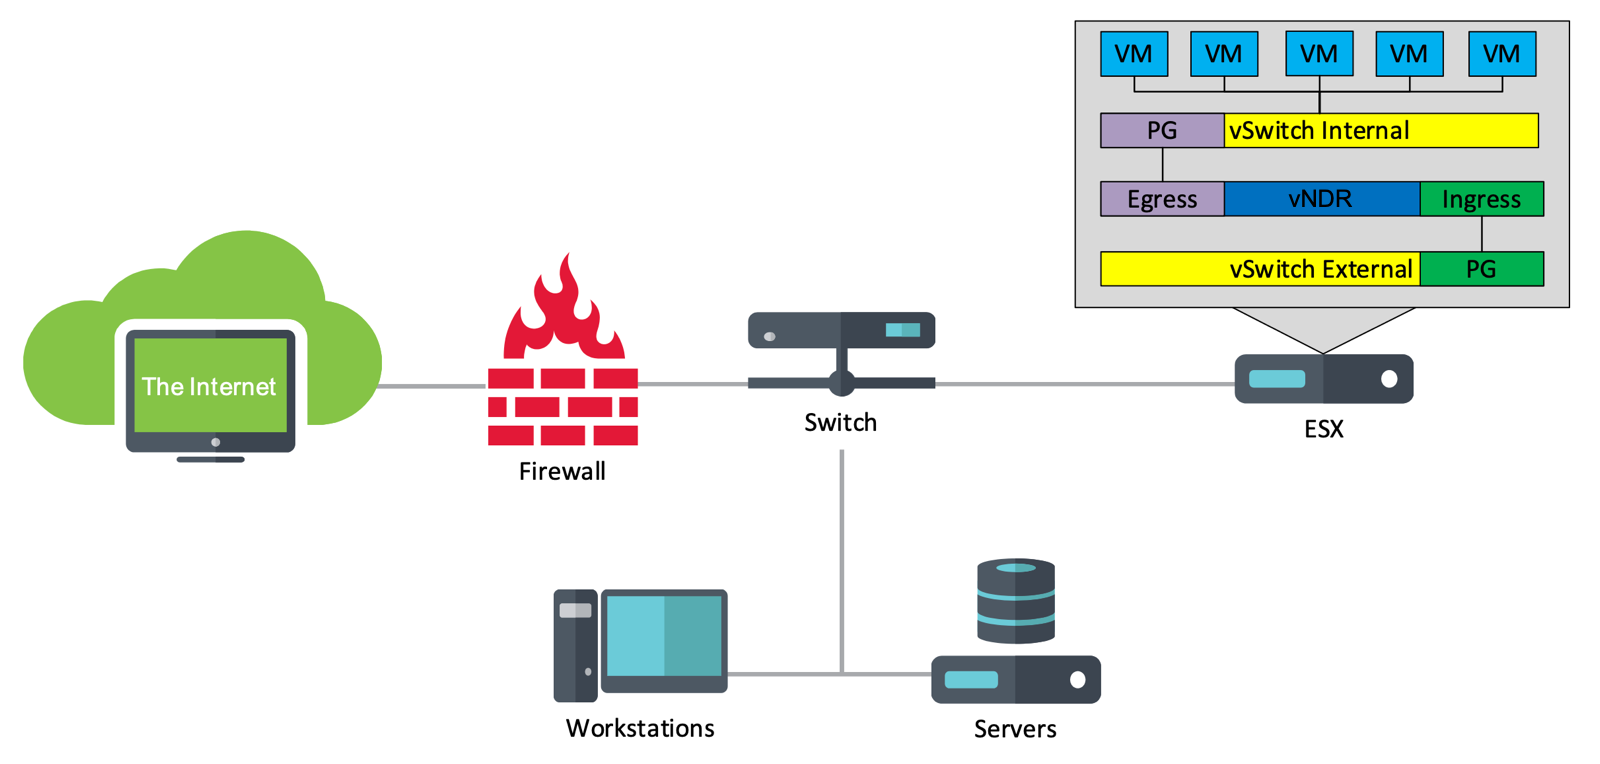
This deployment example provides an inline method for the virtual classic iSensor to inspect the virtual hosts residing within the ESXi server. The virtual classic iSensor contains at least three virtual interfaces:
- Management traffic
-
Network monitoring traffic:
-
Two interfaces make up a bridge: one interface for ingress traffic and one interface for egress traffic. Each port group used for inline monitoring must have promiscuous mode enabled.
- In the example below, the ingress interface is bound to Virtual Switch 2 / Port Group Internal.
- In the example below, the egress interface is bound to Virtual Switch 1 / Port Group External.
-
Depending on the amount of virtual switches, additional virtual network monitoring interfaces may be required on the virtual classic iSensor.
-
Download virtual classic iSensor
To download the virtual classic iSensor image, do as follows.
- In Sophos Fusion, go to My Products > NDR > NDR Appliances.
- Click the virtual classic iSensor you want to deploy.
- In the Summary tab, click Actions and select Downloads.
- Note the registration code. You'll need this during device registration.
- Click the checkbox to acknowledge you have read and agree to the information presented.
- Click Download VMWare or Download HyperV.
When the download completes, proceed to the next section.
Deploy virtual classic iSensor
This deployment example uses an ESXi server. The virtual classic iSensor will be deployed in sniffer mode with one passive monitoring interface.
Note
ESXi v7.0 and later are preferred and are the official supported versions.
-
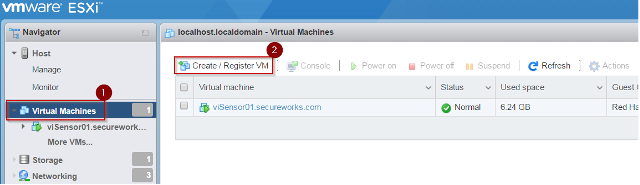
Select Virtual Machines from the Navigator and then select Create / Register VM.
-
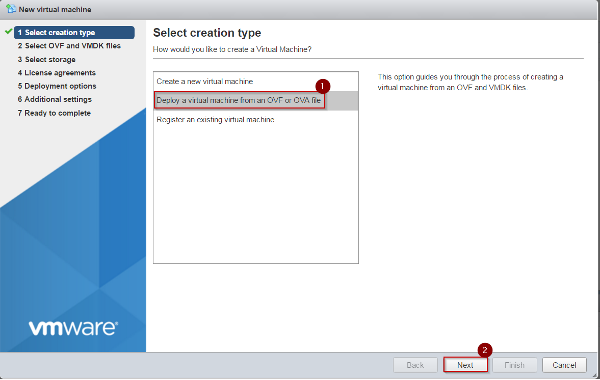
Select Deploy a virtual machine from an OVF or OVA file and select Next.
-
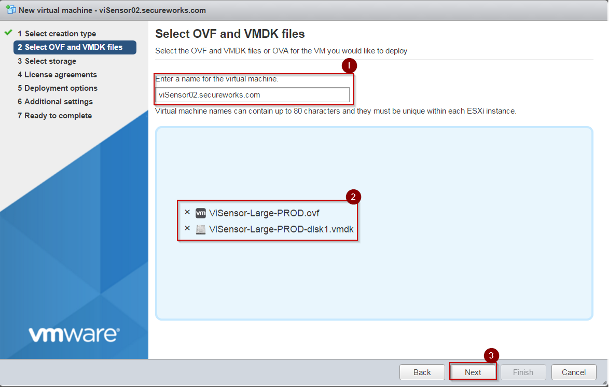
Enter a name for the virtual machine, add the virtual classic iSensor's OVF and VMDK files, then select Next.
-
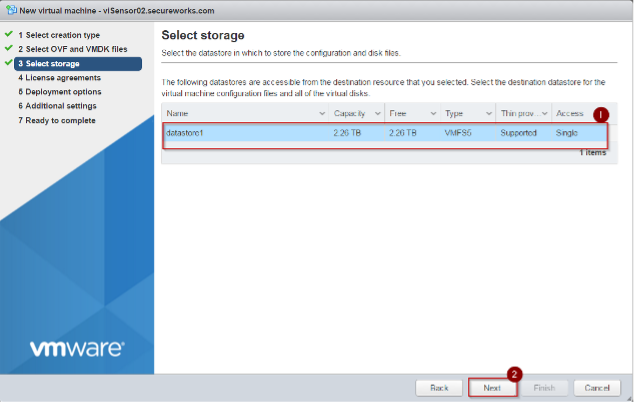
Select the appropriate storage location for the virtual classic iSensor, then select Next.
-
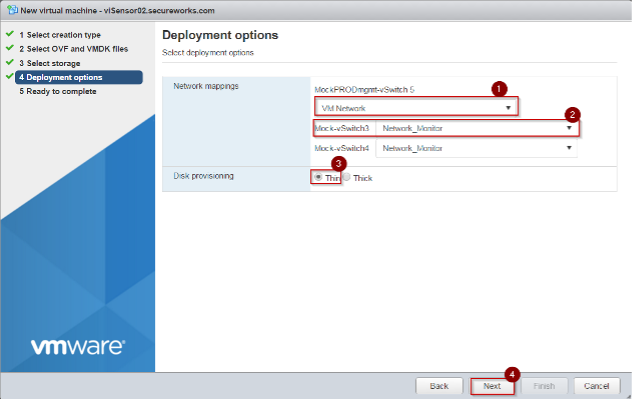
Define the virtual classic iSensor's network mappings:
- Select the appropriate Management Network. In the example below, VM Network is the management network.
- Select the appropriate Network Monitoring networks. In the example below, Network_Monitor is reserved for network monitoring.
- Select Thin or Thick provisioning. Secureworks recommends Thin provisioning.
-
Select Next after the deployment options are complete.
- Review the summary and select Finish when you have confirmed everything is correct.
- ESXi then starts the virtual machine creation process, which involves uploading the OVF and VMDK files and may take some time to complete.
-
Confirm the virtual device has one socket:
- In vSphere, edit the Device Settings.
- Open the CPU under Virtual Hardware.
- Set the number of Cores per Socket to equal the number of CPUs.
- Sockets then show 1.
Registration preparation
Before you begin the installation of your virtual classic iSensor, prepare the following important pieces of information that you will be prompted for during the installation process:
- Device hostname
- Classic iSensor registration key: The key you got in Sophos Fusion.
- Classic iSensor mode that you wish to use: At this time, you should have already worked with a Sophos representative to identify the best solution for you. You must select one of the three modes during the installation process.
- IP address to assign to your classic iSensor: If you plan to use a static IP for your classic iSensor, have your IP address, network mask, and gateway address ready for entry during the installation process. These values should have been provisioned by your network team for use by the classic iSensor.
Configuration and registration
To begin installation of your virtual classic iSensor, do as follows:
- Power on the classic iSensor virtual machine.
- Navigate to the virtual classic iSensor Console. The classic iSensor Configuration Wizard displays.
- At the initial screen, the classic iSensor automatically attempts to detect if the management port is connected. If No interface detected shows, verify the management interface cable is connected and fully seated. Once done, select Yes to retry the interface detection.
- On the next prompt, select Configure Static and then enter your IP, netmask, and gateway information.
- The classic iSensor attempts to ping its gateway to verify the information is valid. If a ping failure is expected, select Ignore to continue with the registration process.
- Confirm the network configuration by selecting the Use option.
- After you confirm the network configuration, select the classic iSensor mode for your device and then select OK to continue.
-
Enter the registration key you noted in Sophos Fusion. See the following note to download a specific classic iSensor version, if required. Otherwise, select OK.
(Optional) Specify iSensor version.
If your compliance framework requires your classic iSensor version to be controlled, you may select a specific classic iSensor version to download.
After you've entered your registration key, select Classic iSensor Version, enter your desired classic iSensor version, and select OK.
-
If you didn't select the option to enter a specific classic iSensor version, select whether to disable automatic software updates. These updates include minor OS patches that won't disrupt inspection or network connection(s). We recommend you select No to enable updates.
-
The classic iSensor now downloads software and configures itself.
You have now successfully registered and configured your virtual classic iSensor.
Network reconfiguration
Use the classic iSensor CLI to modify the network configuration when working with support.
Warning
This command should only be used while working with support to change the network configuration of the classic iSensor. Changes made locally have direct impact on the monitoring and management of the device and could lead to a service outage if not directed by a member of support.
Do as follows:
-
From the console of the classic iSensor, connect a monitor and keyboard to the system.
If there is no output present, select Enter to wake the console.
-
Use the
setcommand with the following options to make changes to your network configuration:set dhcp [enable|disable]set gateway <ip>set ip <ipv4> <netmask> <gateway>set netmode [passive|ips|monitor]
Hyper-V deployment guidance
You can deploy the virtual classic iSensor on Microsoft Hyper-V as well as VMware. For Hyper-V deployments, configure three external virtual switches to provide the management and traffic inspection network connectivity the device requires. The step-by-step instructions below guide you through setting up three external virtual switches in the Hyper-V Manager.
Configure Hyper-V virtual switches
To create the required external virtual switches in Hyper-V, do as follows:
- Open Hyper-V Manager on your host system.
- In the Actions pane, select Virtual Switch Manager.
-
For each of these network interfaces, create the following new external virtual switches:
- Management: Handles device management and registration.
- Capture 1: Serves as the first network monitoring (capture) interface.
- Capture 2: Serves as the second network monitoring (capture) interface. For inline deployments, this is typically the egress interface.
For each switch, do as follows:
- Select New virtual network switch > External > Create Virtual Switch.
- Enter a descriptive name, such as NDR Management, NDR Capture 1, and NDR Capture 2.
- Select the correct physical network adapter for the switch.
- Check Allow management operating system to share this network adapter for only the management switch.
- Click OK to create the switch.
-
When you create the classic iSensor virtual machine, assign its three network adapters to the corresponding virtual switches:
- Adapter 1: Management
- Adapter 2: Capture 1
- Adapter 3: Capture 2
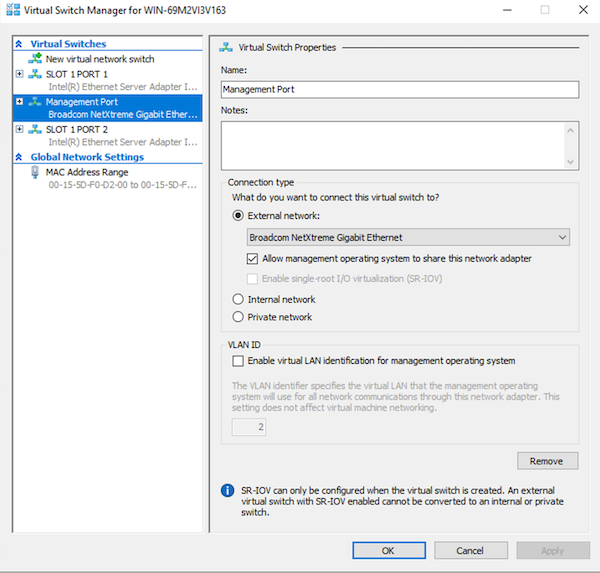
This setup ensures the virtual classic iSensor can communicate for management purposes and monitor or bridge network traffic as your deployment scenario requires.
For more details on creating and managing virtual switches, see Microsoft own documentation: Create and configure a virtual switch with Hyper-V.
Note
Hyper-V doesn't allow for inline deployments. Capture 1 and Capture 2 for Hyper-V allow for two sources of sniffer input.
Use the deployment PowerShell script
To deploy the virtual classic iSensor on Hyper-V using the provided PowerShell script, do as follows:
- Unzip the deployment package you downloaded from Sophos Fusion, for example,
taegis-ndr-hyperv-9.2.2.2.zip. - Open PowerShell as an Administrator on your Hyper-V host.
-
Change to the directory where you extracted the deployment files:
cd .\taegis-hyperv-prod-9.2.2.2 -
Run the setup script:
.\isensor-hyperv-setup.ps1 -
Respond to the script prompts by providing the switch names and network assignments you defined in the preceding section:
-
Assign the three external virtual switches:
- Management: Device management and registration.
- Capture 1: First network monitoring (capture) interface.
- Capture 2: Second network monitoring (capture) interface, typically the egress interface for inline deployments.
-
Enter the same switch names you used when creating the switches, such as
NDR Management,NDR Capture 1, andNDR Capture 2.
-
-
After the script completes, you can start and provision your classic iSensor on Hyper-V. See Configuration and registration.
Registration error codes
The following error codes may be seen during configuration or registration. Review the description for details.
| Error code | Description |
|---|---|
| 20 | User cancelled the process of setting the network configuration. |
| 21 | User cancelled the process of selecting the classic iSensor mode. |
| 22 | User cancelled the process of setting up a registration key. |
| 23 | The policy obtained isn't a valid XML file. |
| 24 | The policy contains an empty VPN password field. |
| 25 | VPN connection failed - user decides not to retry. |
| 26 | Unable to retrieve RCMS certificates. |
| 27 | Certificate tar file missing /var/mqm/ssl/Key.sth file. |
| 28 | CIP server information is missing from the policy (Certinit.config). |
| 29 | Unable to obtain UIN - Server provided an invalid response. |
| 30 | Unable to obtain UIN - Server provided no response. |
| 31 | Imagetools configuration is missing the classic iSensor Version. |
| 32 | Image MD5Sum didn't match what the server MD5Sum. |
| 33 | Image installation failed (instimage.barebone). |