Deploy a physical Sophos NDR appliance
Claim and configure a physical Sophos NDR appliance in Sophos Fusion after you complete its initial hardware setup. The zero-touch process then registers the appliance with Sophos Fusion.
Requirements
You must have an active Sophos NDR product license. For IDS/IPS capabilities, you must also have the appliance-level IDS/IPS license.
Before you start, you must do as follows:
- Install the Sophos NDR physical appliance in the rack.
- Connect the power cable.
- Connect the MGMT port to your management network.
- Power on the appliance and complete the local setup assistant.
- Power off the appliance. You'll turn it on after you configure it in Sophos Fusion.
For these initial setup steps, see the quick start guide supplied with the appliance. For a condensed version of the NDR 5500 guide, see NDR 5500 quick start guide.
Note
Don't connect the appliance to monitored network traffic yet. You'll connect the capture ports after you claim, configure, and register the appliance in Sophos Fusion.
Claim appliance
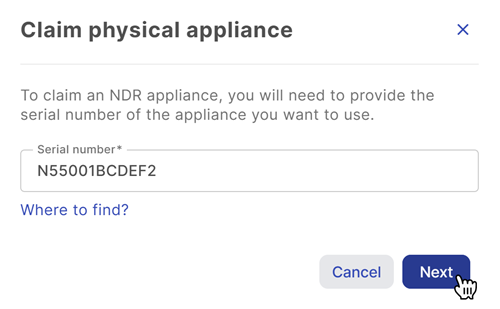
To claim an appliance in Sophos Fusion, you need its serial number. You can find this on a sticker on the appliance.
To claim the appliance, do as follows:
- Sign in to Sophos Fusion as an Admin or Super Admin.
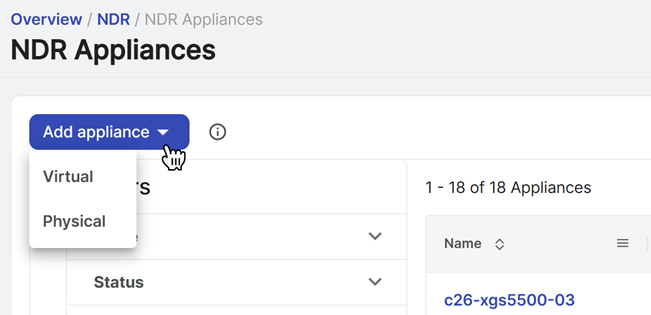
- Go to My Products > NDR > NDR Appliances.
-
Click Add appliance.
-
Select Physical.
-
Enter the serial number.
-
Click Next.
Add appliance
To configure and add the appliance, do as follows:
-
Select a Mode. See Mode.
NDR mode is available to all customers. Additional IDS and IPS modes require an appliance-level IDS/IPS license.
-
Enter a hostname for the appliance.
- If you selected a mode that includes IDS or IPS, select the rule set you want from the Rule set subscription type menu. For more information about each rule set, see Appliance rule set.
-
Specify the Management/EXTP port setting:
-
Select DHCP to assign the IP address automatically.
Note
If you select DHCP, you must reserve the IP address.
-
Select Manual to specify network settings.
Example
- IP address:
192.168.12.25 -
Subnet mask:
192.168.12.0/24You must enter the subnet mask in IPv4 CIDR notation.
-
Gateway:
192.168.12.1
- IP address:
Note
Only IPv4 is supported.
-
-
In Home net, enter the IP addresses or ranges that determine which traffic Sophos NDR inspects. For details, see Home net.
You can add a single IP address or a range of addresses defined in CIDR notation, such as
192.168.0.0/16. After you enter an address or range, click Add and then repeat as needed.Tip
To include private IPv4 address ranges in the "home network" setting, add these ranges:
10.0.0.0/8172.16.0.0/12192.168.0.0/16
-
Verify that all settings are correct, then click Save.
The new appliance is added to the NDR Appliances page.
Verify and register appliance
To verify the appliance settings and register the appliance, do as follows:
- Go to My Products > NDR > NDR Appliances.
- Click the name of the appliance you just added.
-
Verify the appliance details, settings, and licenses as follows:
- Review the device details above the tabs.
- Click the Summary tab and review the appliance settings.
- Click the Licenses tab and review the licenses attached to the appliance.
-
Turn on the appliance to start registration.
- Wait for the LCD panel to indicate that registration is successful.
- Refresh the Appliance Details page in Sophos Fusion and check that Registration status is Complete.
After registration completes, the appliance status can take up to 30 minutes to change to Healthy. Health information and charts can also take up to 30 minutes to show data.
Connect monitored traffic
Connect the monitored network traffic to the appropriate capture ports for your selected appliance mode. For NDR 5500 port wiring guidance, see Port wiring.