Add certificate
You can upload external certificates and generate locally-signed certificates and certificate signing requests (CSR) on Sophos Firewall.
Warning
We recommend setting the firewall clock to the predefined NTP server or custom NTP servers in your network. NTP servers use Coordinated Universal Time (UTC), which certificate authorities use. See Time.
Manually setting the firewall clock can result in inaccurate date and time, which can cause failures in importing certificates.
To upload an externally generated certificate to the firewall, do as follows.
- Go to Certificates > Certificates and click Add.
- Enter a name.
-
Select the Certificate file format from the following options:
- PEM (.pem): Base64 encoded form of DER certificate. Certificate and private key are stored in different files.
- DER (.der): Binary form of PEM certificate used on the Java platform. Certificate and private key are stored in different files.
- CER (.cer): Binary form. Contains certificate owner information and the public key.
- PKCS7 (.p7b): ASCII code. Contains certificates but not the private key.
- PKCS12 (.pfx or .p12): Binary form used on Windows platforms. Stores the private key with the public key.
-
Click Browse and upload the Certificate.
-
Click Browse and upload the Private key.
You can add RSA and ECC keys.
-
Enter the passphrase or preshared key if the private key has one.
- Click Save.
To generate a certificate signed by the firewall's Default CA, do as follows:
- Go to Certificates > Certificates and click Add.
-
For Action, select Generate locally-signed certificate.

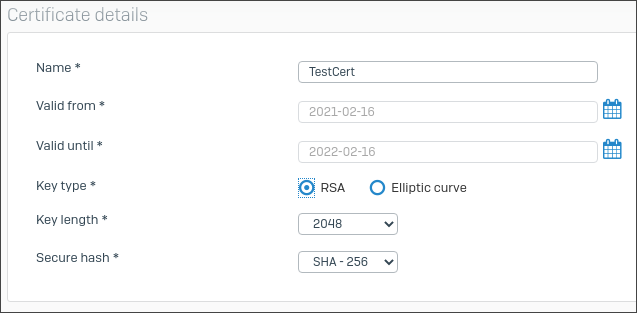
Certificate details
- Enter a name.
-
To set the validity period for the certificate, click the calendars and select the Valid from and Valid until dates.
Default: One year
-
For Key type, select one of the following:
- RSA
- Elliptic curve
-
Select the Key length (for RSA) or Curve name (Elliptic curve).
Larger RSA keys offer greater security but take longer to encrypt and decrypt data.
-
Select a Secure hash algorithm.
Here's an example. You must enter your domain's details.
Subject name attributes
You must enter a common name. The firewall automatically fills all other fields with the details from your license. You can change these if you want.
- Country name: Enter the country in which the firewall is deployed.
- State: Enter the state or region.
- Locality name: Enter the city.
- Organization name: Enter the certificate owner's name (example:
Sophos Group). - Organization unit name: Enter the department to which you'll assign the certificate (example:
Marketing). - Common name: Enter the hostname or FQDN (example:
marketing.sophos.com). -
Enter the contact person's email address.
Here's an example:
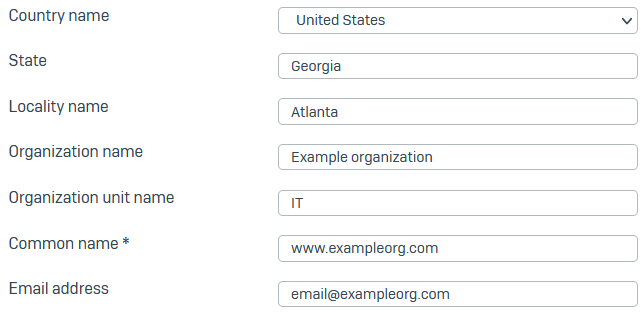
The distinguished name shows the certificate's configured details and is dynamically updated when you make changes.
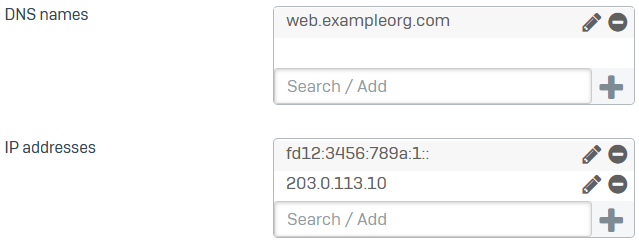
Subject Alternative Names (SAN)
SANs define the DNS names and IP addresses the certificate secures.
Note
You must enter at least one SAN or a certificate ID.
-
Enter a DNS name, IPv4, or IPv6 address, and click
 .
.Here's an example:
-
(Optional) If you're generating a certificate to use with earlier versions of SFOS, do as follows:
- Click Advanced settings.
-
For Certificate ID, select from the following options and enter the ID:
- DNS: Enter a domain name. The name must resolve to the IP address in the DNS records.
- IP address: Enter a public IP address that you own.
- Email: Enter the contact person's email address.
- DER ASN1 DN [X.509]: Use this if you specify a digital certificate to secure an object.
-
Click Save.
You can generate a certificate signing request (CSR). An external CA can issue a certificate or a subordinate CA based on the CSR.
- Go to Certificates > Certificates and click Add.
-
For Action, select Generate certificate signing request (CSR).

Certificate details
- Enter a name.
-
For Key type, select one of the following:
- RSA
- Elliptic curve
-
Select the Key length (for RSA) or Curve name (Elliptic curve).
Larger RSA keys offer greater security but take longer to encrypt and decrypt data.
-
Select a Secure hash algorithm.
Here's an example. You must enter your domain's details.
Subject name attributes
You must enter a common name. The firewall automatically fills all other fields with the details from your license. You can change these if you want.
- Country name: Enter the country in which the firewall is deployed.
- State: Enter the state or region.
- Locality name: Enter the city.
- Organization name: Enter the certificate owner's name (example:
Sophos Group) - Organization unit name: Enter the name of the department to which you'll assign the certificate (example:
Marketing). - Common name: Enter the hostname or FQDN (example:
marketing.sophos.com). -
Enter the contact person's email address.
Here's an example:
The distinguished name shows the certificate's configured details and is dynamically updated when you make changes.
Subject Alternative Names (SAN)
You must enter at least one SAN or a certificate ID.
-
Enter a DNS name, IPv4, or IPv6 address, and click
.Subject alternative names (SANs) define the DNS names and IP addresses the certificate secures.
Here's an example. You must enter your domain's details.
-
(Optional) If you're generating a certificate to use with earlier versions of SFOS, do as follows:
- Click Advanced settings.
-
For Certificate ID, select from the following options and enter the ID:
- DNS: Enter a domain name. The name must resolve to the IP address in the DNS records.
- IP address: A public IP address that you own.
- Email: Contact person's email address.
- DER ASN1 DN [X.509]: Use this if you specify a digital certificate to secure an object.
-
Click Save.
The CSR is added to the certificates list.
Copy or download CSR
-
On the certificates list, click
 for the CSR.
A dialog box shows the certificate signing request.
-
Copy or download the CSR (
.csrfile).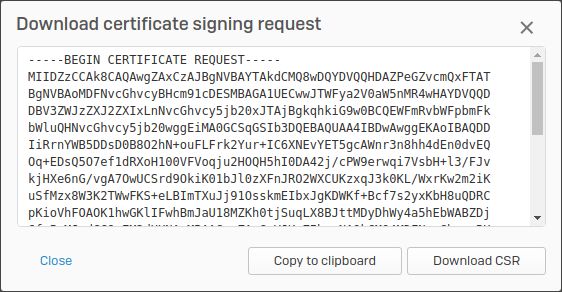
Next steps
- Use the copied or downloaded CSR to get a signed certificate or subordinate CA from a root CA. See Add subordinate and root CAs for TLS traffic.
- Import it to the firewall. See Import a certificate.