Deploy the firewall in discover or TAP mode
When you deploy the firewall in discover or TAP mode, you can monitor network traffic without making any changes to your network schema.
Introduction
You want to deploy the firewall in discover mode using a TAP interface and schedule a security audit report (SAR) email.
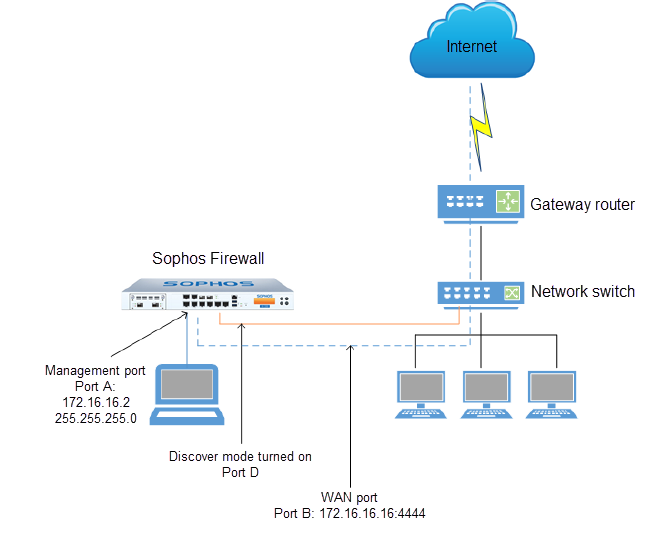
Network diagram
Requirements
- Make sure you integrate the firewall with external authentication servers, such as Microsoft Entra ID, RADIUS, LDAP, Apple Directory, or Novell eDirectory, so you can get user-specific data in the SAR.
- The firewall must be connected to the internet for on-cloud classification, IPS updates, and SAR generation.
- The firewall must be connected to a switch that supports Switch Port Analyzer (SPAN) or mirror port configuration.
- The firewall must have an unbound interface.
Features supported in discover mode
| Subscription | Features | Availability |
|---|---|---|
| Base Subscription | IPv6 | |
| Network services (ARP, routing, DNS, DHCP) | ||
| Firewall | ||
| DoS protection | ||
| Spoofing protection | ||
| IPsec VPN | ||
| SSL VPN | ||
| Wireless device support | ||
| Current activity | ||
| Traffic Access Control List (ACL) | ||
| QoS | ||
| Reports | ||
| User identity | ||
| User identity-based control | (user-based policy can't be applied) | |
| High availability (HA) | (HA can be configured in discover mode) | |
| Network Protection | IPS detection | |
| IPS control | ||
| Sophos X-Ops threat feeds | ||
| RED device management | ||
| Security Heartbeat | ||
| Synchronized Application Control | ||
| Web Protection | Web categorization (uses IPS) | (Categorization against URLs) |
| Web filtering | ||
| Application classification (signature-based) | ||
| Micro apps (HTTPS micro apps) | ||
| Application filtering | ||
| Web and Email Protection | Antivirus | |
| Email Protection | Mail usage | |
| Anti-spam | ||
| Web Server Protection | WAF | |
| Xsteam Protection Bundle | MDR threat feeds |
Connect and access the firewall
To connect your firewall to the switch and access your firewall's web admin console, do as follows:
- Connect port A of your firewall to a port on the network switch.
- Change the IP address of the computer from which you want to access your firewall to
172.16.16.2and the subnet mask to255.255.255.0. - Open a web browser on the computer and browse to
https://172.16.16.16:4444. - Sign in to the web admin console of your firewall with the default username and password (both
admin).
Turn on discover mode on an unbound interface
Note
You can only turn on discover mode on an unbound interface.
By default, ports A, B, and C are bound to the LAN, DMZ, and WAN zones, while the rest of the ports are unbound. However, you can bind any port, including ports A, B, and C, to other zones at any time. In this example, you turn on discover mode on port D.
If you want to turn on discover mode on a previously bound interface, you must first unbind it. To unbind an interface, go to Network > Interfaces, select the required interface, and set the Network zone as None.
Note
We recommend you bind the TAP interface with a CPU to get the desired output. To do this, change the port-affinity settings and configure the interface by using the bind-with option on the CLI console before using the interface for discover mode.
You can turn on discover mode through the following:
- Assistant
- CLI
To turn on discover mode on an unbound interface, do as follows:
- Connect the unbound port (port D) to the network switch port on which you'll configure port mirroring.
- Go to https://172.16.16.16:4444 from the management computer and sign in with the default username and password (both
admin). - Click Click to begin and follow the on-screen instructions.
- On the Network configuration (LAN) page, click Enable TAP/discover mode.
- Select one or more ports to connect to the mirror port on the switch. In this example, select port D.
- Click Apply, then click Continue and follow the on-screen instructions.
To turn on discover mode on an unbound interface, do as follows:
- Connect the unbound port (port D) to the network switch port on which you'll configure port mirroring.
- Sign in to the command-line console (CLI) of the firewall.
- Choose the following option:
4. Device Console. -
Enter the following command to turn on discover mode on port D:
console> system discover-mode tap add PortDYou'll see the following message:
Discover Interface added successfully
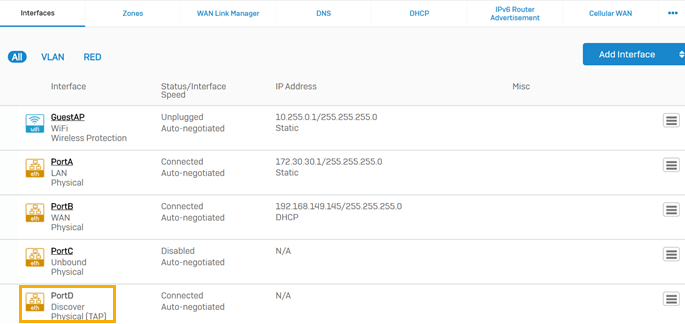
The image below shows the interface page on the firewall with port D configured as the TAP interface.
Configure port mirroring on the switch. For details, see your switch documentation.
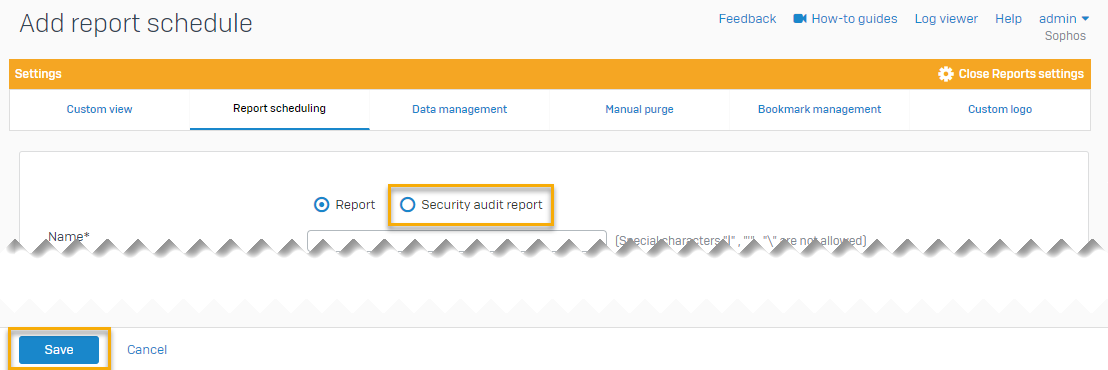
Schedule security audit report emails
To schedule security audit report emails, do as follows:
- Go to Reports > Show report settings > Report scheduling.
- Click Add to add a report schedule.
- Select Security audit report and enter your settings.
- Click Save.
The image below shows the report scheduling page on the firewall.
Additional information
- When you deploy the firewall in discover mode, you can't apply security policies.
-
You can combine discover mode with the gateway, mixed, and bridge modes. If you combine discover mode with any of these modes, consider the following:
- You can connect the TAP interface and LAN port on the firewall to the same switch. You must connect the TAP interface on the firewall to the SPAN port on the switch and the LAN port on the firewall to another port on the switch.
- You can't apply a security policy to the traffic on a TAP interface, but you can apply it on other interfaces.
-
You can use discover mode on virtual Sophos Firewall devices.
- HTTPS isn't supported in discover mode.
Discover mode and HA
- Discover mode doesn't work in HA active-active mode.
- Synchronized application control is turned off in HA active-active mode.
- Discover mode works in HA active-passive mode.
- You can't configure HA when a TAP interface is active. To configure HA, you must first deactivate the TAP interface on both firewalls (from the CLI). After you've established HA, you can start the TAP interface again.
- When you turn on HA, the TAP interface is active on the passive firewall.