Create a site-to-site SSL VPN
You can establish site-to-site VPN tunnels using an SSL/TLS connection to connect branch offices to the head office.
Requirements
Before getting started, select a firewall to be the server. It's good practice to select the more powerful unit if there's a difference in models. If you have a firewall with a dynamic IP address and another with a static IP address, use the one with the static IP address.
Define LANs
You create hosts for the head office and branch office networks.
Do the following on the head office firewall:
- Go to Hosts and services > IP host and click Add.
-
Create a host for the head office LAN.

-
Click Save.
- Click Add.
-
Create a host for the branch LAN.

-
Click Save.
Add an SSL VPN site-to-site server connection
You create a connection and download the file that will be used to configure the client system.
Do the following on the head office firewall:
- Go to Site-to-site VPN > SSL VPN.
- In the Server section, click Add.
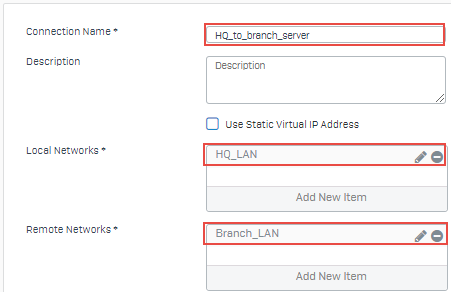
-
Specify a name for the tunnel and the networks to be accessed through the tunnel.
-
Click Save. The connection is created and it appears in the server list.
-
Click Download
 and save the file that will be used to configure the client system.
You can supply a password to encrypt the file, if required. The file format is
.apc.
Note
If you change the port, protocol, certificate, or override hostname settings in the server firewall on Remote access VPN > SSL VPN > SSL VPN global settings, download the server configuration file again and upload it to the client firewall.
Add SSL VPN site-to-site client connection
You use the file that was created on the server to create and configure the client connection.
Do the following on the client firewall:
- Go to Site-to-site VPN > SSL VPN.
- In the Client section, click Add.
-
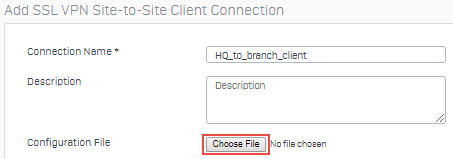
Specify the settings.
Name Setting Connection name HQ_to_branch_client -
Click Choose file and select the file that you downloaded from the SSL VPN server.
-
Click Save.
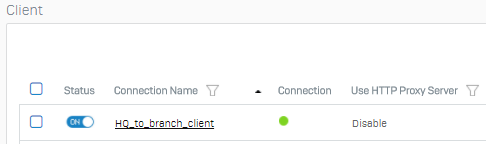
The new connection appears in the client list. The tunnel is operational when the status indicator shows green.
More resources