Policies
With web policies, you can create rules to control end users’ web browsing activities.
Policies take effect when you add them to firewall rules. The default set of policies specifies some common restrictions. You can change one of the default policies to fit your requirements or create new policies.
- To edit a policy, find the policy you want to change and click Edit
 .
. - To test and troubleshoot policies, click Policy tester.
Policy rules
Rules specify the following criteria:
-
Users to whom the rule applies.
Note
Users specified by firewall rules take precedence over those specified by policies.
-
Activities that describe the type of usage to restrict. These include user activities, categories, URL groups, file types, and dynamic categories.
- Content filters to restrict web content that contains any terms in the lists specified.
- An action to take when the firewall encounters HTTP traffic that matches the rule criteria.
You can also specify a separate action for HTTPS traffic and set a schedule for the rule.
Note
For a rule to be effective, make sure it's turned on.
- To turn on a rule, click the Status switch.
- To add a rule to a policy, click Add
 .
. - To clone a rule, click Clone
 .
. - To position rules within a policy, click and drag the Rule handle
 .
.
Positioning rules
The firewall evaluates rules from highest to lowest. For example, if a rule that allows all traffic precedes a rule that blocks a specific type of traffic, the rule that allows all traffic is the effective rule.
Here's an example:
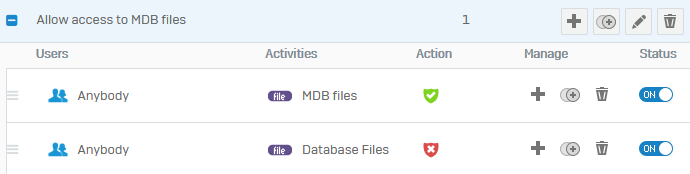
The following policy includes a separate rule for .mdb files. Because the rule is positioned above the rule for database files, which includes the .mdb file type, the policy allows access to .mdb files and blocks all other database files.
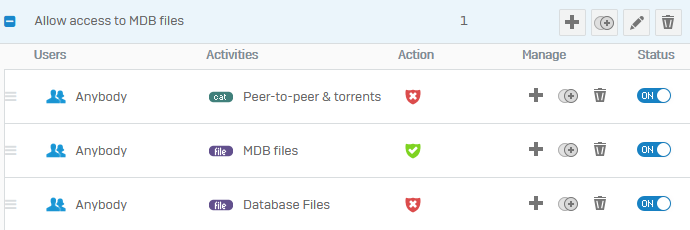
If you want to add a category block to the example policy, you must add it above the allow rule for .mdb files. This policy now blocks access to the Peer-to-peer & torrents category and allows access to only .mdb files from all other websites.
Warning
If you position the category block rule below the rule that allows a file type, the firewall does the following:
- Allows access to
.mdbfiles from any website because the allow rule is evaluated first. - When using the DPI engine, the firewall allows the initial connection to
Peer-to-peer & torrentswebsites because it must check the file type to see if it's a.mdbfile. If the file isn't a.mdbfile, the firewall drops the connection and doesn't show a block page.
Policy quota
Restriction
DPI mode doesn't support policy quota. You must use web proxy mode if you want to use a policy quota.
Using time quota, you can allow access to restricted websites for a limited period. This applies to all the restricted web categories in the policy with a quota action. Time quota applies to all the rules in the web policy. Users can have individual quotas for each web policy.
When you change the quota, the changes aren't applied if the web policy is invalid, the user has no time quota left, or has an active quota session in the web policy.
Quota details:
- When the quota traffic matches an SSL/TLS inspection rule that has action set to Deny, the quota won't take effect and the website continues to be blocked. To prevent this, go to Web > Exceptions, and create an exception to skip HTTPS decryption for the matching criteria.
- To see the remaining quota and to reset it, go to Web > Policy quota status.
- To customize the quota notification page, go to Web > User notifications.
Policy overrides and Time quota: Instead of using their quota, users who're allowed to override web policies can sign in to the user portal and grant themselves temporary access to websites that a web policy would normally block. When they use policy override, quota doesn't apply.
User action: When users try to access a page restricted by time quota, a quota block page appears. They can specify the quota they want to use and select Proceed. If they don't want to use their quota, they need to select Return to previous page. The block page reappears at the end of the period. When users exceed their quota, a message appears that no time quota remains.
More resources