Add a rule to a web policy
You can add rules to web policies and specify activities, content filters, and constraints.
To add a rule to a policy, do as follows:
- Click Add rule. The firewall creates a default rule at the top of the rule hierarchy that blocks all HTTP traffic for all users. The rule is off.
-
Specify users.
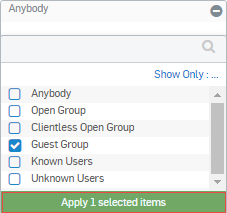
- In the new rule, move the pointer over the Users field, click the user (“Anybody”), and click Add new item.
- Clear the Anybody check box.
- Select users.
-
Click Apply selected items.
-
Specify activities and content filters.
- Move the pointer over the Activities field, click the activity (All web traffic), and click Add new item.
- In the Activities tab, clear the All web traffic check box.
- Select activities.
- Click Apply selected items.
- Click the Content filters tab and select the and with content check box.
- Click Add new item and select filters.
- Click Apply selected items.
-
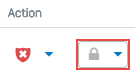
Specify an action to take when the firewall encounters HTTP traffic that matches the selected criteria.
-
Move the pointer over the Action field and click the action indicator.

-
Select an option.
Name Description Allow HTTP Allow HTTP traffic that matches the selected criteria. Warn HTTP Display a warning message when encountering HTTP traffic that matches the selected criteria. Block HTTP Block HTTP traffic that matches the selected criteria. Quota HTTP Allows users to select the duration in which to access a website that matches the selected criteria or to stop accessing it. Users can select up to the time quota you set for the web policy.
-
-
To specify an action to take for HTTPS traffic, move the pointer to the right of the HTTP action list and select an option from the HTTPS action list.
Name Description Use action Always applies the HTTP action.
All web traffic: You can select a different HTTPS action.
Content filters: You can't change this selection. The firewall always applies the same action to HTTP and HTTPS traffic that matches the content filters.
Allow HTTPS Allows HTTPS traffic that matches the selected criteria. Warn HTTPS Shows a warning message when encountering HTTPS traffic that matches the selected criteria. Block HTTPS Blocks HTTPS traffic that matches the selected criteria. Quota HTTPS Allows users to select the duration in which to access a website that matches the selected criteria or to stop accessing it. Users can select up to the time quota you set for the web policy. -
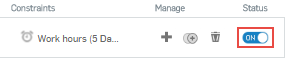
Move the pointer over the Constraints field and select a schedule or create a new one.
-
Click and drag the rule handle to position the rule in the hierarchy.

The firewall evaluates rules from highest to lowest. For example, if a rule that allows all traffic precedes a rule that blocks a specific type of traffic, the rule that allows all traffic is the effective rule.
-
Click the Status switch to turn the rule on.
-
Click Save.