Configure a policy-based IPsec VPN connection using digital certificates
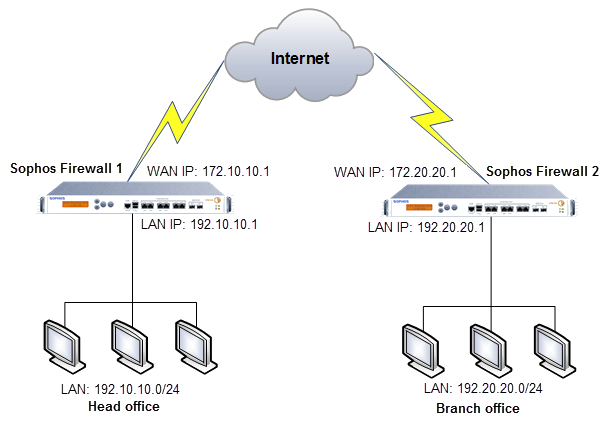
This article shows an example of configuring a policy-based IPsec VPN connection using digital certificates as an authentication method for VPN peers. You may configure the values according to your organization details.
Network diagram
Configure certificates and CAs
Upload the SF1 CA to SF2
- On Sophos Firewall 1 (SF1), go to Certificates > Certificate authorities.
- Click Default, verify the details, then click Download.
- Unzip the file and rename
Default.pemtoHead_Office_Default.pemto differentiate it from the branch office (BO) certificate authority (CA). - On Sophos Firewall 2 (SF2), go to Certificates > Certificate authorities and click Add.
- Click Choose File and select
Head_Office_Default.pem. - Enter
SF1_CAas the Name. - Click Save.
Upload the SF2 CA to SF1
- On SF2, go to Certificates > Certificate authorities.
- Click Default, verify the details, then click Download.
- Unzip the file and rename
Default.pemtoBranch_Office_Default.pem. - On SF1, go to Certificates > Certificate authorities and click Add.
- Click Choose File and select
Branch_Office_Default.pem. - Enter
SF2_CAas the Name. - Click Save.
Configure a locally-signed certificate in SF1
- On SF1, go to Certificates > Certificates and click Add.
- Select Generate locally-signed certificate.
-
Configure as follows:
Setting Value Name SF1_CertificateValid from 2023-02-23 Valid until 2024-02-23 Key type RSA Key length 2048 Secure hash SHA - 256 Tip
Increase the license expiry date from the default of one year to avoid regenerating and updating the certificate annually.
-
Enter
SophosFirewall1as the Common name. - Under Subject Alternative Names (SANs), click Advanced settings.
-
Select a Certificate ID and enter a value. The Certificate ID is required to identify the firewall.
- DNS: Enter any name.
- IP address: Enter any IP address.
- Email: Enter any email address.
- DER ASN1 DN [X.509]: Automatically uses the Subject of the default CA.
Example:
Setting Value Value Certificate ID IP address 172.10.10.1 Note
If you use DER ASN1 DN [X.509], don't configure anything in the DNS names and IP address under the Subject Alternative Names (SANs) because this will result in a conflict in the authentication of the IPsec VPN connection.
-
Click Save.
- Download the certificate.
- Rename the certificate extension to
.cer. - On SF2, go to Certificates > Certificates and click Add.
- Select Upload certificate.
-
Configure as follows:
Setting Value Name SF1_CertificateCertificate file format CER (.cer) Certificate Click Choose File and select the
.cerfiledownloaded from SF1.
-
Click Save.
-
Check if a green checkmark
 shows under the Trusted column.
This indicates the presence of the validating CA in the firewall.
Configure a locally-signed certificate in SF2
- On SF2, go to Certificates > Certificates and click Add.
- Select Generate locally-signed certificate.
-
Configure as follows:
Setting Value Name SF2_CertificateValid from 2023-02-23 Valid until 2024-02-23 Key type RSA Key length 2048 Secure hash SHA - 256 Tip
Increase the license expiry date from the default of one year to avoid regenerating and updating the certificate annually.
-
Enter
SophosFirewall2as the Common name. - Under Subject Alternative Names (SANs), click Advanced settings.
-
Select a Certificate ID and enter a value. The Certificate ID is required to identify the firewall.
- DNS: Enter any name.
- IP address: Enter any IP address.
- Email: Enter any email address.
- DER ASN1 DN [X.509]: Automatically uses the Subject of the default CA.
Example:
Setting Value Value Certificate ID IP address 172.20.20.1 Note
If you use DER ASN1 DN [X.509], don't configure anything in the DNS names and IP address under the Subject Alternative Names (SANs) because this will result in a conflict in the authentication of the IPsec VPN connection.
-
Click Save.
- Download the certificate.
- Rename the certificate extension to
.cer. - On SF1, go to Certificates > Certificates and click Add.
- Select Upload certificate.
-
Configure as follows:
Setting Value Name SF2_CertificateCertificate file format CER (.cer) Certificate Click Choose File and select the
.cerfiledownloaded from SF2.
-
Click Save.
-
Check if a green checkmark
shows under the Trusted column.This indicates the presence of the validating CA in the firewall.
Configure the IPsec VPN connection
SF1 configuration
- Go to Host and services > IP host.
-
Configure the IP hosts for the local and remote subnets as follows:
Setting IP host 1 IP host 2 Name SF1_LAN SF2_LAN IP version IPv4 IPv4 Type Network Network IP address 192.10.10.0 192.20.20.0 -
Click Save.
- Go to Site-to-site VPN > IPsec and click Add.
-
Configure as follows:
Setting Value Name SF1_to_SF2IP version IPv4 Connection type Site-to-site Gateway type Respond only Activate on save Turned on Create firewall rule Turned on Profile Head office (IKEv2) Authentication type Digital certificate Local certificate SF1_Certificate Remote certificate SF2_Certificate Listening interface Port2 - 172.10.10.1 Local subnet SF1_LAN Gateway address 172.20.20.1 Remote subnet SF2_LAN -
Click Save.
Note
The connection will be activated, and a firewall rule named
IPsec SF1_to_SF2will be created automatically and positioned at the top of the firewall rules list. Make sure that the firewall rule is positioned at the top. -
Check that the Active column shows a green button
 .
.This indicates that the HO IPsec VPN connection is active.
SF2 configuration
- Go to Host and services > IP host.
-
Configure the IP hosts for the local and remote subnets as follows:
Setting IP host 1 IP host 2 Name SF2_LAN SF1_LAN IP version IPv4 IPv4 Type Network Network IP address 192.20.20.0 192.10.10.0 -
Click Save.
- Go to Site-to-site VPN > IPsec and click Add.
-
Configure as follows:
Setting Value Name SF2_to_SF1IP version IPv4 Connection type Site-to-site Gateway type Initiate the connection Activate on save Turned on Create firewall rule Turned on Profile Branch office (IKEv2) Authentication type Digital certificate Local certificate SF2_Certificate Remote certificate SF1_Certificate Listening interface Port2 - 172.20.20.1 Local subnet SF2_LAN Gateway address 172.10.10.1 Remote subnet SF1_LAN -
Click Save.
Note
The connection will be activated, the BO will start the connection to the HO, and a firewall rule named
IPsec SF1_to_SF2will be created automatically and positioned at the top of the firewall rules list. Make sure that the firewall rule is positioned at the top. -
Check that the Active and Connection columns show a green button
.This indicates that the IPsec VPN connection is established.
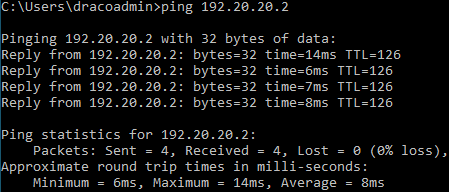
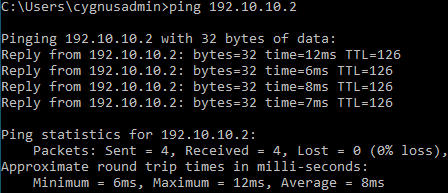
Verify the IPsec VPN connection
You can verify the IPsec VPN connection as follows:
-
Do a ping test between endpoints behind SF1 and SF2.
-
Go to Rules and policies > Firewall rules to verify that the firewall rules allow inbound and outbound traffic.


More resources