Create a route-based VPN (any to any subnets)
You want to create and set up a route-based VPN (RBVPN) between your head office (HO) and branch office (BO), with traffic allowed both ways. You set the local and remote subnets to Any.
Introduction
In this scenario, the branch office initiates the connection. You use IPv4, the IPsec profile IKEv2, and RSA keys for authentication. You add a static route.
Note
The network addresses used here are examples only. Use your network addresses when creating your route-based VPN.
Do as follows:
- Configure the head office RBVPN. Define LANs, create an RBVPN tunnel, edit the xfrm interface, create firewall rules for inbound and outbound traffic, and create a static, SD-WAN, or dynamic route.
- Configure the branch office RBVPN. Define LANs, create an RBVPN tunnel, edit the xfrm interface, create firewall rules for inbound and outbound traffic, and create a static, SD-WAN, or dynamic route.
You can also check connectivity.
Route-Based VPN network diagram
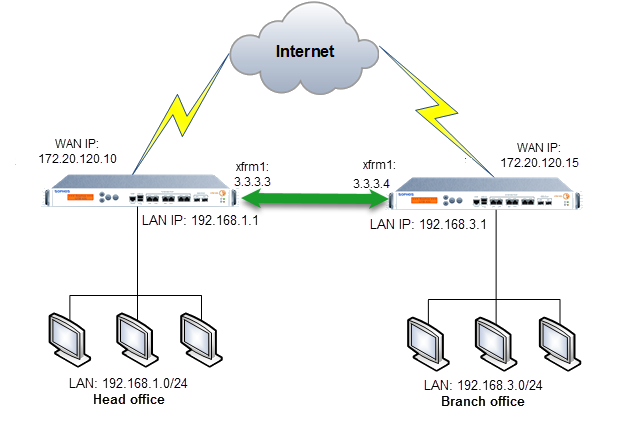
Head and branch office configuration
When you have a head and branch office configuration, the firewall in the branch office usually acts as the tunnel initiator. The firewall in the head office acts as a responder. This is because of the following reasons:
- As the branch offices number vary, we recommend that each branch office retry the connection instead of the head office retrying all connections to branch offices.
-
When the branch office device is configured with a dynamic IP address, the head office device can't start the connection.
However, if you configure dynamic DNS (DDNS) on the head office Sophos Firewall, the head office device can start the connection. For more information, see Add a dynamic DNS provider.
Define LANs at the head office
Create hosts for the head office and branch office networks.
- Go to Hosts and services > IP host and click Add.
-
Specify local LAN settings.
Name Setting Name HO_LANIP version IPv4Type NetworkIP address 192.168.1.0Subnet /24 (255.255.255.0)Here's an example:

-
Click Save.
- Click Add.
-
Specify remote LAN settings.
Name Setting Name BO_LANIP version IPv4Type NetworkIP address 192.168.3.0Subnet /24 (255.255.255.0) -
Click Save.
Create a route-based VPN tunnel (HO)
To create a route-based VPN tunnel, do as follows:
- Go to Site-to-site VPN > IPsec and click Add.
- Enter a name.
-
Specify the general settings:
Note
You can't create a firewall rule here for route-based VPN.
Name Setting IP version The tunnel only passes through data that uses the specified IP version.
Select IPv4.
Connection type Select Tunnel interface. This creates a tunnel interface between two endpoints. The interface is named xfrmfollowed by a number.Gateway type Select the following gateway type:
Respond only: Keeps the connection ready to respond to any incoming request.
Activate on save Select this option. It activates the VPN connection when you click Save. Example:

-
Specify the encryption settings.
Name Setting Profile IPsec profile to use for the traffic.
Select Head office (IKEv2).
Authentication type Select the following authentication type:
RSA key: Authenticates endpoints using RSA keys.
The local RSA key is generated automatically. You need to copy and paste the RSA key from the branch office Sophos Firewall.
Example:

-
Specify the local gateway settings.
Name Setting Listening interface Interface that listens for connection requests.
Select the WAN interface (Port2-172.20.120.10).
Local subnet Any Example:
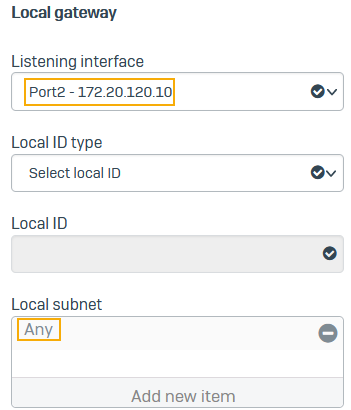
-
Specify the remote gateway settings.
Name Setting Gateway address Enter the WAN IP address of the Branch office Sophos Firewall ( 172.20.120.15).Remote subnet Any Note
You must enter a gateway address, because the wildcard
*isn't supported for route-based VPN. In this scenario, use the WAN IP address of the branch office Sophos Firewall. If you configure DDNS, you can use the DNS address of the branch office Sophos Firewall.Example:
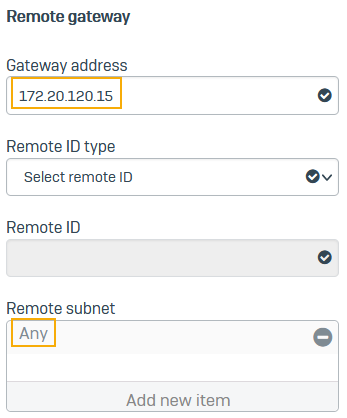
-
Click Save.
-
Go to Profiles > IPsec profiles and make sure Dead peer detection is turned on. We recommend that you select one of the following actions if the peer (branch office) is unreachable:
- Hold
- Disconnect
Edit the xfrm interface (HO)
The xfrm interface is a virtual tunnel interface that Sophos Firewall creates on the WAN interface when you set up a route-based VPN connection.
- Go to Network > Interfaces.
-
Click the port on which you've configured the xfrm interface. Ports with virtual interfaces assigned to them have a blue bar on the left.
Here's an example:
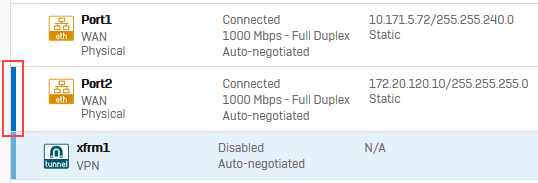
-
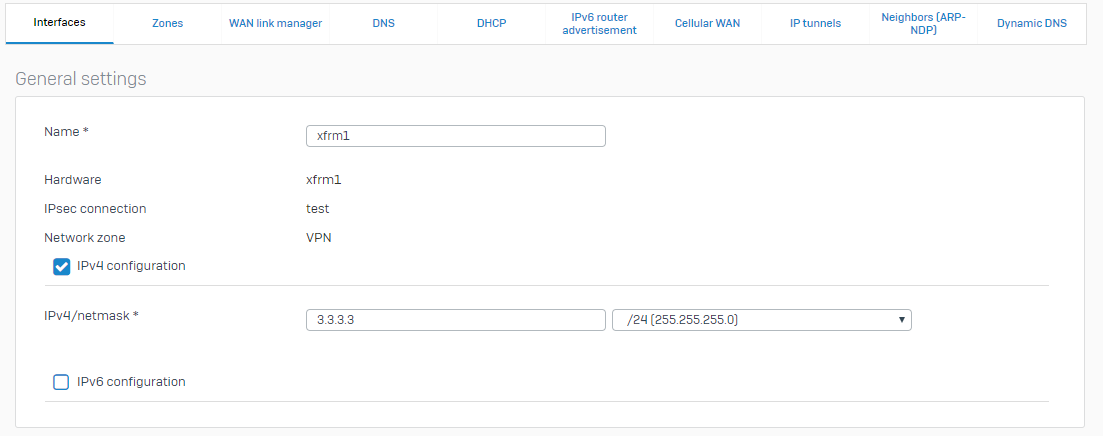
Click the xfrm interface and specify an IP address and subnet. Example:
3.3.3.3/24Example:
-
Click Save.
Add firewall rules (HO)
Create firewall rules for inbound and outbound VPN traffic.
- Go to Rules and policies > Firewall rules.
- Select IPv4 protocol.
- Select Add firewall rule and select New firewall rule.
-
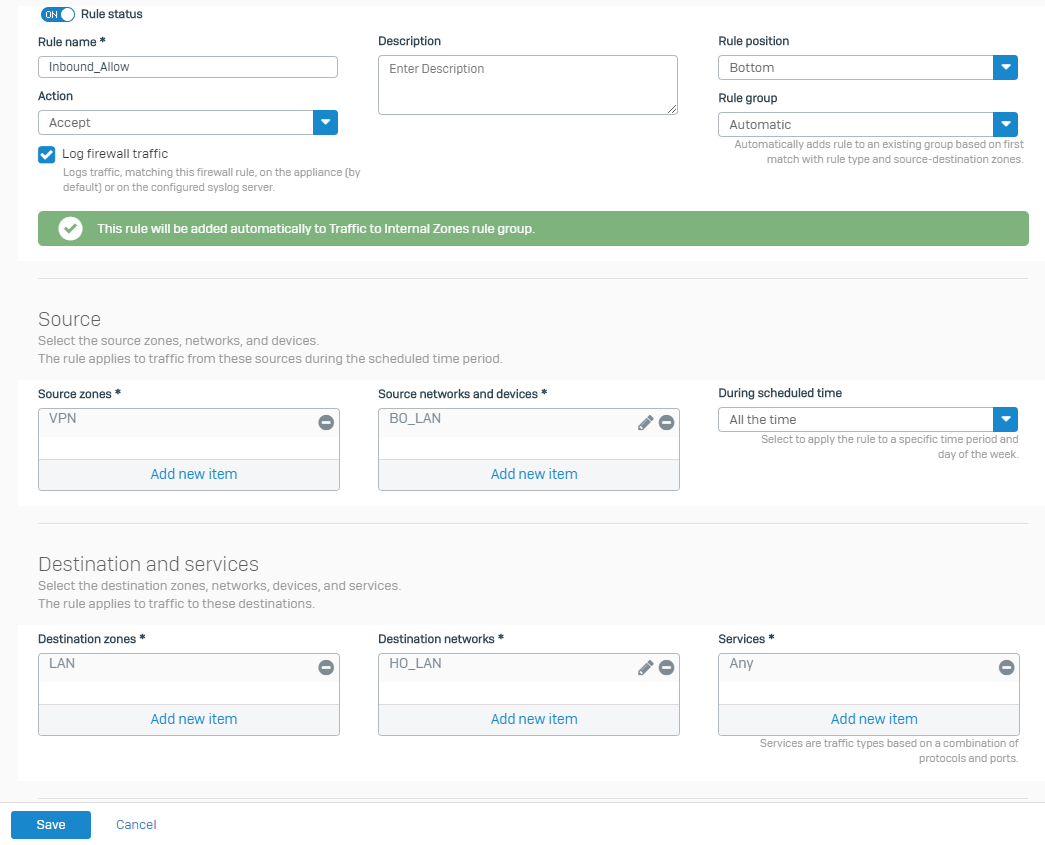
Specify the settings.
Name Setting Rule name Inbound_AllowSource zones VPNSource networks and devices BO_LANDestination zones LANDestination networks HO_LANExample:
-
Select Log firewall traffic.
- Click Save.
- Select IPv4 protocol and select Add firewall rule. Select New firewall rule.
-
Specify the settings.
Name Setting Rule name Outbound_AllowSource zones LAN Source networks and devices HO_LAN Destination zones VPN Destination networks BO_LAN -
Select Log firewall traffic.
- Click Save.
Add a route (HO)
In this example, we show how to configure a static route and an SD-WAN route. For dynamic routes, see the following:
- Go to Routing > Static routing and click Add under IPv4 unicast route.
-
Enter the following route details:
Name Setting Destination IP/netmask 192.168.3.0/24Interface xfrm1-3.3.3.3 Example:

-
Click Save.
- Go to Routing > SD-WAN routes.
- Select IPv4 and click Add.
- Enter a Name.
- Set Source networks to
HO_LAN. -
Set Destination networks to
BO_LAN.
-
Under Link selection settings, select Primary and backup gateways.
Note
If you want to enforce gateway failover based on performance SLAs and health check criteria, create an SD-WAN profile with tunnel interfaces and select the profile here.
-
Click the drop-down list for Primary gateway and click Add.
- Enter a name.
- For Gateway IP, enter the branch office XFRM IP address (example:
3.3.3.4). -
For Interface, select the XFRM interface (example:
xfrm1_3.3.3.3).
-
If you want Health check on, for Monitoring condition, enter an internal IP address of the branch office (example:
192.168.3.2).
-
Optionally, you can select Route only through specified gateways.
The firewall then drops the traffic if the tunnel isn't available.
-
Click Save.
Define LANs at the branch office
Create hosts for the branch office and head office networks.
- Go to Hosts and services > IP host and click Add.
-
Specify local LAN settings.
Name Setting Name BO_LANType Network IP address 192.168.3.0Subnet /24 (255.255.255.0) -
Specify remote LAN settings.
Name Setting Name HO_LANType Network IP address 192.168.1.0Subnet /24 (255.255.255.0)
Create a route-based VPN tunnel (BO)
To create a route-based VPN tunnel, do as follows:
- Go to Site-to-site VPN > IPsec and click Add.
- Enter a name.
-
Specify the general settings:
Name Setting IP version The tunnel only passes through data that uses the specified IP version.
Select IPv4.
Connection type Select Tunnel interface. This creates a tunnel interface between two endpoints. The interface is named xfrmfollowed by a number.Gateway type Select the following gateway type:
Initiate the connection: Establishes the connection every time VPN services or the device restart.
Activate on save Select this option. It activates the VPN connection when you click Save. -
Specify the encryption settings.
Name Setting Profile IPsec profile to use for the traffic. Select Branch office (IKEv2). Authentication type Select the following authentication type:
RSA key: Authenticates endpoints using RSA keys.
The local RSA key is generated automatically. You must copy and paste the RSA key from the head office Sophos Firewall.
-
Specify the local gateway settings.
Name Setting Listening interface Interface that listens for connection requests. Select the WAN interface (Port2-172.20.120.15). -
Specify the remote gateway settings.
Name Setting Gateway address Enter the WAN IP address of the head office Sophos Firewall ( 172.20.120.10).Note
You must enter a gateway address, because the wildcard
*isn't supported for route-based VPN. In this scenario, use the WAN IP address of the head office Sophos Firewall. -
Click Save.
Go to Profiles > IPsec profiles and make sure Dead peer detection is turned on. Select the following action to take when the peer (head office) is unreachable: Re-initiate.
Edit the xfrm interface (BO)
The xfrm interface is a virtual tunnel interface that Sophos Firewall creates on the WAN interface when you set up a route-based VPN connection.
- Go to Network > Interfaces.
- Specify an IP address and subnet. Example:
3.3.3.4/24 - Click Save.
Add firewall rules (BO)
Create firewall rules for inbound and outbound VPN traffic.
- Go to Rules and policies > Firewall rules.
- Select IPv4 protocol.
- Select Add firewall rule and select New firewall rule.
-
Specify the settings.
Name Setting Rule name Inbound_AllowSource zones VPN Source networks and devices HO_LANDestination zones LAN Destination networks BO_LAN -
Select Log firewall traffic.
- Click Save.
- Select IPv4 protocol and select Add firewall rule. Select New firewall rule.
-
Specify the settings.
Name Setting Rule name Outbound_AllowSource zones LAN Source networks and devices BO_LANDestination zones VPN Destination networks HO_LAN -
Click Save.
Add a route (BO)
In this example, we show how to configure a static route and an SD-WAN route. For dynamic routes, see the following:
- Go to Routing > Static routing and click Add under IPv4 unicast route.
-
Enter the following route details:
Name Setting Destination IP/netmask 192.168.1.0/24Interface xfrm1-3.3.3.4 -
Click Save.
- Go to Routing > SD-WAN routes.
- Select IPv4 and click Add.
- Enter a Name.
- Set Source networks to
BO_LAN. -
Set Destination networks to
HO_LAN.
-
Under Link selection settings, select Primary and backup gateways.
-
Click the drop-down list for Primary gateway and click Add.
- Enter a name.
- For Gateway IP, enter the head office XFRM IP address (example:
3.3.3.3). - For Interface, select the XFRM interface (example:
xfrm1_3.3.3.4). - If you want Health check on, for Monitoring condition, enter an internal IP address of the head office (example:
192.168.1.2).
-
Optionally, you can select Route only through specified gateways.
The firewall then drops the traffic if the tunnel isn't available.
-
Click Save.
Check connectivity
- Go to Administration > Device access. For the VPN zone, select Ping/Ping6.
- Go to Rules and policies > Firewall rules. Make sure Log firewall traffic is turned on in the firewall rules you created.
From the head office, do as follows:
- Continuously ping a device on the branch office LAN. On Windows, start a command prompt and type:
ping 192.168.3.10 -t - On Sophos Firewall go to Diagnostics > Packet capture > Configure. In BPF string type the following:
host 192.168.1.10 and proto ICMP - Click Save.
- Turn on Packet capture. If the ping is successful, you can see the ICMP traffic going out of the xfrm interface.
- Go to Log viewer. Search for
192.168.1.10If the ping is successful, you can see the ICMP traffic going out of the xfrm interface to the destination IP address, 192.160.1.10.
To troubleshoot further, select the firewall rule ID and select Filter firewall rule. This opens the firewall rule in the web admin console, where you can check your settings.
More resources