Create a policy-based IPsec VPN using preshared key
You can configure an IPsec VPN between the head office and a branch office.
In this example, we've used a preshared key for authentication.
Network diagram
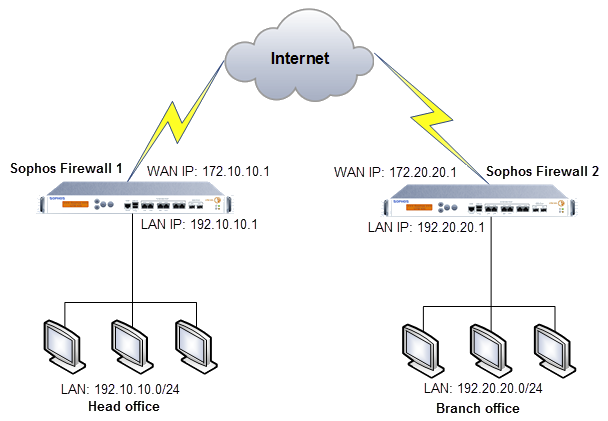
Head office configuration
Configure the LANs
Create hosts for the head office and branch office networks at the head office.
- Go to Hosts and services > IP host and click Add.
-
Configure the IP hosts for the local and remote subnets as follows:
Setting IP host 1 IP host 2 Name HQ_LAN Branch_LAN IP version IPv4 IPv4 Type Network Network IP address 192.10.10.0 192.20.20.0 -
Click Save.
Add an IPsec connection
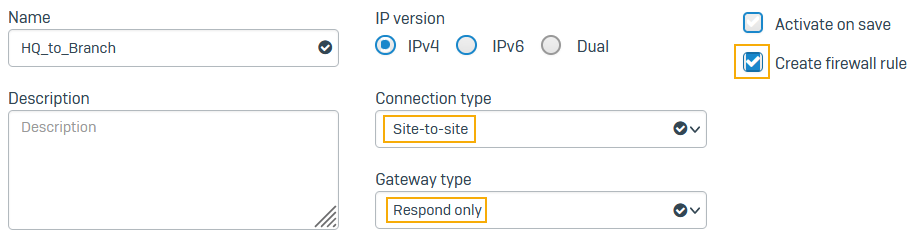
Create and activate an IPsec connection at the head office.
- Go to Site-to-site VPN > IPsec and click Add.
- Enter a name.
- Select IPv4.
- Select Create firewall rule.
- Set Connection type to Site-to-site.
-
Set Gateway type to Respond only.
The head office firewall usually acts as the responder, and the branch office firewalls as tunnel initiators because they are many. We recommend that each branch office retry the connection instead of the head office retrying all connections to branch offices.
-
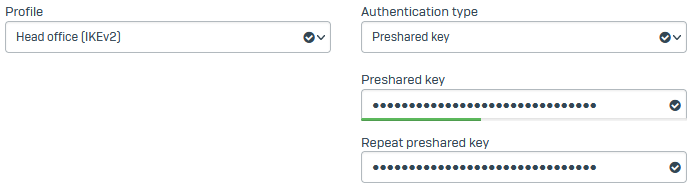
Set Profile to Head office (IKEv2).
IKEv2 allows you to have unique preshared keys for unique local-remote ID combinations.
-
Set Authentication type to Preshared key.
-
Enter the preshared key and repeat it.
Note the preshared key. You'll need to paste it in the branch office firewall's connection.
-
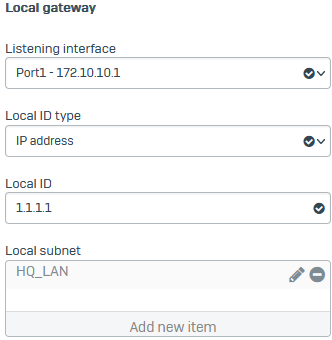
For Listening interface, select the local interface
Port1 - 172.10.10.1. -
Set Local ID type to IP address.
You can select DNS, IP address, or email. The values are only for identification and don't have to be valid values in your network.
-
For Local ID, enter
1.1.1.1. -
For Local subnet, select the local IP host you configured.
-
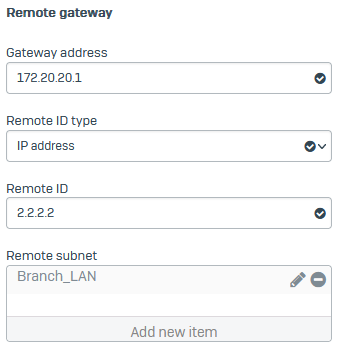
Under Remote gateway, for Gateway address, enter the branch office gateway
172.20.20.1. - Set Remote ID type to IP address.
- For Remote ID, enter
2.2.2.2. -
For Remote subnet, select the remote IP host you configured.
-
Click Save.
The connection appears on the list of IPsec connections.
-
Click the status button
 to activate the connection.
Edit firewall rule to create inbound rule
Edit the automatically created firewall rule when you saved the IPsec connection. You'll save it as a rule to allow inbound VPN traffic. Since you've set the IPsec connection to Respond only, you need a firewall rule to allow inbound traffic from the branch office.
-
Go to Rules and policies > Firewall rules and click the
IPsec HQ to Branchrule.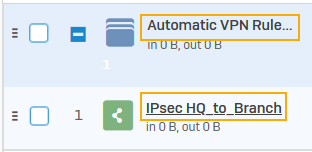
-
(Optional) Change the rule name.
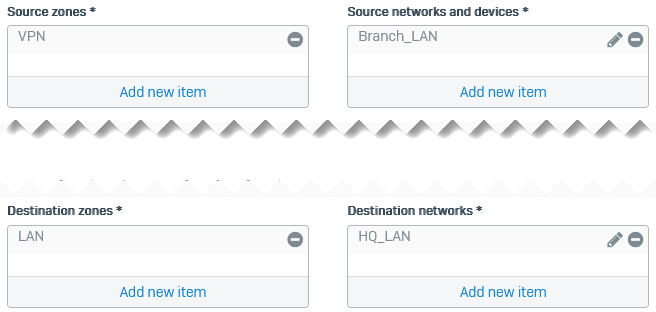
- Set Source zones to VPN.
- Set Source networks and devices to
Branch_LAN. - Set Destination zones to LAN.
- Set Destination networks to
HQ_LAN. -
Click Save.
Note
If you already have a firewall rule to allow inbound VPN traffic, you can add the remote subnet to its Source networks and devices and the local subnet to Destination networks. You don't need to create an independent firewall rule for each IPsec connection.
Allow access to services
Make sure you allow access from WAN to IPsec because you've set the IPsec connection's Gateway type to Respond only.
To check tunnel connectivity, you can ping a remote IP address through the VPN connection you created.
- Go to Administration > Device access.
- Under IPsec, select WAN.
- Under Ping/Ping6, select VPN.
- Click Apply.
Branch office configuration
Configure the LANs
Create the hosts for the branch office and head office networks at the branch office.
- Go to Hosts and services > IP host and click Add.
-
Configure the IP hosts for the local and remote subnets as follows:
Setting IP host 1 IP host 2 Name Branch_LAN HQ_LAN IP version IPv4 IPv4 Type Network Network IP address 192.20.20.0 192.10.10.0 -
Click Save.
Add an IPsec connection
You create and activate an IPsec connection at the branch office.
- Go to Site-to-site VPN > IPsec and click Add.
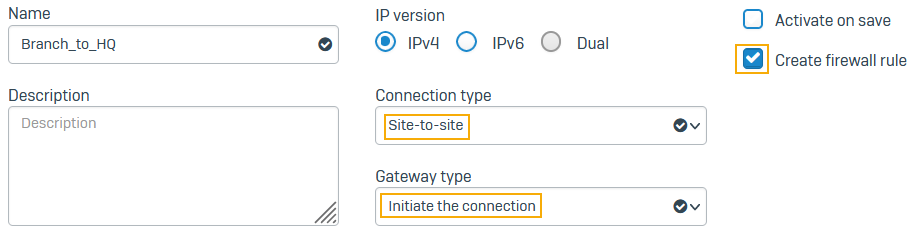
- Enter a name.
- Select IPv4.
- Select Create firewall rule.
- Set Connection type to Site-to-site.
-
Set Gateway type to Initiate the connection.
-
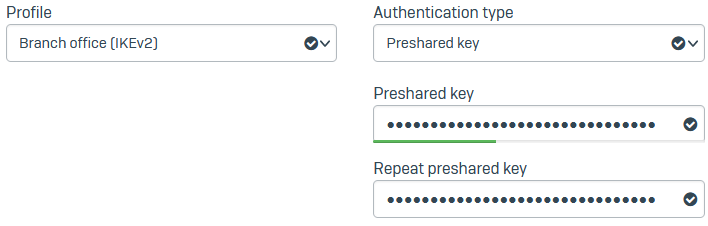
Set Profile to Branch office (IKEv2).
- Set Authentication type to Preshared key.
-
Paste the preshared key you've used in the head office firewall and repeat it.
-
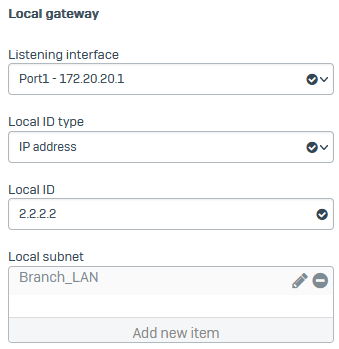
For Listening interface, select the local interface
Port1 - 172.20.20.1. -
Set Local ID type to IP address.
You must select the ID type you've selected in the head office firewall.
-
For Local ID, enter
2.2.2.2. -
For Local subnet, select the local IP host you configured.
-
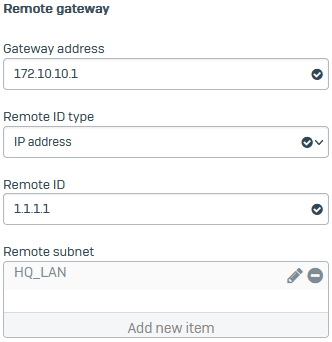
Under Remote gateway, for Gateway address, enter the head office gateway (
172.10.10.1). - Set Remote ID type to IP address.
- For Remote ID, enter
1.1.1.1. -
For Remote subnet, select the remote IP host you configured.
-
Click Save.
The connection appears on the list of IPsec connections.
-
Click Status
to activate the connection.
Edit firewall rule to create outbound rule
Edit the automatically created firewall rule when you saved the IPsec connection. You'll save it as a rule to allow outbound VPN traffic. because you've set the IPsec connection to initiate the connection.
- Go to Rules and policies > Firewall rules and click the
IPsec Branch to HQrule. - (Optional) Change the rule name.
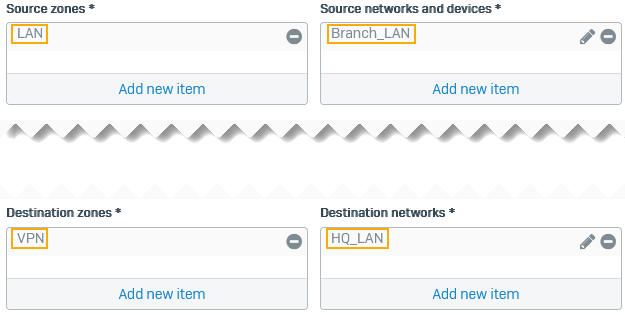
- Set Source zones to LAN.
- Set Source networks and devices to
Branch_LAN. - Set Destination zones to VPN.
- Set Destination networks to
HQ_LAN. -
Click Save.
Note
If you already have a firewall rule to allow outbound VPN traffic, you can add the local subnet to its Source networks and devices and the remote subnet to Destination networks.
Allow access to services
To check tunnel connectivity, you can ping a remote IP address through the VPN connection you created.
- Go to Administration > Device access.
- Under Ping/Ping6, select VPN.
- Click Apply.
Check tunnel's connectivity
-
In the head office and branch office firewalls, check that you can ping the remote subnet.
Example
On the CLI, enter 5 for Device management, then enter 3 for Advanced shell.
In the head office firewall, enter the following command:
ping 192.20.20.2In the branch office firewall, enter the following command:
ping 192.10.10.2 -
Click Rules and policies and go to the firewall rule you created to see the traffic.