IPsec VPN with firewall behind a router
You can configure IPsec VPN connections between firewalls behind a router.
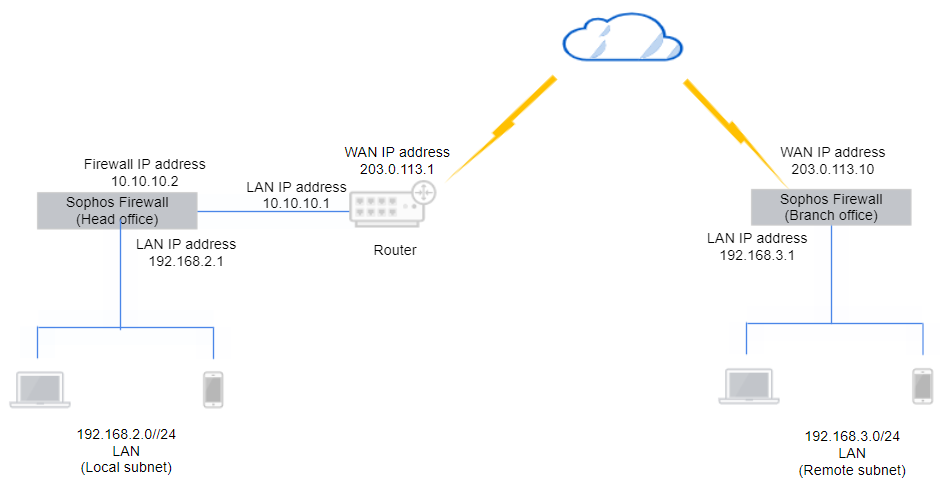
In this example, the head office firewall is behind a router and doesn't have a public IP address. You must configure the following at the head office and the branch office:
- Firewall prerequisite: Configure IP hosts for the local and remote subnets.
- Configure the IPsec VPN connection.
- Optional: Edit the automatically created firewall rule to create an independent rule for outbound traffic.
- Optional: Create a firewall rule for inbound traffic if you want independent firewall rules.
- Allow access to services.
- Configure the router settings.
- Check connectivity.
- Check the logs.
Here's an example network diagram:
Configure the head office firewall
Configure the IPsec connection and firewall rules.
Add an IPsec connection
Create and activate an IPsec connection at the head office.
- Go to Site-to-site VPN > IPsec and click Add.
- Enter a name.
- Select Activate on save.
- Select Create firewall rule.
- For Connection type, select Site-to-site.
-
For Gateway type, select Respond only.
Here's an example:
-
For Profile, select Head office (IKEv2).
- For Authentication type, select Preshared key.
-
Enter a key and confirm it.
Here's an example:
-
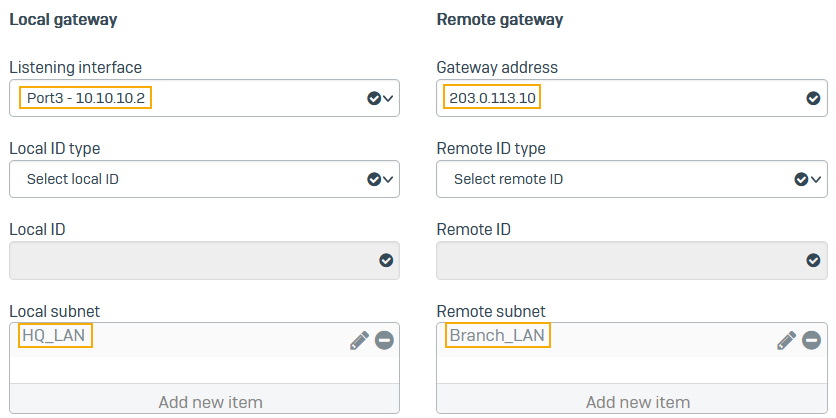
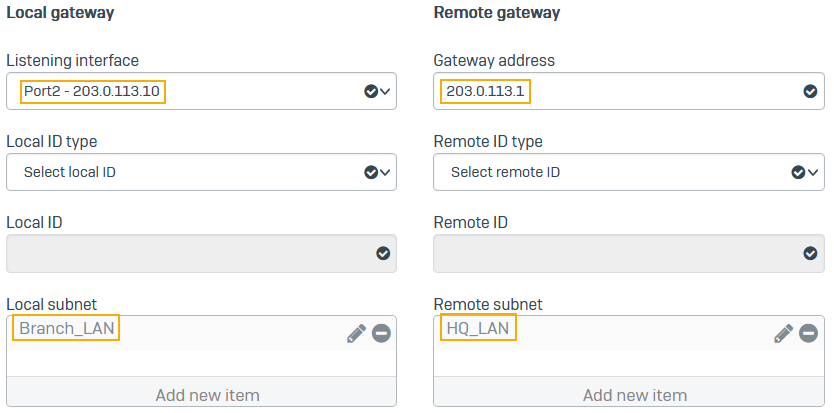
For Listening interface, select the local firewall's WAN port (example:
10.10.10.2). - For Gateway settings, enter the remote firewall's WAN port (example:
203.0.113.10). - For Local subnet, select the IP host you've created for
192.168.2.0. - For Remote subnet, select the IP host you've created for
192.168.3.0. -
Click Save.
Here's an example:
Edit the firewall rule
To configure an independent outbound VPN rule, edit the automatically created firewall rule. Alternatively, check the settings if you already have a firewall rule for VPN traffic.
- Go to Rules and policies > Firewall rules.
-
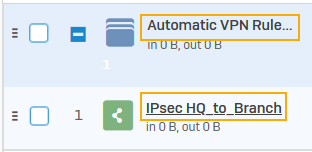
Click the rule group Automatic VPN rules and click the rule you've created.
Here's an example:
-
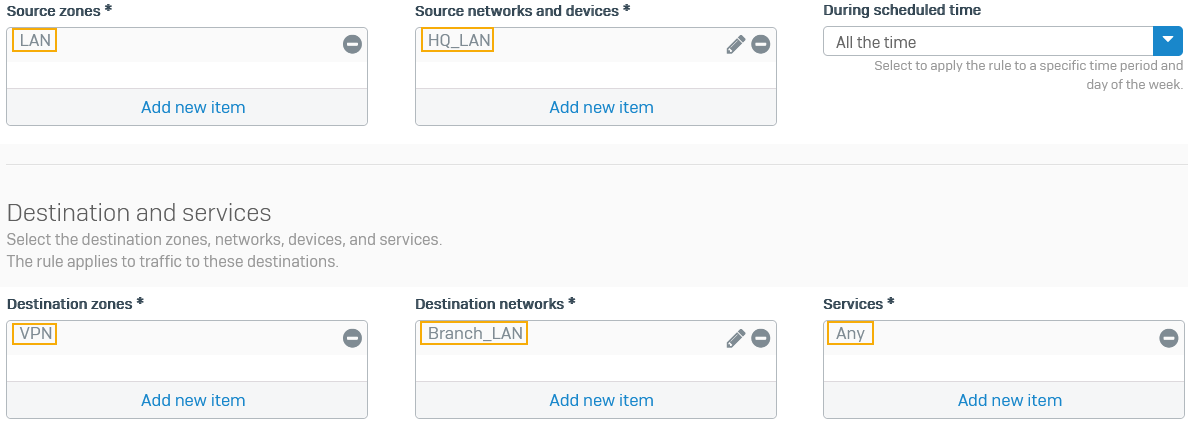
Specify the following settings:
Option Setting Rule name Outbound VPN trafficSource zones LAN Source networks and devices HQ_LANDestination zones VPN Destination networks Branch_LANServices Any -
Click Save.
Here's an example:
Add a firewall rule
Create a firewall rule for inbound VPN traffic if you don't have one.
- Go to Rules and policies > Firewall rules.
- Click Add firewall rule and select New firewall rule.
-
Specify the following settings:
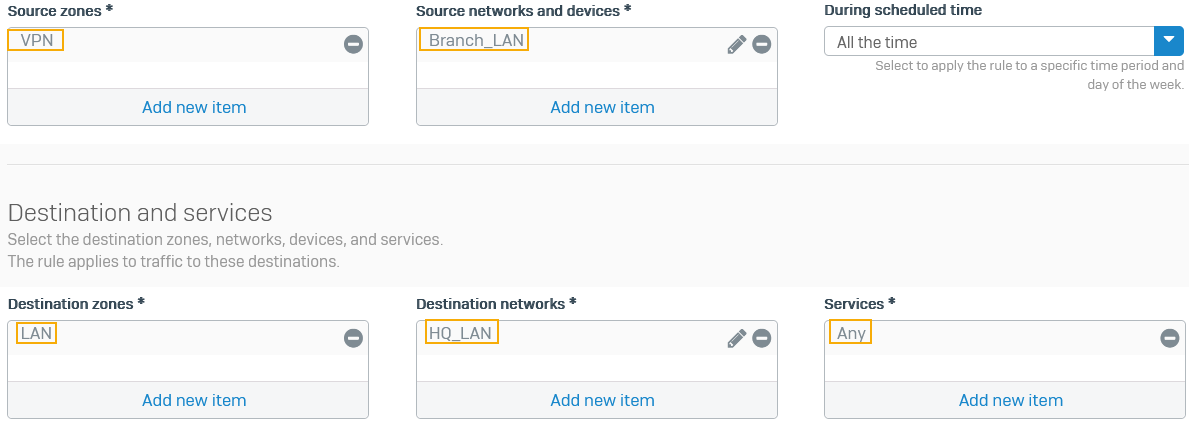
Option Setting Rule name Inbound VPN trafficSource zones VPN Source networks and devices Branch_LANDestination zones LAN Destination networks HQ_LANServices Any -
Click Save.
Here's an example:
Allow access to services
- Go to Administration > Device access.
- Under IPsec, select WAN.
-
Under Ping/Ping6, select VPN.
Users can ping the firewall's IP address through the VPN to check connectivity.
-
Click Apply.
Configure your router settings
Do as follows:
-
Make sure you configure a DNAT rule on the router to allow the VPN traffic.
- Set the original destination to the router's WAN interface (example:
203.0.113.1). - Set the translated destination to the local firewall's WAN interface (example:
10.10.10.2).
- Set the original destination to the router's WAN interface (example:
-
Allow the following services:
- UDP port 500
- UDP port 4500
- IP protocol 50
Configure the branch office firewall
Configure the IPsec connection and firewall rules.
Add an IPsec connection
Create and activate an IPsec connection at the branch office.
- Go to Site-to-site VPN > IPsec and click Add.
- Enter a name.
- Select Activate on save.
- Select Create firewall rule.
- For Connection type, select Site-to-site.
-
For Gateway type, select Initiate the connection.
Here's an example:
-
For Profile, select Branch office (IKEv2).
- For Authentication type, select Preshared key.
-
Enter a key and confirm it.
Here's an example:
-
For Listening interface, select the local firewall's WAN port (
203.0.113.10). - For Gateway settings, enter the head office router's WAN port (
203.0.113.1). - For Local subnet, select the IP host you've created for
192.168.2.0. - For Remote subnet, select the IP host you've created for
192.168.3.0. -
Click Save.
Edit the firewall rule
To configure an independent outbound VPN rule, edit the automatically created firewall rule. Alternatively, check the settings if you already have a firewall rule for VPN traffic.
- Go to Rules and policies > Firewall rules.
-
Click the rule group Automatic VPN rules and click the rule you've created.
Here's an example:
-
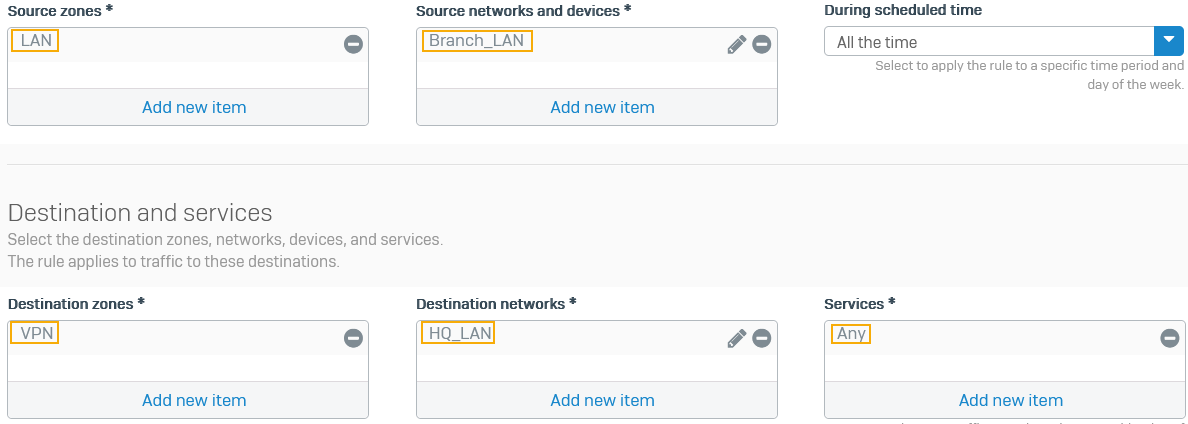
Specify the following settings:
Option Setting Rule name Outbound VPN trafficSource zones LAN Source networks and devices Branch_LANDestination zones VPN Destination networks HQ_LANServices Any -
Click Save.
Here's an example:
Add a firewall rule
Create a rule for inbound VPN traffic if you don't already have one.
- Go to Rules and policies > Firewall rules.
- Click Add firewall rule and select New firewall rule.
-
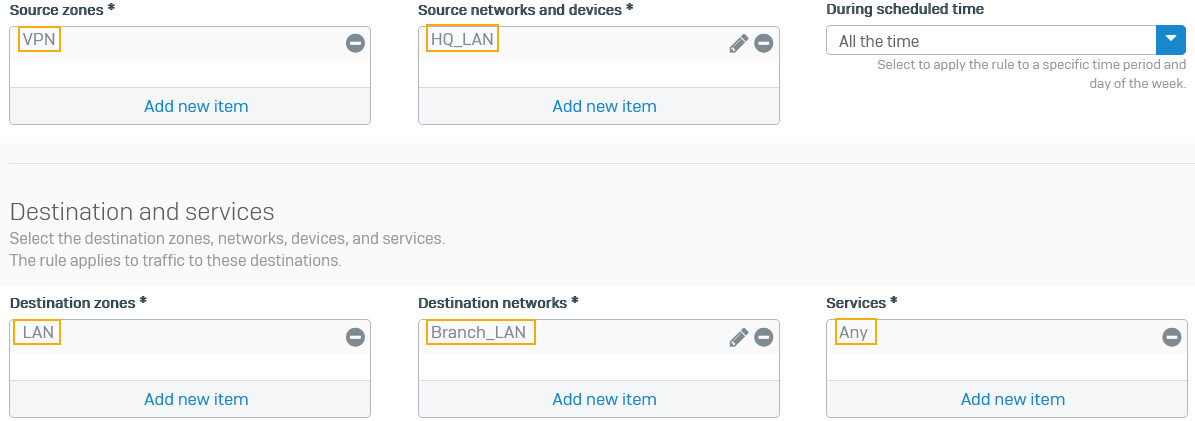
Specify the following settings:
Option Setting Rule name Inbound VPN trafficSource zones VPN Source networks and devices HQ_LANDestination zones LAN Destination networks Branch_LANServices Any -
Click Save.
Here's an example:
Allow access to services
- Go to Administration > Device access.
-
Under Ping/Ping6, select VPN.
Users can ping the firewall's IP address through the VPN to check connectivity.
-
Click Apply.
Check the connectivity
Check the VPN connectivity between the head office and the branch office.
- Head office firewall: Ping the branch office subnet. For example, on Windows, type the following command at the command prompt:
ping 192.168.3.0 - Branch office firewall: Ping the head office subnet. For example, on Windows, type the following command at the command prompt:
ping 192.168.2.0
Check the logs
The head office firewall's logs show that it's detected a NAT device in front of it.
The branch office firewall's logs show that it's detected a NAT device in front of the head office firewall.
More resources
