Set up SATC with Sophos Server Protection
Sophos Authentication for Thin client (SATC) with Sophos Server Protection enables Sophos Firewall to authenticate users accessing a server or remote desktop.
Introduction
SATC is included with Sophos Server Protection in Sophos Central. It's part of Sophos Central Server Core Agent and is available with any Server Protection license in Sophos Central. SATC is supported on Windows Server 2016 and later.
Sophos Firewall no longer supports the standalone SATC component.
Note
SATC with Sophos Server Protection only supports Windows Remote Desktop Services.
Note
You must download the Windows Server installer from Sophos Central. The installers you can see depend on the licenses you have.
To implement SATC authentication with Sophos Server Protection on Windows Remote Desktop Services, you must install the Windows Server installer on the Remote Desktop Session Host. You must then configure SATC through the host's registry in the following location:
HKLM\Software\Sophos\Sophos Network Threat Protection\Application
You can configure the following options:
| Registry value | Description |
|---|---|
| SendSatcEvents (DWORD) | When present and non-zero, the SATC feature is turned on. |
| SatcDestinationAddr (STRING) | The IPv4 address of the firewall. |
| SatcDestinationPort (DWORD) | The port to send the SATC messages to. Default: 6060 |
| SatcExcludedUsers (MULTISTRING) | A list of usernames to exclude. Entries are case-sensitive. By default, SATC sends out authentication information for local users, for example, the SYSTEM and Administrator accounts. We recommend using this key to exclude local user accounts on the device. |
| SatcExcludedAddresses (MULTISTRING) | A list of destinations to exclude. No authentication information is sent to the firewall when users connect to these destinations. You can enter destinations in the following formats:
|
| SatcPendDurationMs (DWORD) | When SATC is turned on and configured to a valid destination, this value controls how long the driver pends outbound IPv4 TCP connections. Defaults to 100ms when not present. Setting this value to zero disables the connection pending. |
Tip
When using Windows Command Prompt to configure multi-string registry keys, use \0 to separate multiple entries. Here's an example:
reg add "HKLM\Software\Sophos\Sophos Network Threat Protection\Application" /v SatcExcludedUsers /t REG_MULTI_SZ /d "SYSTEM\0administrator"
Set up SATC on a Windows server through the registry
To set up SATC using server protection, do as follows:
- Sign in to Sophos Central.
- Go to Protect devices.
-
Under Server protection, download the Windows server installer and install it on your Windows remote desktop server. For more information, see Sophos Server Protection.
Note
The installers you can see on Sophos Central depend on the licenses you have.
-
Turn off tamper protection for server protection. For more information, see Sophos Endpoint: How to disable Tamper Protection.
Tip
Make a note of the current settings before you turn off tamper protection. You need to change these back once SATC is turned on.
-
On the server, open a command-line console.
-
Run the following commands to turn on SATC:
reg add "HKLM\Software\Sophos\Sophos Network Threat Protection\Application" /v SendSatcEvents /t REG_DWORD /d 1reg add "HKLM\Software\Sophos\Sophos Network Threat Protection\Application" /v SatcDestinationAddr /t REG_SZ /d FIREWALL-IPreg add "HKLM\Software\Sophos\Sophos Network Threat Protection\Application" /v SatcDestinationPort /t REG_DWORD /d FIREWALL-PORT
When entering the above commands, replace
FIREWALL-IP, andFIREWALL-PORT, with the IP address of Sophos Firewall and the port (default: 6060) that SATC communicates on. -
Turn on tamper protection again.
- Restart the Windows remote desktop server.
Add Windows remote desktop server IP address on Sophos Firewall
For SATC to authenticate users, you must specify the IP addresses of your Windows remote desktop servers on Sophos Firewall.
- Go to the command-line console of Sophos Firewall and choose option 4. Device Console.
-
Enter the following command to add the Windows remote desktop server's IP address:
system auth thin-client add citrix-ip <TERMINALSERVERIP> Replace <TERMINALSERVERIP> in the command with the IP address of your Windows remote desktop server.
Note
Sophos Firewall supports up to 192 servers. Once the limit is reached, the following error message appears:
Maximum Thinclient limit reached. Maximum supported Thinclients are 192.Note
Once you add the Windows remote desktop server's IP address to Sophos Firewall, only SATC works as the sole authentication method for that IP address. No other authentication method, including a clientless user definition, will work for that IP address.
Add an Active Directory server
First, you add an Active Directory server that includes a search query.
You’ll need the following information to complete this task:
- Domain name
- NetBIOS domain
- Active Directory server password
Check the properties of the Active Directory server. For example, on Microsoft Windows, go to Windows Administrative Tools.
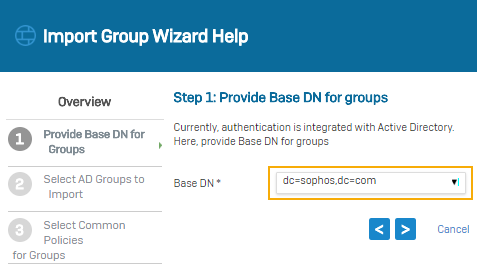
Search queries are based on the domain name (DN). In this example, the domain name is sophos.com, so the search query is: dc=sophos,dc=com.
- Go to Authentication > Servers and click Add.
-
Specify the settings.
The following are example settings:
Option Value Server type Active directory Server name My_AD_Server Server IP/domain 192.168.1.100 NetBIOS domain sophos ADS username administrator Password <AD server password>
Use the password configured on the Active Directory server.Domain name sophos.com Search queries dc=sophos,dc=com -
Click Test connection to validate the user credentials and check the connection to the server.
Note
When both synchronized user ID and STAS are configured, the authentication server uses the mechanism from which it receives the sign-in request first.
-
Click Save.
Import Active Directory groups
Import Active Directory groups into the firewall and specify policies for them.
-
Go to Authentication > Servers and click Import
 .
. -
In the Import group wizard, click Start.
-
Select the base DN for the groups.
-
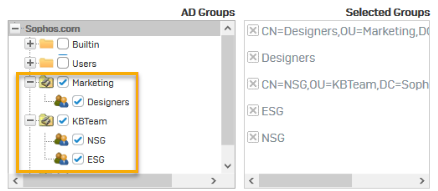
Select the AD groups to import.
-
Select common policies for the groups.
-
Review selection.
- View results.
- Go to Authentication > Groups and verify the recently imported groups.
Set primary authentication method
To query the Active Directory server first, set it as the primary authentication method. When users sign in to the firewall for the first time, they're automatically added as a member of the default group specified.
- Go to Authentication > Services.
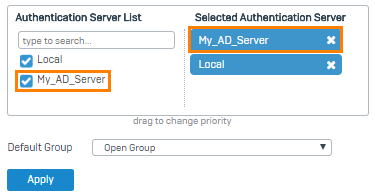
- In the authentication server list under Firewall authentication methods, select My_AD_Server.
-
Move the server to the first position in the list of selected servers.
-
Click Apply.
Go to Authentication > Groups and verify the imported groups.
Allow access
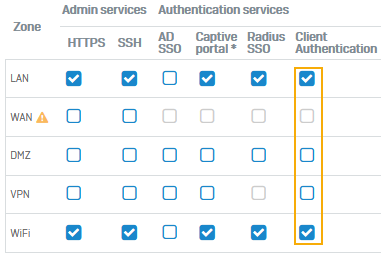
Allow access to the Windows remote desktop server's zone for client authentication by Sophos Firewall. Add a firewall rule to allow the server's traffic. In this example, the Windows remote desktop server is in the LAN zone.
-
To allow access to the Windows remote desktop server's zone, do as follows:
-
Allow access for the server's traffic:
- Go to Rules and policies > Firewall rules, click Add firewall rule, and then New firewall rule.
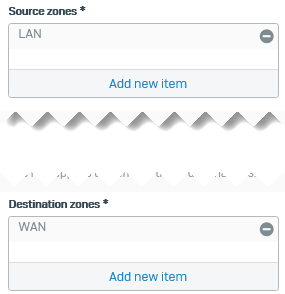
- Under Source zones, select LAN.
-
Under Destination zones, select WAN. Here's an example:
-
Select Match known users.
-
Under Users or groups, select the users and groups to whom you want to allow access.
Here's an example:
-
To see the users who've signed in to the Windows remote desktop server, go to Current activities > Live users.
Users are listed with the following details:

