Configure inter-VLAN routing
VLANs are isolated broadcast domains, so you must configure inter-VLAN routing for endpoint computers on different VLANs so they can communicate with each other.
Video
This video shows you how to configure inter-VLAN routing.
Requirements
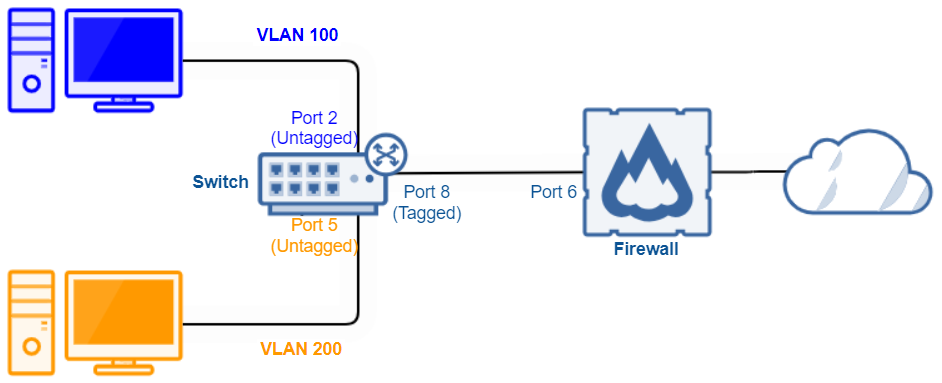
Before you can configure inter-VLAN routing on Sophos Firewall, you must complete the following steps:
- Configure VLANs on a switch connected to the firewall.
- Configure the uplink port that connects the switch to the firewall as a trunk port.
-
The network looks like the following diagram.
Configuration
To configure inter-VLAN routing on Sophos Firewall, you must do as follows:
Configure the VLAN interfaces
To configure the VLAN interfaces, do as follows:
- Go to Network > Interfaces.
- Click Add interface and click Add VLAN.
-
Configure as follows:
- Name: VLAN 100
- Interface: Port6
- Zone: LAN
- VLAN ID: 100
- IPv4/netmask: 172.16.100.1/24
-
Click Save.
- Click Add interface and click Add VLAN.
-
Configure as follows:
- Name: VLAN 200
- Interface: Port6
- Zone: LAN
- VLAN ID: 200
- IPv4/netmask: 172.16.200.1/24
-
Click Save.
- Click VLAN to confirm the creation of the VLAN interfaces.
Create the VLAN network objects
You must create a network object for each VLAN for your firewall rule as follows:
- Go to Hosts and services > IP host.
- Click Add.
-
Configure as follows:
- Name: VLAN 100 Network
- IP version: IPv4
- Type: Network
- IP address: 172.16.100.0
- Subnet: /24
-
Click Save.
- Click Add.
-
Configure as follows:
- Name: VLAN 200 Network
- IP version: IPv4
- Type: Network
- IP address: 172.16.200.0
- Subnet: /24
-
Click Save.
Create a firewall rule
The firewall rule allows traffic between the two VLANs as follows:
- Go to Rules and policies.
- Click Add firewall rule and click New firewall rule.
-
Configure as follows:
- Rule name: Inter-VLAN routing
- Source zones: LAN
- Source networks and devices: VLAN 100 Network and VLAN 200 Network
- Destination zones: LAN
- Destination networks: VLAN 100 Network and VLAN 200 Network
Leave all other settings as the default.
-
Click Save.
More resources

