All users can't establish tunnels
If no user can establish remote access SSL VPN tunnels, check the following settings.
SSL VPN global settings
Go to Remote access VPN > SSL VPN > SSL VPN global settings.
Change in global settings
-
Scenario
- Protocol
- SSL server certificate
- Override hostname
- Port
Requirement
These settings ensure that tunnels are established. If you change any of these, users must download the .ovpn configuration file from the VPN portal and import it to the VPN client again.
Override hostname
-
Scenario: WAN interface
- Single static public IP address
- Multiple public IP addresses
- Private IP address
- Dynamic public IP address
Static public IP addresses
- Single IP address: You can leave Override hostname empty if the firewall has a single static IP address.
- Multiple IP addresses: You can enter the domain name or leave the field empty. The firewall will list all the WAN addresses in the
.ovpnfile.
Perform the following checks in both scenarios:
- Open the
.ovpnfile in a text editor. -
Check if it contains the domain name or public IP addresses.
- If it doesn't, download the
.ovpnfile again and check. - Go to Network > Interfaces, and check your WAN interface settings.
- If you entered the domain name, check its DNS resolution.
- If it doesn't, download the
Private or dynamic public IP addresses
Choose one of the following options:
-
Upstream router: If the firewall has an upstream router, check the following configurations:
- Enter the router's public IP address or the domain name in Override hostname.
-
Configure the router to port-forward SSL VPN traffic to the firewall.
See How to configure SSL VPN remote access when Sophos Firewall is behind a NAT device.
-
Dynamic IP address: To resolve the firewall's dynamic public IP addresses, do as follows:
- Go to Network > DDNS and configure the settings. See Add a dynamic DNS provider.
- Under Override hostname, enter the DDNS Hostname. It's an FQDN.
SSL server certificate
-
Scenario
ApplianceCertificateor locally-signed certificate- External certificate
- Characters in certificate fields
-
Certificate source:
ApplianceCertificateor another locally-signed certificate: If you change the Default CA settings, users must download and import the.ovpnfile to the VPN client again.- External certificate: Upload the certificate, its private key, the intermediate certificate, if any, and the root CA. See SSL VPN global settings.
-
If you change the server certificate, users must download and import the
.ovpnfile to the VPN client again. - Characters: Don't use UTF-8 encoded characters in certificate and CA settings. See SSL VPN connection error "certificate verify failed".
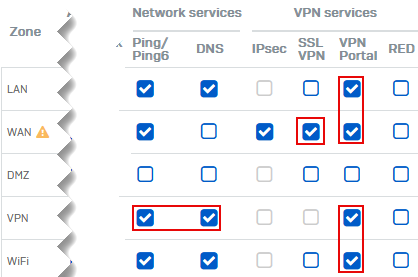
WAN access
-
Scenario
- SSL VPN
- VPN portal
- Ping/Ping6
Go to Administration > Device access and select the zones for the following services:
- SSL VPN: WAN
- VPN portal: WAN, LAN
- (Optional) Ping/Ping6: VPN
DNAT rule
If a DNAT rule with the following settings exists, the firewall matches it first and sends traffic to the permitted network resource instead of establishing the tunnel.
- Original source: Any
- Original destination: Any
- Services: Any or the SSL VPN port and protocol.
Change the DNAT rule's services to exclude the remote access SSL VPN's port-protocol combination. You'll find these on SSL VPN global settings.
SSL VPN service
Check if SSL VPN service is running in the firewall as follows:
- Sign in to the CLI and enter 5 for Device management and 3 for Advanced shell.
-
Enter the following command:
service -S | grep sslvpn
DoS settings
- Go to Intrusion prevention > DoS & spoof protection.
-
Under DoS settings, check if you selected the flags for UDP, TCP, and ICMP/ICMPv6 flood.
The firewall drops SSL VPN traffic and ping requests when they cross the corresponding limits.
To prevent this, under DoS bypass rules, add an inbound rule as follows:
| Settings | Inbound rule |
|---|---|
| Source IP/Netmask | * |
| Destination IP/Netmask | Permitted network resource address |
| Protocol | TCP or UDP |
| Source port | Any |
| Destination port | 8443 |

