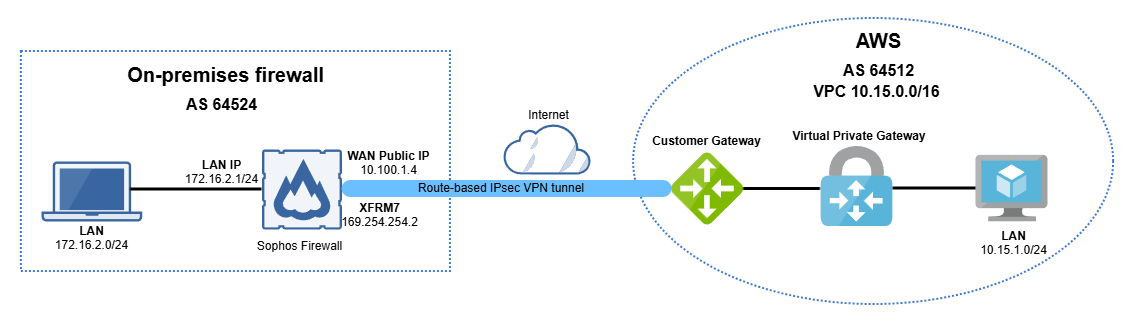
Sophos Firewall and AWS VPN gateway route-based IPsec VPN connection with BGP
You can configure a route-based IPsec VPN connection between Sophos Firewall and AWS VPN gateway and use BGP for dynamic routing.
Note
AWS doesn't support IPv6 yet.
Network diagram
The diagram below shows Sophos Firewall and AWS VPN gateway route-based IPsec VPN connection with BGP.
Requirements
An operational AWS environment with correctly configured network permissions, including the setup of appropriate Network Access Control Lists (ACLs), Security Groups, and other necessary configurations to allow inbound and outbound communication through the required ports.
AWS
Create a customer gateway, a virtual private gateway, and a site-to-site IPsec VPN connection in AWS.
This guide includes instructions for third-party products. We recommend that you check the vendors' latest documentation.
Create a customer gateway
Create a customer gateway as follows:
- Go to AWS console and sign in to your account.
- Search for
vpcand click VPC. - Go to Virtual private network (VPN) > Customer gateways and click Create customer gateway.
-
Configure the following settings:
Setting Value Name tag Enter a name. BGP ASN Enter a private Autonomous system number (ASN) within the range 64212-65534. IP address Enter the public IP address of your Sophos Firewall. -
Click Create customer gateway.
Create a Virtual private gateway
- Go to Virtual private network (VPN) > Virtual private gateways and click Create virtual private gateway.
-
Configure the following settings:
Setting Value Name tag Enter a name. Autonomous system number (ASN) Select Amazon default ASN. -
Click Create virtual private gateway.
- Click the Virtual private gateway (VPG) you created.
- Click Actions > Attach to VPC.
- Under Available VPCs, select your VPC.
-
Click Attach to VPC.
After a few seconds, it shows as Attached.

Create a site-to-site IPsec VPN connection
Create a site-to-site IPsec VPN connection as follows:
- Go to Virtual private network (VPN) > Site-to-site VPN connections and click Create VPN connection.
-
Configure the following settings:
Setting Value Name tag Enter a name. Target gateway type Select Virtual private gateway. Virtual private gateway Select the VPG you created. Customer gateway Select Existing. Customer gateway ID Select the customer gateway ID you created. Routing options Select Dynamic (requires BGP). (Optional) Local IPv4 network CIDR 0.0.0.0/0(Optional) Remote IPv4 network CIDR 0.0.0.0/0Tunnel 1 options Inside IPv4 CIDR for tunnel 1 Enter a /30CIDR from the169.254.0.0/16network. For example,169.254.254.0/30.Pre-shared key for tunnel 1 Enter a pre-shared key. If not, Amazon generates it automatically. Advanced options for tunnel 1 Select Edit tunnel 1 options. Phase 1 encryption algorithms Select AES256. Phase 2 encryption algorithms Select AES256. Phase 1 integrity algorithms Select SHA256. Phase 2 integrity algorithms Select SHA256. Phase 1 DH group numbers Select 14. Phase 2 DH group numbers Select 14. IKE version Select ikev2. Phase 1 lifetime (seconds) Enter 28800.Phase 2 lifetime (seconds) Enter 3600.Rekey margin time (seconds) Enter 360.Rekey fuzz (percentage) Enter 50.DPD timeout action Select Restart. Tunnel 2 options Inside IPv4 CIDR for tunnel 2 Enter a /30CIDR from the169.254.0.0/16network other than the one you configured for tunnel 1. For example,169.254.254.4/30.Pre-shared key for tunnel 2 Enter a pre-shared key. If you don't enter a pre-shared key, Amazon generates it automatically. Advanced options for tunnel 2 Select Edit tunnel 2 options. Phase 1 encryption algorithms Select AES256. Phase 2 encryption algorithms Select AES256. Phase 1 integrity algorithms Select SHA256. Phase 2 integrity algorithms Select SHA256. Phase 1 DH group numbers Select 14. Phase 2 DH group numbers Select 14. IKE version Select ikev2. Phase 1 lifetime (seconds) Enter 28800.Phase 2 lifetime (seconds) Enter 3600.Rekey margin time (seconds) Enter 360.Rekey fuzz (percentage) Enter 50.DPD timeout action Select Restart. Note
The options you select or enter must match the IPsec policy in Sophos Firewall.
-
Click Create VPN connection.

-
Click the VPN connection you created and click Download configuration.
-
Configure the following settings:
Setting Value Vendor Select Generic. Platform Select Generic. Software Select Vendor agnostic. IKE version Select ikev2. -
Click Download.
Sophos Firewall
Configure an IPsec profile, a site-to-site IPsec VPN connection, BGP, and firewall rules.
Create an IPsec profile
Configure the IPsec profile as follows:
- Sign in to your Sophos Firewall.
- Go to Profiles > IPsec profiles and click Add.
-
Under General settings, configure the following settings:
Setting Value Name Enter a name. Key exchange Select IKEv2. Key negotiation tries Enter 0.Re-key connection Selected Use strict profile Cleared -
Under Phase 1, configure the following settings:
Setting Value Key life Enter 28000.Re-key margin Enter 360.Randomize re-keying margin by Enter 50.DH group (key group) Select 14 (DH2048). Encryption Select AES256. Authentication Select SHA2 256. -
Under Phase 2, configure the following settings:
Setting Value PFS group (DH group) Select 14 (DH2048). Key life Enter 3600.Encryption Select AES256. Authentication Select SHA2 256. -
Under Dead peer detection, configure the following settings:
Setting Value Dead Peer Detection Selected Check peer after every Enter 30.Wait for response up to Enter 120.When peer unreachable Select Re-initiate. -
Click Save.
Create a site-to-site IPsec VPN connection
Create a site-to-site IPsec VPN connection as follows:
- Go to Site-to-site VPN > IPsec and click Add.
-
Under General settings, configure the following settings:
Setting Value Name Enter a name. Connection type Select Route-based (Tunnel interface). IP version Select IPv4. Gateway type Select Initiate the connection. Activate on save Selected -
Under Encryption, configure the following settings:
Setting Value Profile Select IKEv2. Authentication type Select Preshared key. Preshared key Enter the preshared key you entered in AWS. Repeat preshared key Enter the preshared key again. Note
If you let Amazon generate a preshared key automatically, you must find the Pre-shared key in the AWS VPN connection configuration file you downloaded.

-
Under Gateway settings, configure the following settings:
Setting Value Listening interface Your WAN port. This must match the IP address you entered in the AWS customer gateway you created. Local ID type Select IP address. Local ID Enter a random IP address or the public IP address of the Listening interface. Gateway address Enter the AWS Virtual private gateway public IP address, which you can find in the downloaded AWS VPN connection configuration file.

Remote ID type Select IP address. Remote ID Enter a random IP or the AWS VPG IP address. -
Click Save.
Configure the XFRM interface
Configure the XFRM interface as follows:
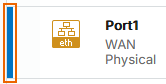
- Go to Network > Interfaces.
-
Click the blue bar next to the WAN port you used in the VPN configuration.
-
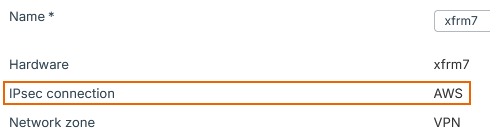
Click the XFRM interface created for the IPsec VPN connection you created.
Make sure that the IPsec connection linked in the XFRM interface is correct.
-
Select IPv4 configuration.
-
Under IPv4/netmask, enter the Customer gateway IP address and subnet mask, which you can find in the downloaded AWS VPN connection configuration file.

-
Click Save.
Configure BGP
Configure BGP as follows:
- Go to Routing > BGP.
-
Under Global configuration, configure the following settings:
Setting Value Router ID assignment Select Manual. Router ID Enter any IP address. For example, 172.16.1.100.Local AS Enter the Customer gateway ASN, which you can find in the downloaded AWS VPN connection configuration file.

-
Click Apply.
- Under Neighbors, click Add.
-
Configure the following settings:
Setting Value IP version Select IPv4. IP address Enter the Neighbor IP address, which you can find in the downloaded AWS VPN connection configuration file.

Remote AS Enter the Virtual Private Gateway ASN, which you can find in the downloaded AWS VPN connection configuration file.

-
Click Save.
- Under Networks, click Add.
-
Configure the following settings:
Setting Value IP version Select IPv4. IP address and Subnet Enter the network addresses and subnet masks behind your Sophos Firewall that you want to advertise to AWS via BGP. For example, 172.16.2.0/24. -
Click Save.
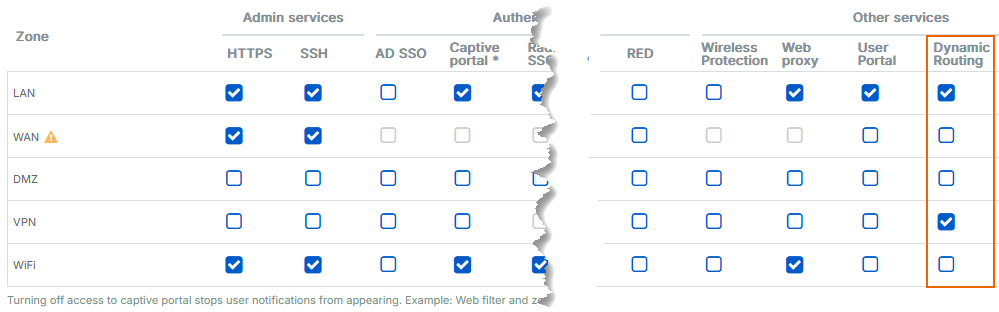
Configure device access
Configure the device access as follows:
- Go to Administration > Device access.
-
Under Local service ACL, in the Dynamic routing column, select the zones that you want to include in BGP routing, such as LAN and VPN zones.
-
Click Apply.
Establish the VPN connection
Activate the site-to-site IPsec VPN connection as follows:
- Go to Site-to-site VPN > IPsec.
- In the AWS VPN connection you created, click the red button
 under Connection to connect the VPN tunnel.
 - Click Ok.
The button will turn green, indicating the established VPN connection.
Create firewall rules
Configure the firewall rules as follows:
- Go to Rules and policies > Firewall rules.
- Select IPv4 protocol.
- Click Add firewall rule and select New firewall rule.
-
Configure the following settings:
Setting Value Rule name Enter a name. Action Select Accept. Rule position Select Top. Rule Group Select None. Log firewall traffic Selected -
Under Source, configure the following settings:
Setting Value Source zones Select LAN and VPN. Source networks and devices Enter your Sophos Firewall and AWS networks. -
Under Destination and services, configure the following settings:
Setting Value Destination zones Select LAN and VPN. Destination networks Enter your Sophos Firewall and AWS Networks. Services Select Any.
If you don't use Any, add the services you require and make sure you also add BGP port 179.
-
Click Save.
Note
You can create two separate firewall rules, one for LAN-to-VPN traffic and one for VPN-to-LAN traffic. This separates the incoming and outgoing traffic logs, which can help troubleshoot connection issues.
Verify BGP
You can verify that BGP routing works in Sophos Firewall and AWS.
Sophos Firewall
Verify BGP routing in Sophos Firewall as follows:
- Go to Routing > Information.
- Under BGP-IPv4, click Neighbors.
- Make sure that BGP state is Established. If it's Active, BGP hasn't been established yet.

AWS
Verify BGP routing in AWS as follows:
- Search for
vpcand click VPC. - Go to Virtual private network (VPN) > Site-to-site VPN connections.
- Click your VPN connection and click Tunnel details.
- For Tunnel 1, make sure that the State column is Up and the Details column contains BGP routes.

Verify connectivity
From a host behind Sophos Firewall, run a ping test to a host behind the AWS Virtual private gateway.
In this example, a ping test from a host within the 172.16.2.0/24 network can ping a host within the 10.15.1.0/24 network.
Troubleshooting
You can check the following troubleshooting steps:
- In your AWS VPC dashboard, go to Security > Security groups and check that you allow the correct subnets and ports.
- In your AWS VPC dashboard, go to Virtual Private cloud > Route tables > Route propagation and check that route propagation is turned on for the subnets you want to route.
- In your AWS VPC dashboard, go to Security > Network ACLs and check that all network ACLs involved in your configuration have the correct inbound and outbound rules.
- Check that you used private ASN numbers in Sophos Firewall and AWS.
-
In AWS, to make BGP work, you can force the VPN connection to use local IPv4 and remote IPv4 CIDR.
Note
When BGP works, remove this configuration.
-
In Sophos Firewall, you can create a static route to force traffic through the XFRM interface and then start a ping test to start BGP.
Note
When BGP works, remove this configuration.
Note
Most issues are within the AWS configuration, such as route tables, network ACLs, and security groups. Contact AWS support for assistance.