Add a Microsoft Entra ID (Azure AD) server
Complete configuration to integrate Microsoft Entra ID SSO with Sophos Firewall
- Configure Entra ID
- Configure firewall
- Add redirect URIs
- Allow Azure URLs
- Import groups
This task has several steps. Click a link to go to the page for that step.
Add a Microsoft Entra ID (Azure AD) server to authenticate administrators and users signing in to the following services:
- Web admin console
- Captive portal
- VPN portal
- Remote access IPsec VPN and remote access SSL VPN through the Sophos Connect client
Requirement
In the Azure Portal, you must integrate your Microsoft Entra ID with Sophos Firewall. See Integrate Microsoft Entra ID with Sophos Firewall.
Add a Microsoft Entra ID server
You can add a Microsoft Entra ID server to authenticate users and administrators through single sign-on (SSO).
Server settings
To add a Microsoft Entra ID server in the firewall, configure the following settings:
- Go to Authentication > Servers and click Add.
- From the Server type list, select Azure AD SSO.
- In Server name, enter a name for the server.
-
Paste the following IDs you copied from the firewall application you created in the Azure Portal:
- Application (client) ID
- Directory (tenant) ID
-
In Client secret, enter the client secret that you created. See Create a client secret.
-
(Optional) Under Redirect URI, the firewall automatically uses the web admin console's FQDN from the URL shown in the browser.
Alternatively, enter the FQDN or IP address of the firewall's web admin console.
You must copy and paste the URLs in Microsoft Entra ID. See Add redirect URIs to Microsoft Entra ID.
When you configure a Microsoft Entra ID server in the firewall from Sophos Central, you must do as follows:
- In an individual firewall: Manually enter the hostname. Don't use the automatically generated URLs because the firewall uses the Sophos Central reverse SSO URL.
- In a firewall group policy: You won't see the Redirect URI setting. The Redirect URI is automatically set to the individual firewalls' hostname if it's configured in 20.0 MR1 and later. It automatically uses "defaultHostname" in earlier versions.
Note
If you use the provisioning file for remote access VPN, you must enter the FQDN or IP address used in Redirect URI as the
gatewayvalue in the file. See Remote access VPN.
User attributes and policies
Under User attribute mapping, the user attributes are automatically fetched from the Microsoft Entra ID token to create users in the firewall.
Under User policies, do as follows:
-
From the Fallback user group list, select a user group.
If a user's Microsoft Entra ID group exists in the firewall, it assigns the user to that group. If it doesn't exist, the firewall assigns the user to the group you select here.
Note
If you use the Microsoft Entra ID server in Authentication > Services under Firewall authentication methods, the Fallback user group still applies instead of the Default group.
Role mapping
If you only want to implement SSO for the user services, such as the captive portal, you can skip this section.
-
Select the user type depending on whether you want to implement SSO for the web admin console:
- User: Only implements SSO for the user services. This is the default selection.
- Administrator: Implements SSO for the user services and the web admin console.
-
If you selected Administrator, do as follows:
-
Identifier type and Value: Set Identifier type to one of the following types and enter the exact value you configured in Microsoft Entra ID:
- Roles: Enter a role value, for example,
adminFullAccess. - Groups: Enter a group name, for example,
Admin Full Access.
- Roles: Enter a role value, for example,
-
Profile: Select an administrator profile.
You can see these on Profiles > Device access in the firewall. See Device access.
Note
When users sign in to the firewall, the token sent by Microsoft Entra ID includes their role value and group name. The firewall checks the Identifier type and profile in the order shown and assigns the first matching profile to the administrator and allows the sign-in.
If the token doesn't contain a role value or group name, the firewall creates a regular user. See Configure groups or roles for administrators.
Tip
To add multiple identifier types, click add
 .
. -
Test connection
- Click Test connection to make sure the firewall connects with Microsoft Entra ID.
- Click Save.
Configure authentication methods
The firewall only allows one Microsoft Entra ID server for each authentication method.
To configure the authentication methods, do as follows:
- Go to Authentication > Services.
-
Select the Microsoft Entra ID server as an authentication method for the services you want:
- Firewall authentication methods: For the captive portal.
- VPN portal authentication methods: For the VPN portal.
-
VPN (IPsec/dial-in/L2TP/PPTP) authentication methods: For remote access IPsec VPN.
Note
If you use the provisioning file to establish remote access VPN connections, select the same server as the VPN portal.
-
SSL VPN authentication methods: For remote access SSL VPN. Always select the same server as the VPN portal.
- Administrator authentication methods: For the web admin console.
-
Drag and drop the server to the top of the list in each method.
- Click Apply for each service where you added the Microsoft Entra ID server.
Configure firewall rules
To authenticate users through Microsoft Entra ID SSO, you must select Match known users and Use web authentication for unknown users in the corresponding firewall rules.
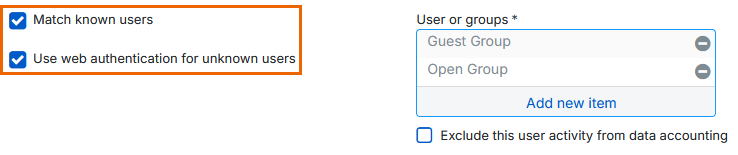
Note
Microsoft Entra ID (formerly Azure AD) uses token-based authentication through OAuth 2.0 and OpenID Connect (OIDC). So, local and remote users can't use Credential login and sign in with username and password.
To implement Credential login, you can use directory services, such as Active Directory (AD) or LDAP.
Secure the captive portal access
If you want to use the captive portal, we recommend securing it. Do as follows:
- In the firewall, go to Authentication > Web authentication.
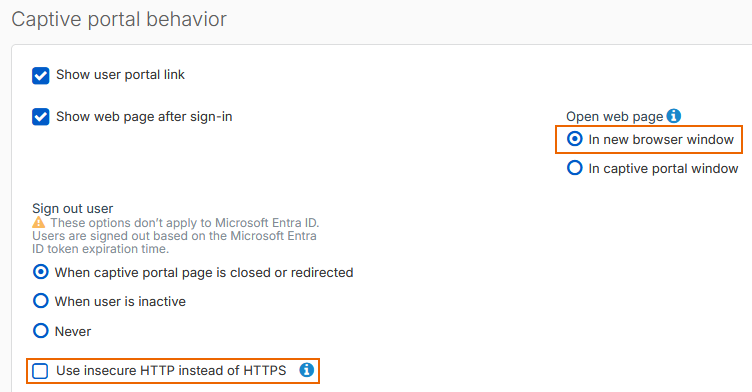
-
Under Captive portal behavior, select In new browser window.
Users must explicitly sign out to end their sessions or wait for the Microsoft Entra ID token expiration time. We recommend keeping the captive portal window open for users to sign out.
-
Clear Use insecure HTTP instead of HTTPS.
Microsoft Entra ID SSO isn't supported if you select this option.
-
Click Apply.
To continue with the configuration, see Add redirect URIs to Microsoft Entra ID.