NAT with policy-based IPsec when local and remote subnets are the same
Configure Network Address Translation (NAT) with policy-based IPsec VPN when the subnets are the same in the local and remote firewalls.
You can use 1:1 (host-to-host), 1:n (host-to-subnet), or n:n (subnet-to-subnet) NAT. To configure n:n NAT, the original and translated subnets must be of the same size.
The example scenario shows n:n NAT with a /24 subnet.
Key steps
The key steps are as follows:
-
Configure the head office firewall:
- Add the IP hosts.
- Add an IPsec connection.
- Check the firewall rules.
-
Configure the branch office firewall:
- Add the IP hosts.
- Add an IPsec connection.
- Check the firewall rules.
-
Establish the IPsec connection.
- Confirm the traffic flow.
All configuration details are examples based on the network in the following diagram:
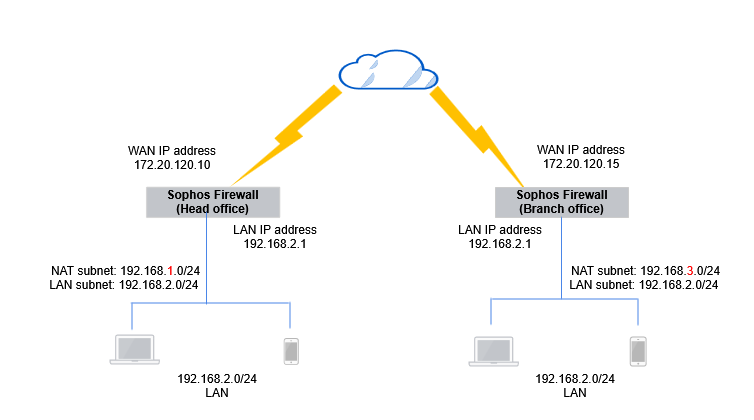
Head office firewall
Configure the following:
Configure IP hosts
Configure the head office firewall device to NAT traffic over the site to site connection. The following are example settings:
-
Go to Hosts and services > IP host, select Add, and create the local LAN.
Here's an example:

-
Go to Hosts and services > IP host, select Add, and create the local NATed LAN.
Here's an example:

-
Go to Hosts and services > IP host, select Add, and create the remote NATed LAN.
Here's an example:

Note
You must use the same subnet mask for the local LAN and NAT networks.
Configure an IPsec connection
The following are example settings:
- Go to Site-to-site VPN > IPsec.
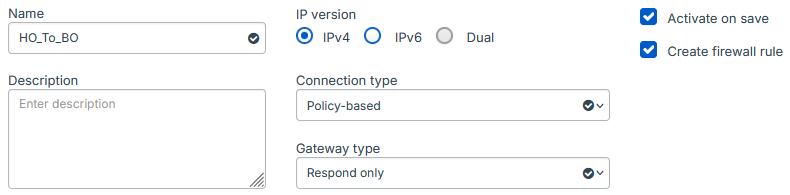
- Under IPsec connections, click Add.
- Enter a name.
- Make sure Connection type is set to Policy-based.
- Make sure Gateway type is set to Respond only.
-
Make sure Activate on save and Create firewall rule are selected.
Here's an example:
-
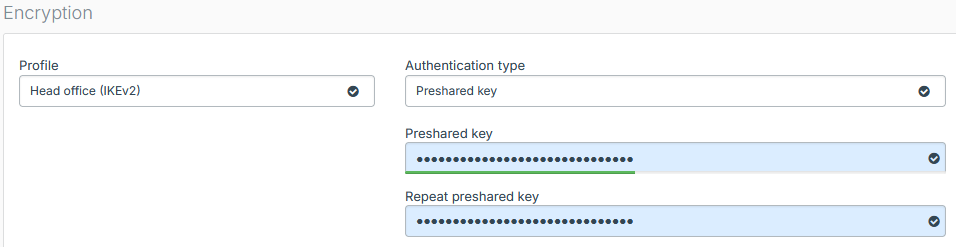
Under Encryption, set Profile to Head office (IKEv2).
- For Authentication type, select Preshared key.
- Enter a preshared key.
-
Confirm the preshared key.
Here's an example:
-
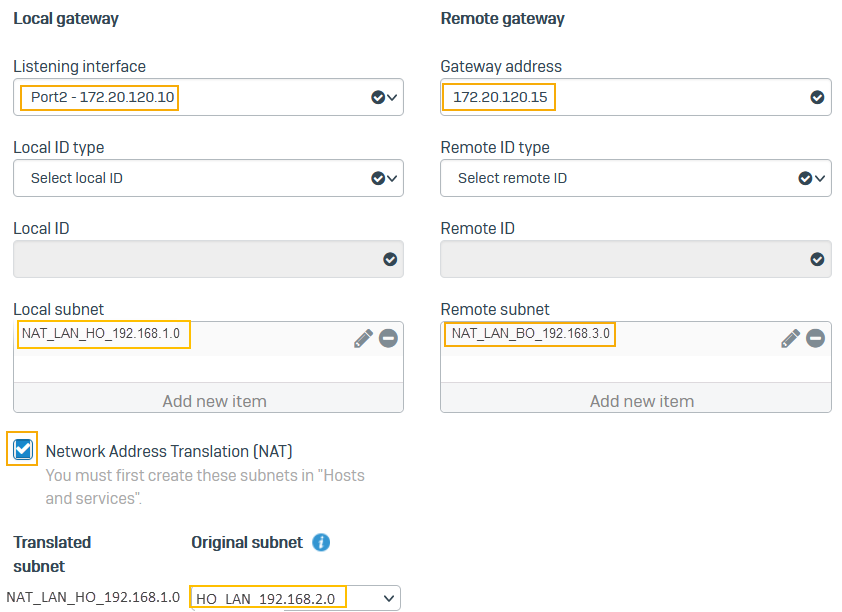
For Listening interface, select Port2.
- For Gateway address, enter
172.20.120.15. - For Local subnet, select
NAT_LAN_HO_192.168.1.0. - For Remote subnet, select
NAT_LAN_BO_192.168.3.0. - Select Network address translation (NAT).
- For Original subnet, select
HO_LAN_192.168.2.0. -
Click Save.
Here's an example:
The connection shows as active.

Check the firewall rules
When you save the IPsec connection, the firewall automatically creates inbound and outbound firewall rules. They allow traffic between the head and branch offices.
To see the firewall rules, go to Rules and policies > Firewall rules and click the Automatic VPN rules rule group. You'll see two firewall rules named Incoming HO_to_BO and Outgoing HO_to_BO.
Make sure that VPN firewall rules are at the top of the firewall rule list.

Note
If you already have a firewall rule to allow inbound VPN traffic, you can add the remote subnet to its Source networks and devices and the local subnet to Destination networks. You don't need to create an independent firewall rule for each IPsec connection.
Branch office firewall
Configure the following:
Configure IP hosts
Configure the second Sophos Firewall to NAT traffic over the site-to-site connection. The following are example settings:
-
Go to Hosts and services > IP host and select Add and create the local LAN.

-
Go to Hosts and services > IP host and select Add and create the local NATed LAN.

-
Go to Hosts and services > IP host and select Add and create the remote NATed LAN.

Note
You must use the same subnet mask for the local LAN and NAT networks.
Configure an IPsec connection
The following are example settings:
- Go to Site-to-site VPN > IPsec and select Add.
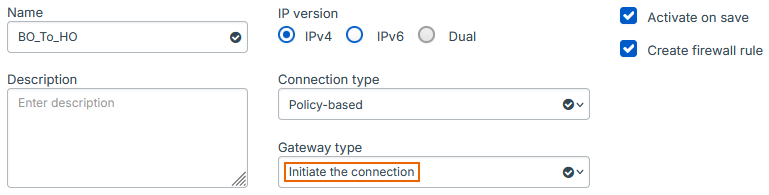
- Enter a name.
- Make sure Connection type is set to Policy-based.
- Make sure Gateway type is set to Initiate the connection.
-
Make sure Activate on save and Create firewall rule are selected.
Here's an example:
-
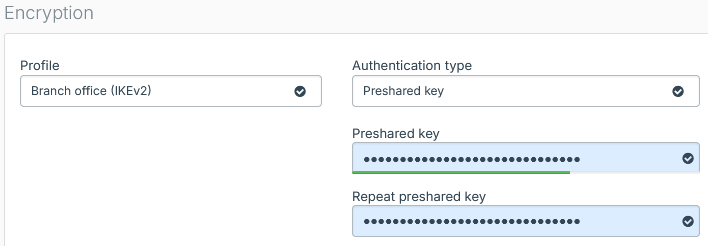
Under Encryption, set Profile to Branch office (IKEv2).
- For Authentication type, select Preshared key.
-
Enter a preshared key and enter it again.
Here's an example:
-
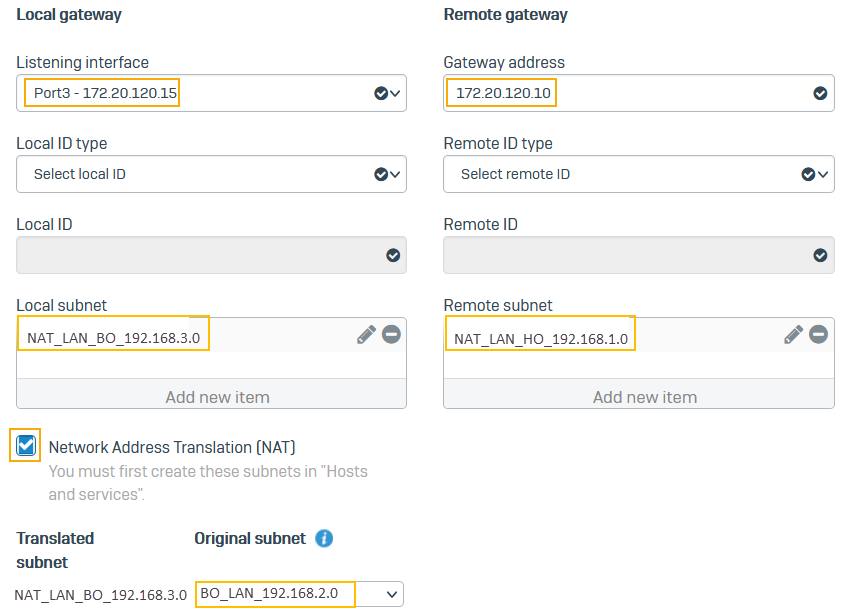
For Listening interface, select Port3.
- For Gateway address, enter
172.20.120.10. - For Local subnet, select
NAT_LAN_BO_192.168.3.0. - For Remote subnet, select
NAT_LAN_HO_192.168.1.0. - Select Network address translation (NAT).
- For Original subnet, select
BO_LAN_192.168.2.0. -
Click Save.
Here's an example:
The connection shows as active.

Check the firewall rules
When you save the IPsec connection, the firewall automatically creates inbound and outbound firewall rules. They allow traffic between the head and branch offices.
To see the firewall rules, go to Rules and policies > Firewall rules and click the Automatic VPN rules rule group. You'll see two firewall rules named Incoming BO_To_HO and Outgoing BO_To_HO.
Make sure that VPN firewall rules are at the top of the firewall rule list.

Note
If you already have a firewall rule to allow outbound VPN traffic, you can add the local subnet to its Source networks and devices and the remote subnet to Destination networks.
Establish the IPsec connection
Once both Sophos Firewall devices at the head and branch offices are configured, you must establish the IPsec connection.
- Go to Site-to-site VPN > IPsec.
-
Under Connection, click the status button
 to establish the connection.
The connection indicator turns green when the connection is established.

Confirm traffic flow
- Generate some traffic that goes across the VPN connection.
- Go to Rules and policies > Firewall rules.
-
Confirm the firewall rules created earlier are allowing traffic flow in both directions.

-
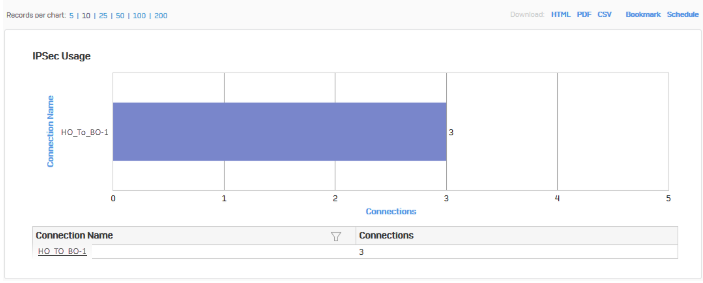
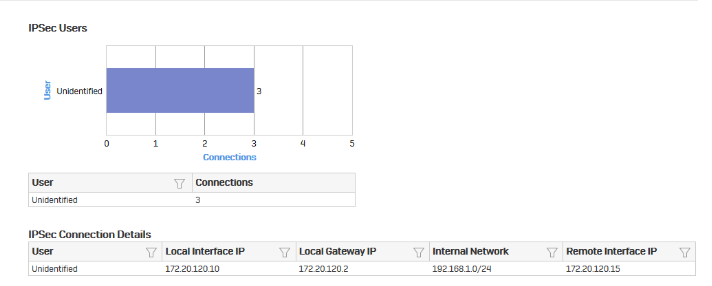
Go to Reports > VPN and confirm IPsec usage.
-
Click the connection name to show further details.
Check tunnel's connectivity
To make sure the traffic has end-to-end connectivity, send a ping from branch and head office endpoints to the NAT addresses you've used in the remote firewall. Do as follows:
- On the branch office endpoint, open the Windows command prompt.
- Run the following command:
ping 192.168.1.2. - On the head office endpoint, open the Windows command prompt.
- Run the following command:
ping 192.168.3.2.
Additional information
In a head and branch office configuration, the branch office firewall usually acts as the tunnel initiator and the head office firewall as a responder due to the following reasons:
- When the branch office device is configured with a dynamic IP address, the head office device can't initiate the connection.
- As the branch offices number varies, we recommend that each branch office retry the connection instead of the head office retrying all connections to branch offices.