IPsec VPN with firewall behind a router
You can configure IPsec VPN connections between firewalls behind a router.
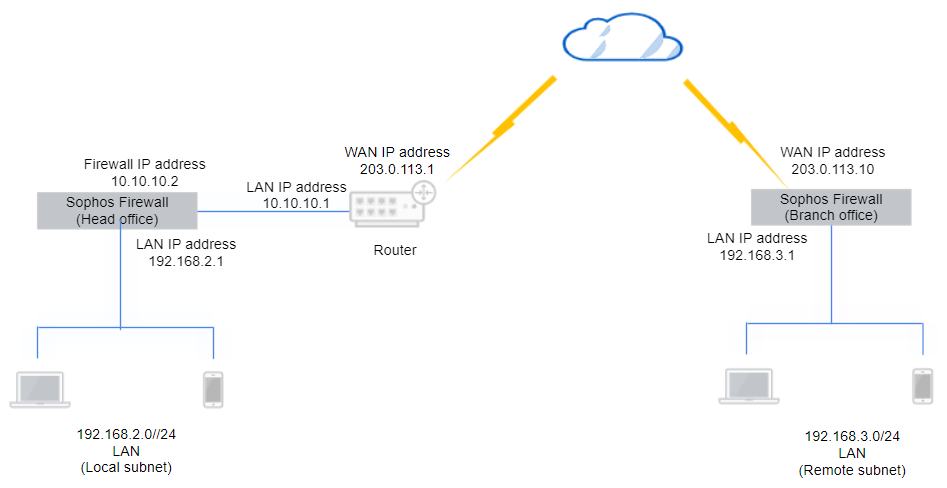
In this example, the head office firewall is behind a router and doesn't have a public IP address. You must configure the following at the head office and the branch office:
- Firewall prerequisite: Configure IP hosts for the local and remote subnets.
- Configure the IPsec VPN connection.
- Check the firewall rules.
- Allow access to services.
- Configure the router settings.
- Check connectivity.
- Check the logs.
Here's an example network diagram:
Configure the head office firewall
Configure the IPsec connection and firewall rules.
Add an IPsec connection
Create and activate an IPsec connection at the head office.
- Go to Site-to-site VPN > IPsec and click Add.
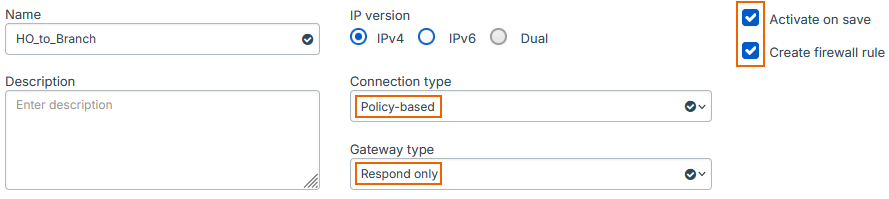
- Enter a name.
- Select Activate on save.
- Select Create firewall rule.
- For Connection type, select Policy-based.
-
For Gateway type, select Respond only.
Here's an example:
-
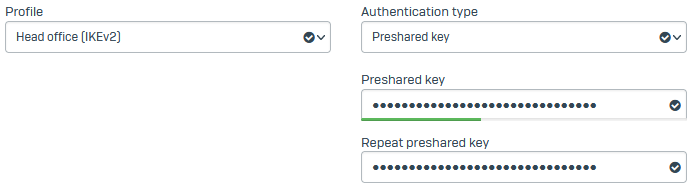
For Profile, select Head office (IKEv2).
- For Authentication type, select Preshared key.
-
Enter a key and confirm it.
Here's an example:
-
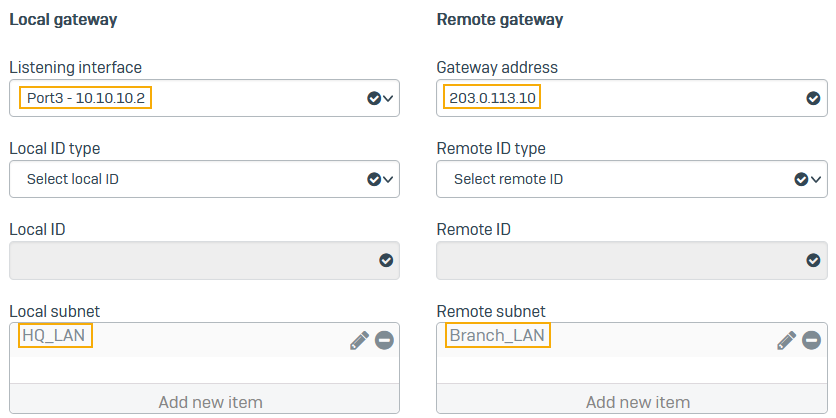
For Listening interface, select the local firewall's WAN port (example:
10.10.10.2). - For Gateway settings, enter the remote firewall's WAN port (example:
203.0.113.10). - For Local subnet, select the IP host you've created for
192.168.2.0. - For Remote subnet, select the IP host you've created for
192.168.3.0. -
Click Save.
Here's an example:
Check the firewall rules
When you save the IPsec connection, the firewall automatically creates inbound and outbound firewall rules. They allow traffic between the head and branch offices.
To see the firewall rules, go to Rules and policies > Firewall rules and click the Automatic VPN rules rule group. You'll see two firewall rules named Incoming HQ_to_Branch and Outgoing HQ_to_Branch.

Note
If you already have a firewall rule to allow inbound VPN traffic, you can add the remote subnet to its Source networks and devices and the local subnet to Destination networks. You don't need to create an independent firewall rule for each IPsec connection.
Allow access to services
- Go to Administration > Device access.
- Under IPsec, select WAN.
-
Under Ping/Ping6, select VPN.
Users can ping the firewall's IP address through the VPN to check connectivity.
-
Click Apply.
Configure your router settings
Do as follows:
-
Make sure you configure a DNAT rule on the router to allow the VPN traffic.
- Set the original destination to the router's WAN interface (example:
203.0.113.1). - Set the translated destination to the local firewall's WAN interface (example:
10.10.10.2).
- Set the original destination to the router's WAN interface (example:
-
Allow the following services:
- UDP port 500
- UDP port 4500
- IP protocol 50
Configure the branch office firewall
Configure the IPsec connection and firewall rules.
Add an IPsec connection
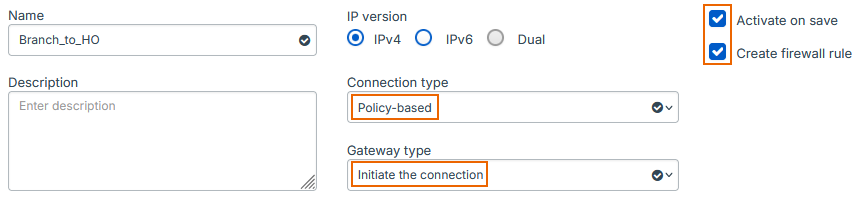
Create and activate an IPsec connection at the branch office.
- Go to Site-to-site VPN > IPsec and click Add.
- Enter a name.
- Select Activate on save.
- Select Create firewall rule.
- For Connection type, select Policy-based.
-
For Gateway type, select Initiate the connection.
Here's an example:
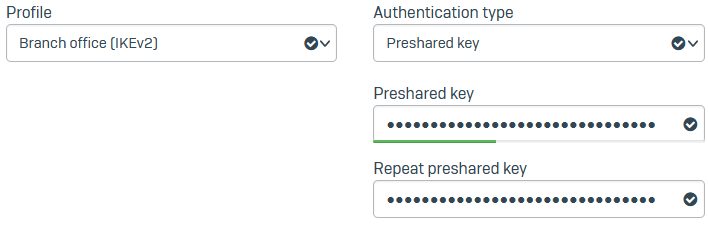
-
For Profile, select Branch office (IKEv2).
- For Authentication type, select Preshared key.
-
Enter a key and confirm it.
Here's an example:
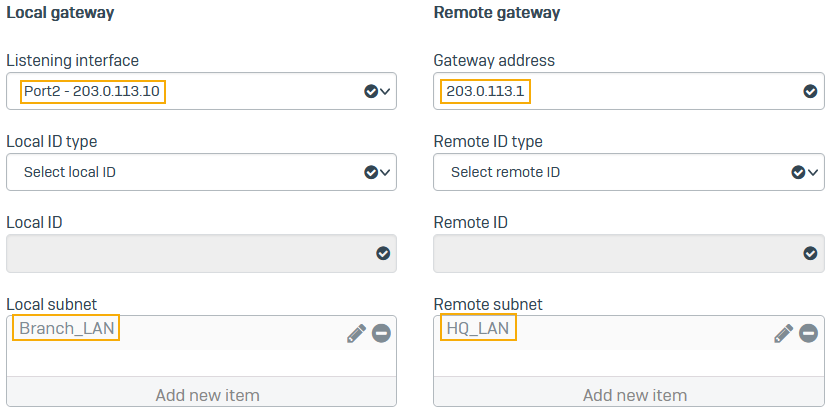
-
For Listening interface, select the local firewall's WAN port (
203.0.113.10). - For Gateway settings, enter the head office router's WAN port (
203.0.113.1). - For Local subnet, select the IP host you've created for
192.168.2.0. - For Remote subnet, select the IP host you've created for
192.168.3.0. -
Click Save.
Check the firewall rules
When you save the IPsec connection, the firewall automatically creates inbound and outbound firewall rules. They allow traffic between the head and branch offices.
To see the firewall rules, go to Rules and policies > Firewall rules and click the Automatic VPN rules rule group. You'll see two firewall rules named Incoming Branch_to_HQ and Outgoing Branch_to_HQ.

Note
If you already have a firewall rule to allow outbound VPN traffic, you can add the local subnet to its Source networks and devices and the remote subnet to Destination networks.
Allow access to services
- Go to Administration > Device access.
-
Under Ping/Ping6, select VPN.
Users can ping the firewall's IP address through the VPN to check connectivity.
-
Click Apply.
Check the connectivity
Check the VPN connectivity between the head office and the branch office.
- Head office firewall: Ping the branch office subnet. For example, on Windows, type the following command at the command prompt:
ping 192.168.3.0 - Branch office firewall: Ping the head office subnet. For example, on Windows, type the following command at the command prompt:
ping 192.168.2.0
Check the logs
The head office firewall's logs show that it's detected a NAT device in front of it.
The branch office firewall's logs show that it's detected a NAT device in front of the head office firewall.