Send DHCP traffic over policy-based IPsec VPN to servers
Learn how to configure Sophos Firewall in the branch office as a DHCP relay agent and send DHCP requests from clients securely through a policy-based IPsec tunnel to a DHCP server located behind the head office firewall.
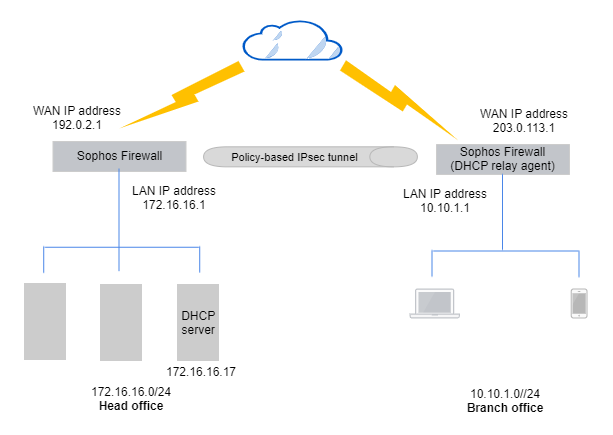
Network diagram
This example shows a Windows Server configured as the DHCP server. The network details are as follows:
Head office:
- WAN IP address:
192.0.2.1 - DHCP server IP address:
172.16.16.17 - LAN subnet:
172.16.16.0/24
Branch office:
- WAN IP address:
203.0.113.1 - DHCP relay agent's interface:
10.10.1.1 - LAN subnet:
10.10.1.0/24
Branch office
Configure the DHCP relay agent and a policy-based IPsec connection, and translate the LAN interface.
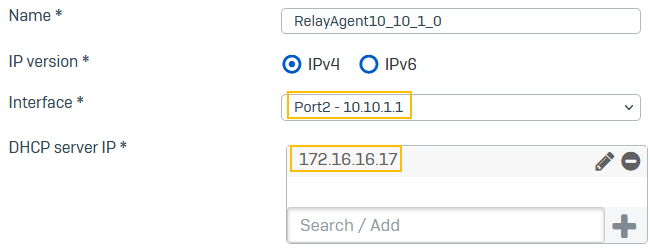
Configure a DHCP relay agent
Configure the Sophos Firewall in the branch office as the DHCP relay agent. In this example, it relays the IP addresses leased by the DHCP server to branch office clients.
- Go to Network > DHCP.
- Under Relay, click Add.
-
Under Interface, select the client-side interface, for example,
Port2 - 10.10.1.1.The server responds if its configured lease range belongs to this interface subnet.
-
Enter the IP address for DHCP server IP, for example,
172.16.16.17. -
Click Save.
Here's an example:
Configure a policy-based IPsec connection
Configure a policy-based IPsec connection in the branch office firewall as follows:
- On the web admin console, go to Site-to-site VPN > IPsec > IPsec connections and click Add.
-
The following settings are an example. You must specify your network's settings:
Setting Value Connection type Policy-basedGateway type Initiate the connectionCreate firewall rule Clear the checkbox.
Firewall rules don't control system-generated traffic.
Authentication type Preshared keyEnter the key you specified in the head office firewall.
Listening interface Port3 - 203.0.113.1Gateway address 192.0.2.1Local subnet 10.10.1.0Remote subnet 172.16.16.0 -
Click Save.
Here's an example:

Translate the LAN interface
You must configure Source Network Address Translation (SNAT) for system-generated traffic, such as DHCP requests, using the CLI.
To translate the LAN port's (DHCP relay interface) IP address on the branch office firewall to the DHCP server at the head office, do as follows:
- Sign in to the CLI and enter 4 for Device Console.
-
Run the following command:
set advanced-firewall sys-traffic-nat add destination <destination IP or network address> snatip <source IP address to translate>Example
set advanced-firewall sys-traffic-nat add destination 172.16.16.17 snatip 10.10.1.1
Add an IPsec route
If the DHCP requests aren't sent through the tunnel, you must configure an IPsec route. This step is optional and depends on your network configuration.
To add the route, run the following command:
system ipsec_route add host <IP address of host> tunnelname <tunnel name>
Example
system ipsec_route add host 172.16.16.17 tunnelname BO_to_HO
Note
In SFOS 22.0 and later, you can't see ipsec0 routes in the routing table, but the traffic is processed based on internal routing.
Head office
Configure a policy-based IPsec connection and firewall rules.
Configure a policy-based IPsec connection
Configure a policy-based IPsec connection in the head office firewall as follows:
- On the web admin console, go to Site-to-site VPN > IPsec > IPsec connections and click Add.
-
The following settings are an example. You must specify your network's settings:
Setting Value Connection type Policy-basedGateway type Respond onlyTo allow WAN traffic to access the IPsec tunnel, go to Administration > Device access and make sure you select WAN under IPsec.
Create firewall rule Select the checkbox. Authentication type Preshared keyEnter the key you specified in the branch office firewall.
Listening interface Port3 - 192.0.2.1Gateway address 203.0.113.1Local subnet 172.16.16.17Remote subnet 10.10.1.0 -
Click Save.
Here's an example:

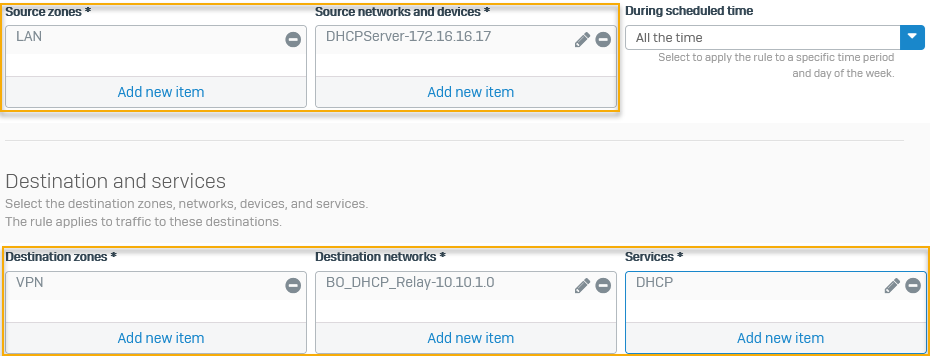
Outbound firewall rule
Edit the automatically created firewall rule in the head office firewall to allow outbound DHCP communication from the server to the DHCP relay agent in the branch office.
Specify the following settings:
- Enter a name.
- Source zones:
LAN - Source networks and devices:
DHCPServer-172.16.16.17 - Destination zones:
VPN - Destination networks:
BO_DHCP_Relay-10.10.1.0 - Services:
DHCP -
Click Save.
Here's an example:
Inbound firewall rule
Configure a firewall rule in the head office firewall to allow inbound DHCP communication to the server from the DHCP relay agent in the branch office.
Specify the following settings:
- Enter a name.
- Source zones:
VPN - Source networks and devices:
BO_DHCP_Relay-10.10.1.0 - Destination zones:
LAN - Destination networks:
DHCPServer-172.16.16.17 - Services:
DHCP -
Click Save.
Here's an example:
