
Only for authentication based on X.509 certificate, you do not need define this firewall rule if you have enabled the Automatic firewall rule function during the configuration of IPsec.
Open the Network Protection > Firewall > Rules tab.
Click the New Rule button.
The dialog box Create New Rule opens.
Make the following settings:
Sources: Add the remote host or user (in this example: gforeman).
Services: Add the allowed services.
Destinations: Add the allowed networks (in this example: Internal (Network)). For the remote user to be able to access Internet you should e.g. select the Internet or Any network definition.
Action: Select Allow.
Click Save.
The new firewall rule is added to the list and remains disabled (toggle switch shows gray).
Enable the rule by clicking the toggle switch.
The toggle switch turns green.

Security Note – Active rules are processed in the order of the numbers (next to the toggle switch) until the first matching rule. Then the following rules will be ignored! The sequence of the rules is thus very important. Therefore never place a rule such as Any – Any – Any – Allow at the beginning of the rules since all traffic will be allowed through and the following rules ignored.
Cross Reference – More detailed information on the definition of Firewall rules and detailed explanations of the individual settings can be found in the UTM administration guide in chapter Network Protection.
Note – This is an optional step depending on your environment.
Masquerading is used to mask the IP addresses of one network (in this example: gforeman) with the IP address of a second network (e.g. External). Thus remote users who have only private IP addresses can e.g. surf on the Internet with an official IP address. Depending on your system configuration masquerading can also be necessary for other connection types.
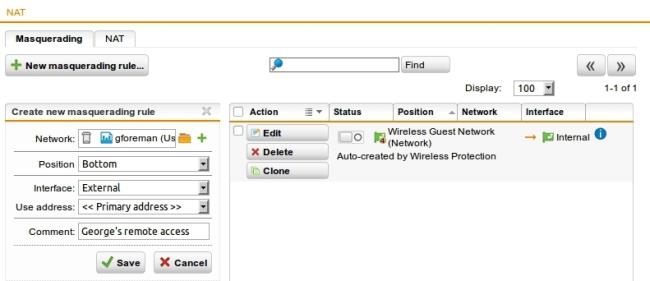
Open the Network Protection > NAT > Masquerading tab.
Click the New Masquerading Rule button.
Make the following settings:
Network: Select the network of the remote endpoint (in this example: gforeman).
Interface: Select the interface that should be used to mask the clients (in this example: External).
Use address: If the interface you selected has more than one IP address assigned, you can define here which IP address is to be used for masquerading.
Click Save.
Your settings will be saved.
The new masquerading rule is added at the end of the list and remains disabled (toggle switch shows gray).
Enable the rule by clicking the toggle switch.
The toggle switch turns green.
Cross Reference – More detailed information on the definition of masquerading rules and detailed explanations of the individual settings can be found in the UTM administration guide in chapter Network Services.
Optionally, activate the proxies:
If the remote employees should access URL services via the remote access you may configure the required proxies on the UTM – this would be the DNS and HTTP proxy for example.
Cross Reference – More detailed information on the configuration of proxies and detailed explanations of the individual settings can be found in the UTM administration guide.
Open the Management > User Portal > Global tab.
The User Portal needs to be activated for the remote access user.
If the toggle switch is gray, click the Enable button to enable the User Portal.
Select the networks that are allowed to access the User Portal.
To the Allowed networks box, add the networks that should be allowed to access the User Portal (in this example: Any or the respective VPN Pool, or just gforeman).
Cross Reference – More detailed information on the configuration of the User Portal and detailed explanations of the individual settings can be found in the UTM administration guide in chapter Management.
After configuring the VPN server (headquarter) you need to configure the road warrior. Depending on the security policy of your organization and the requirements of your network, you might have to make additional settings.
| © 2019 Sophos Limited | Sophos UTM 9.600 |