
Configure the L2TP settings
This chapter describes how to turn on L2TP, configure basic settings, and access control.
-
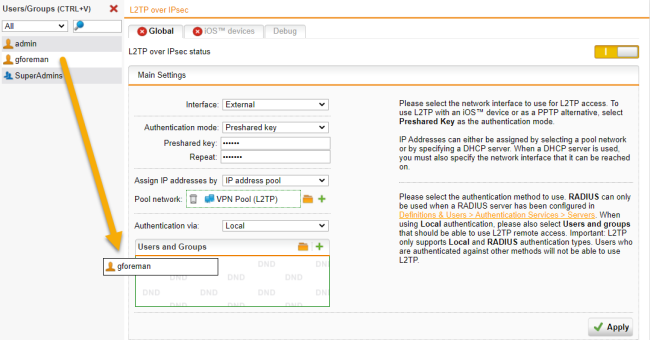
Go to Remote Access > L2TP over IPsec > Global.
-
Click the switch to turn on L2TP over IPsec.
The switch turns amber and the page becomes editable.
Main settings
-
In the Main Settings section, specify the following settings:
Interface: Select the network interface to use for L2TP access.
Note: If you use uplink balancing, only the primary interface that is up will be used for L2TP traffic.
Authentication mode: L2TP over IPsec remote access supports authentication based on Preshared key or X.509 CA check:
-
Preshared key
With this method you can use L2TP over IPsec as an easy PPTP alternative in Windows.
Preshared key: Enter the shared secret. This shared secret is a secure phrase or password that is used to set up a secure tunnel.
Repeat: Confirm the shared secret.
Security Note: Use a secure password. Ensure that this password does not fall into the hands of unauthorized third parties. With this password, an attacker can build a connection to the internal network. We recommend changing this password at regular intervals.
-
X.509 CA check
Certificate: Select Local X509 Cert to authenticate the server. Authentication through an X.509 certificate doesn't work with iOS.
Assign IP addresses by: During connection establishment, endpoint devices get an IP address. The IP address can be taken from a predefined IP address pool or it can be requested from a DHCP server.
-
IP address pool
Pool network: The default settings assign addresses from the private IP space 10.242.3.x/24. This network is called the VPN Pool (L2TP). If you wish to use a different network, simply change the definition of the VPN Pool (L2TP) on the Definitions & Users > Network Definitions page. Alternatively, you can create another IP address pool by clicking the Plus icon.
Note: If you wish the L2TP-connected users to be allowed to access the internet, you additionally need to define appropriate Masquerading or NAT rules.
-
DHCP server
DHCP server: Select the DHCP server here. Please note that the local DHCP server is not supported. The DHCP server to be specified here must be running on a different physical system. Click the folder icon to open a list that shows all networks and hosts that had been defined on the Definitions & Users > Network Definitions page.
Via interface: Define the network card through which the DHCP server is connected. Note that the DHCP server doesn't have to be directly connected to the interface. It can also be accessed through a router.
-
-
Click Apply to save your settings.
The switch turns green. L2TP over IPsec is active now.
Access control
L2TP remote access supports Local and RADIUS authentication. For users using other authentication methods remote access won't work. For local users, Sophos UTM supports the authentication protocols MS-CHAPv2 and PAP (local authentication). By default, a Microsoft Windows endpoint device negotiates MS-CHAPv2.
You can use RADIUS authentication, if you have defined a RADIUS server on the Definitions & Users > Authentication Services > Servers page. In conjunction with RADIUS authentication, Sophos UTM supports the authentication protocols MS-CHAPv2, MS-CHAP, CHAP, and PAP. The authentication requests are forwarded to the RADIUS server. The L2TP module sends the following string as NAS-ID to the RADIUS server: l2tp. The authentication algorithm gets automatically negotiated between endpoint device and server.
Cross Reference: The configuration of the Microsoft IAS RADIUS server and the configuration of RADIUS within WebAdmin is described in the Sophos UTM administration guide under Definitions & Users.
-
In the Access Control section, select an authentication method.
Authentication via: Select the authentication method.
Users and groups: When using Local authentication, please also select the users and groups that should be able to use L2TP remote access.
-
Click Apply to save your settings.
Cross Reference: For more information about remote access, go to Remote Access in the UTM administration guide.