Configuring IPsec Settings
This chapter describes how to enable IPsec, configuring basic settings and access control.
-
Open the Remote Access > IPsec > Connections tab.
-
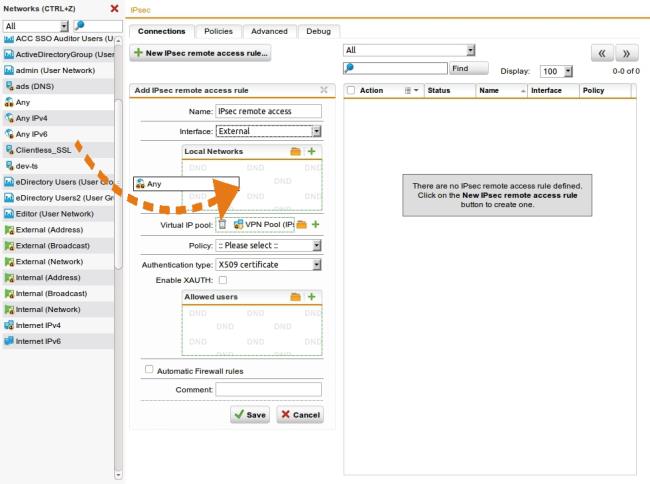
Click New IPsec Remote Access Rule.
The Add IPsec Remote Access Rule dialog box opens.
-
Make the following settings:
Name: Enter a descriptive name for this connection.
Interface: Select the network interface which is used as the local endpoint of the IPsec tunnel.
Local networks: Select the local networks that should be reachable to the client.
Note: If you wish the IPsec-connected users to be allowed to access the internet, you need to select Any in the Local networks dialog box. Additionally, you need to define appropriate Masquerading or NAT rules.
Virtual IP pool: The default settings assign addresses from the private IP space 10.242.4.x/24. This network is called the VPN Pool (IPsec). If you wish to use a different network, simply change the definition of the VPN Pool (IPsec) on the Definitions & Users > Network Definitions page.
Policy: Select an already defined policy (in this example: AES-256). Or you can use the IPsec > Policies tab to define your own policies.
Cross Reference: Creating new IPsec policies is described in the UTM administration guide in Chapter Remote Access.
Authentication type: IPsec remote access supports authentication based on CA DN match, Preshared key, and X.509 certificate. The settings in this section depend on the authentication type:
-
CA DN match
The authentication is based on the Distinguished Name (DN) and the following widgets are displayed:
Authority: Select the certificate authority VPN Signing CA for the VPN users.
DN mask: In order to use a Distinguished Name as an ID, you will need information from the X.509 index. Possible indications are Country (C), State (ST), Local (L), Organization (O), Unit (OU), Common Name (CN), and E-Mail Address (E).
Enable XAUTH (optional): Extended authentication should be enabled to require authentication of users against configured backends.
-
Preshared key
If you select Preshared key, the following widgets are displayed:
Preshared key: Enter the shared secret. This shared secret is a secure phrase or password that is used to encrypt the traffic using the encryption algorithm for IPsec.
Confirm: Confirm the shared secret.
Security Note: Use a secure password! Your name spelled backwards is, for example, not a secure password–while something like xfT35!4z would be. Ensure that this password does not fall into the hands of unauthorized third parties. With this password, an attacker can build a connection to the internal network. We recommend changing this password at regular intervals.
Enable XAUTH (optional): Extended authentication should be enabled to require authentication of users against configured backends. Note that this option has to be enabled and the user has to be added to the Allowed users box to be able to access the respective remote access information in the User Portal.
-
X.509 certificate
If you select X.509 CA certificate, the following widgets will be displayed:
Enable XAUTH (optional): Extended authentication should be enabled to require authentication of users against configured backends.
Allowed users: Select the user object which had been created automatically, e.g., gforeman.
Automatic firewall rules: Select to automatically create firewall rules for the SSL VPN tunnel traffic. These rules exist only for the lifetime of the tunnel. If you don’t select this option, you must define the firewall rules manually (see below).
Comment (optional): Add a description or other information about the IPsec connection.
-
-
Click Save.
-
Enable the IPsec rule.
You can enable the rule now or later after completing the whole UTM configuration.
Click the toggle switch in front of the rule to activate the rule.
The switch turns green. The IPsec remote access rule is active now.
Cross Reference: Find more information about remote access in the UTM administration guide under Remote Access.