
How to update UTM on AWS (HA/Auto Scaling)
Learn how to update your high-availability or Auto Scaling UTM on AWS using CloudFormation. This includes both cold and warm standby HA setups.
Note: A standalone UTM on AWS setup works in the same way as a virtual UTM and can use the regular Up2Date process: UTM: How to run Up2Date
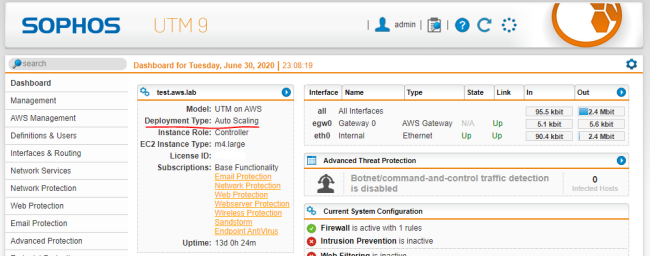
If you’re uncertain of which deployment type you’re using, check your UTM dashboard.
Prerequisites
Check that your UTM on AWS setups are functioning properly, especially the configuration synchronization.
You may have made modifications to the UTM environment after the initial deployment. If you didn’t update the CloudFormation template to reflect these changes, then the CloudFormation service may overwrite any conflicts with the template values. Common changes include:
- Security groups
- Secondary IP addresses
- Routing
- Elastic Load Balancer configuration
- Auto Scaling configuration
Review your environment and take note of any settings that the CloudFormation template may overwrite.
Instructions
-
Go to the Sophos templates on GitHub to download the latest template according to your deployment type:
Deployment Type Template File Name Auto Scaling autoscaling.template Cold Standby HA ha_standalone.template Warm Standby HA ha_warm_standby.template -
Check the CHANGELOG.md file for release notes on the newest template: CHANGELOG.md on Sophos GitHub
It denotes any mandatory template changes that you need to include during the template update.
-
Copy the AMI mappings section of the new template. For example:
"Mappings": {
"RegionMap": {
"ap-northeast-1": {
"Hourly": "ami-00321e6cbecc38742",
"BYOL": "ami-0a62c0fa119272b26",
"ARN": "aws",
"QueenInstanceType": "m4.large",
"SwarmInstanceType": "m4.large"
},
"ap-northeast-2": {
"Hourly": "ami-0cffc6eaa2c989b4e",
"BYOL": "ami-05f7e7a221ffa8612",
"ARN": "aws",
"QueenInstanceType": "m4.large",
"SwarmInstanceType": "m4.large"
},
"ap-south-1": {
"Hourly": "ami-09311af8ab3bc9ac0",
"BYOL": "ami-06a70f1c72a832eb0",
"ARN": "aws",
"QueenInstanceType": "m4.large",
"SwarmInstanceType": "m4.large"
},
"ap-southeast-1": {
"Hourly": "ami-06902687025523826",
"BYOL": "ami-00c058ec21a89330a",
"ARN": "aws",
"QueenInstanceType": "m4.large",
"SwarmInstanceType": "m4.large"
},
"ap-southeast-2": {
"Hourly": "ami-043e4d5a3abd49c42",
"BYOL": "ami-0212747e32437326f",
"ARN": "aws",
"QueenInstanceType": "m4.large",
"SwarmInstanceType": "m4.large"
},
"ca-central-1": {
"Hourly": "ami-081de97e032d32e13",
"BYOL": "ami-0f4588b8507515c07",
"ARN": "aws",
"QueenInstanceType": "m4.large",
"SwarmInstanceType": "m4.large"
},
"eu-central-1": {
"Hourly": "ami-05312ba0a99a49746",
"BYOL": "ami-03ca1a4fa7a8f996d",
"ARN": "aws",
"QueenInstanceType": "m4.large",
"SwarmInstanceType": "m4.large"
},
"eu-north-1": {
"Hourly": "ami-0d000cfe7f1883f8d",
"BYOL": "ami-04e7a9b6eda2c681f",
"ARN": "aws",
"QueenInstanceType": "c5.large",
"SwarmInstanceType": "m5.large"
},
"eu-west-1": {
"Hourly": "ami-001516a31f1eb73a2",
"BYOL": "ami-03f5ce4d29d7c0e61",
"ARN": "aws",
"QueenInstanceType": "m4.large",
"SwarmInstanceType": "m4.large"
},
"eu-west-2": {
"Hourly": "ami-0f944579ca5f415b1",
"BYOL": "ami-0b6126bcd48698c3d",
"ARN": "aws",
"QueenInstanceType": "m4.large",
"SwarmInstanceType": "m4.large"
},
"eu-west-3": {
"Hourly": "ami-0c317c112169c3730",
"BYOL": "ami-04688f9700c58d10e",
"ARN": "aws",
"QueenInstanceType": "c5.large",
"SwarmInstanceType": "m5.large"
},
"sa-east-1": {
"Hourly": "ami-0166c20b2e5cadfb3",
"BYOL": "ami-0c9fe8a15251579d8",
"ARN": "aws",
"QueenInstanceType": "m3.medium",
"SwarmInstanceType": "m3.medium"
},
"us-east-1": {
"Hourly": "ami-0d40e109ecec508df",
"BYOL": "ami-01cf4135047a76c45",
"ARN": "aws",
"QueenInstanceType": "m4.large",
"SwarmInstanceType": "m4.large"
},
"us-east-2": {
"Hourly": "ami-0536af8569b1c309b",
"BYOL": "ami-0728953cca6fdbc44",
"ARN": "aws",
"QueenInstanceType": "m4.large",
"SwarmInstanceType": "m4.large"
},
"us-gov-east-1": {
"Hourly": "ami-44d43935",
"BYOL": "ami-af2fc2de",
"ARN": "aws-us-gov",
"QueenInstanceType": "c5.large",
"SwarmInstanceType": "m5.large"
},
"us-gov-west-1": {
"Hourly": "ami-07cbe266",
"BYOL": "ami-30cfe651",
"ARN": "aws-us-gov",
"QueenInstanceType": "m4.large",
"SwarmInstanceType": "m4.large"
},
"us-west-1": {
"Hourly": "ami-0324f568659006197",
"BYOL": "ami-0e930bdc61836b781",
"ARN": "aws",
"QueenInstanceType": "m4.large",
"SwarmInstanceType": "m4.large"
},
"us-west-2": {
"Hourly": "ami-0e20e0d70d60f443e",
"BYOL": "ami-045afb5ca43d0a739",
"ARN": "aws",
"QueenInstanceType": "m4.large",
"SwarmInstanceType": "m4.large"
},
},
} -
Sign in to the AWS console and navigate to CloudFormation.
-
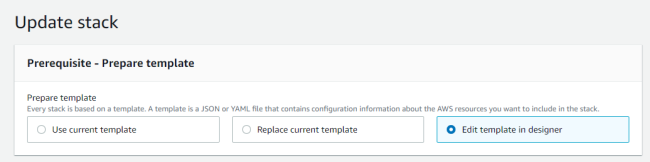
Select your UTM stack and select Update.

-
Select Edit template in designer.
-
Click View in Designer.
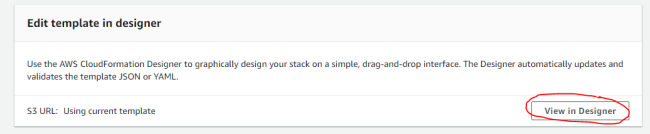
The designer shows the existing CloudFormation template in the bottom section.
-
Copy the text and create a backup of the template.
-
Go to the Mappings section and paste in the updated AMI mappings.
Make sure you set the Queen and Swarm instance types as desired.
-
Make any other mandatory changes that the GitHub changelog denotes.
-
Validate the template.
The checkbox to start the validation is located at the top of the designer.
The validation ensures you didn’t introduce any syntax errors when you changed the AMI mappings. Resolve any errors before you proceed.

-
Review the template parameters.
-
Click the cloud button at the top of the designer and then click Next.
-
Review the parameters of the template and update them if needed.
-
Click Next.
-
- Review the stack options and specify any if needed.
-
Click Next.
The final review page shows an overview of the planned changes at the bottom.
-
Check if there are any unexpected changes.
Expected changes include:
- QueenLaunchConfiguration
- SwarmLaunchConfiguration
- Auto Scaling desired instances
- Role changes for the new instances
-
Click the checkbox to acknowledge the creation of IAM resources and then Update stack.
AWS CloudFormation and Auto Scaling start the update process:
- New instances are created in parallel with the existing old instances.
- The new instances launch and pull their configuration/license from the existing S3 bucket.
- Once the new instances are healthy, Auto Scaling terminates the old instances.
Once the CloudFormation stack update is complete, verify functionality within the AWS environment.