AP6 mounting guide
When planning your AP6 deployment, you must consider many factors that significantly impact your wireless network's performance, such as building construction, obstructions, mounting orientation, access point density, user locations, neighboring networks, and more. This guide provides information to help you properly choose the placement and mount your access points to maximize their performance.
Selecting access points
Selecting the appropriate AP6 model for your environment is important. AP6 access points include indoor and outdoor models.
- Indoor: AP6 420, 420E, 840, and 840E
- Outdoor: AP6 420X
Make sure you select the appropriate model for the environmental conditions. To help you make your selection, you can find antenna radiation patterns and mounting options in the corresponding operating instructions. See the following links:
Physical placement
There are many recommendations and guidelines for selecting the proper access point placement to achieve full wireless coverage and make sure that all clients in your environment receive a strong wireless signal. We recommend the following guidelines:
- To provide maximum signal coverage, install access points in a central location away from corners, walls, or other physical obstructions.
- Install access points in a high location to provide the best signal strength reception and performance for your wireless network. Generally, one access point can cover up to approximately 185 square meters, depending on the physical environment, the wireless interference, and the frequency. When mounted on the ceiling, an access point can cover approximately 100 square meters without obstructions with optimal signal quality.
- Don't install access points near electronic devices that can interfere with the signal, such as televisions, microwave ovens, cordless phones, air conditioners, fans, or any other equipment that can cause signal interference.
- Maintain a distance of approximately 12 to 18 meters between access points. When installing multiple access points, make sure there's adequate space between them to provide maximum coverage for your wireless network. When access points are mounted closer together, make sure to reduce the transmission power accordingly.
-
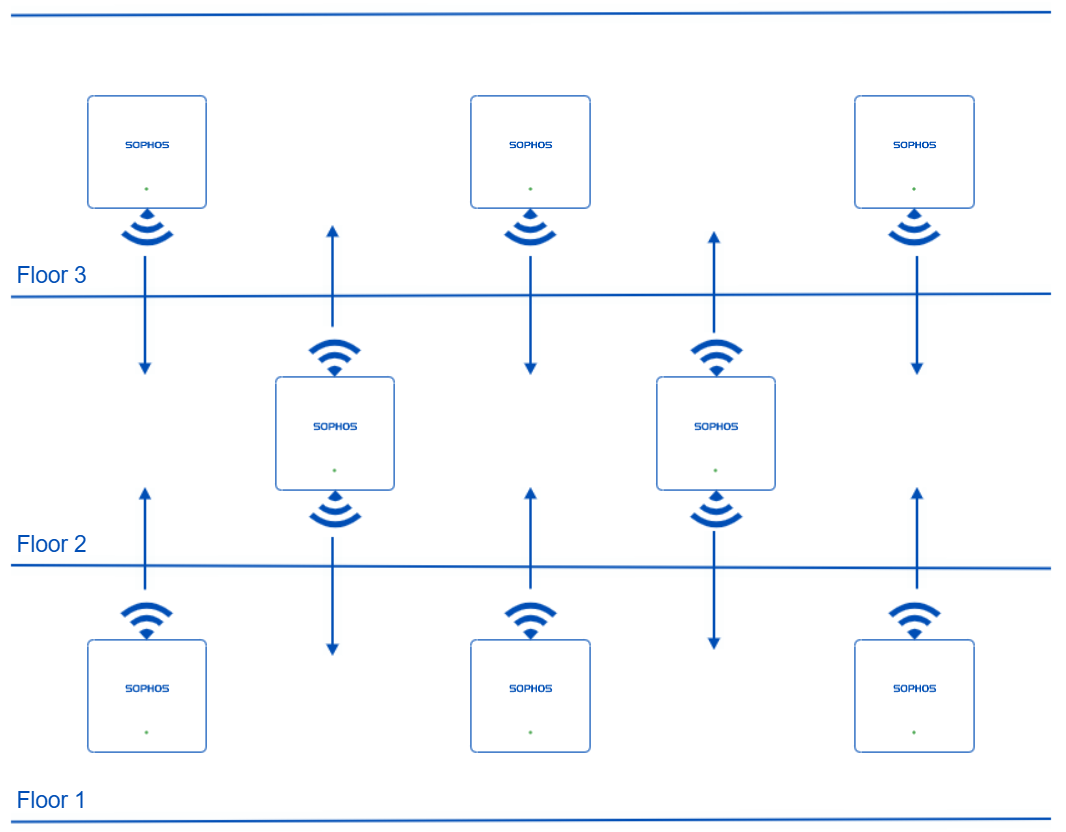
For wireless coverage over multiple floors, stagger the placement of access points to cover both vertical and horizontal space. Mount access points in a staggered, or honeycomb pattern across the floors to normalize distance in all directions for optimal coverage.
Mounting hardware
All Sophos AP6 access point models come with a mounting bracket that you can use to mount them to walls, flat ceilings, and drop ceilings. The AP6 420X also includes clamps you can use to attach the mounting bracket to a pole.
While the included mount will work on walls and flat ceilings, it's not ideal due to the drop-ceiling clamps, which prevent it from being completely flush with the mounting surface. For a cleaner installation, we recommend using the optional flat ceiling and plenum mounting kit, available through your Sophos partner.
Sometimes, you may need to suspend your AP6 access points from a ceiling for better access or performance. For this scenario, we recommend using the optional suspend mounting kit, available through your Sophos partner.
Indoor access points
Indoor access points are designed to be mounted on walls and ceilings, with the Sophos logo pointing toward the users. The strongest signal is in this direction. Avoid corners and other obstacles that can block the line of sight. An unobstructed line of sight provides the best performance.
We don't recommend desk or cubicle mounts. They typically don't allow for a clear line of sight throughout the coverage area, which can reduce WLAN performance. Don't put access points in enclosures, such as small rooms, server racks, or boxes, because signal quality will be negatively affected.
Ceiling mount
Most wireless deployments use ceiling-mounted access points. When mounting AP6 access points on a ceiling, you must mount them face down below the ceiling with the Sophos logo pointing towards the floor. Make sure the access point is at least one meter from lights, vents, or other ceiling-mounted objects.
Mount access points between 2.5 and 4.5 meters high. For high ceilings, you can hang them to reduce the height or use models with external antennas such as the AP6 420X and its optional directional antenna.
Don't hide access points above a drop ceiling. Ceiling tiles can contain materials or metallic backing that greatly reduce signal quality. The ceiling space above the tiles can include metallic structures such as pipes or AC ducts that interfere with wireless transmissions.
Wall mount
Wall-mounted access points are popular in hotels, dormitory rooms, and large spaces such as lecture halls where reaching the ceiling is difficult. Wall deployments may also be preferable in areas with a hard ceiling where cable runs aren't possible. When wall-mounting an access point, consider the antenna pattern before deployment to optimize signal distribution.
Mount wall-mounted access points approximately two meters from the floor but never less than one meter to avoid obstructions from furniture, equipment, and people.
Outdoor access points
Outdoor access point deployments usually involve wall or pole-mounted solutions, which are preferable because they maximize coverage and signal propagation. Of the available AP6 models, only the AP6 420X is designed for outdoor use, and it can be mounted vertically or horizontally, depending on the deployment scenario.
We recommend directional antennas for areas with high client density or when focusing coverage in a specific direction, such as down a hallway. Make sure directional antennas are aimed correctly to optimize the wireless signal.
Mounting the access point on a ceiling can be effective when the environmental conditions or the ceiling height require external antennas for effective signal distribution. To optimize performance, consider suspending the access point below the ceiling to reduce the distance to clients or accommodate optional directional antennas. When hanging an outdoor access point, keep it vertical as you would when pole-mounting it.
Pole mount
We recommend vertical pole mounting for best performance, as it maximizes coverage and signal propagation. Choose a sturdy, weather-resistant pole that can withstand wind and environmental stress away from obstructions from buildings, trees, and other physical barriers and firmly secure the access point to it. Use outdoor-rated, UV-resistant, and weatherproof cabling secured to the pole with tamper-resistant cable ties avoiding sharp bends. Use lightning arrestors and proper grounding to protect the access point from power surges.
The mounting height significantly impacts performance. Mount outdoor access points at least 3 to 4.5 meters high to ensure optimal coverage and protect them from unauthorized access or tampering in public spaces.
Site survey
A site survey can help identify the best access point placement for maximizing wireless coverage by simulating or scanning the environment for sources of interference, signal attenuation, and coverage patterns. There are many tools and methods for conducting site surveys. The following list includes various methods used to conduct site surveys:
- Virtual site survey: A quick way to simulate access point placements and understand coverage patterns. Virtual site surveys can provide initial estimates but aren't as accurate as physical site surveys. The Sophos predictive site survey is a free service for Sophos wireless customers. See Learn about the Sophos Wireless Desk.
- Passive site survey: Use a tool such as netstumbler to passively listen to probes and beacons without generating network traffic to create coverage maps and identify potential interference.
- Active site survey: Generates network traffic to measure sent and received packets and determines packet loss and delay metrics.
- Spectrum clearing site survey: Use a spectrum analyzer to identify sources of RF interference and optimize access point deployment.
Some common tools for performing site surveys are as follows:
When conducting a site survey to determine access point placement, remember that higher-frequency RF signals cover shorter distances than lower-frequency signals. For optimal performance, we recommend designing the network so that the 5 GHz band covers the required area instead of relying solely on 2.4 GHz signals, which have greater range but can lead to coverage holes in 5 GHz coverage.
Interference sources
A site survery can help identify all potential sources of interference to get you a complete picture of your environment. Using an RF spectrum analyzer as part of a site survey helps you detect non-WiFi sources of interference that could affect the performance of your wireless network.
Click the appropriate tab to see some common sources of interference.
- Personal hotspots
- Malfunctioning wireless clients
- Poorly designed wireless network
- Misconfiguration
- Neighboring networks
- External wireless clients
- Microwave ovens (2.4 GHz)
- Bluetooth devices (speakers, keyboards, mice, and so on)
- Cordless phones
- Baby monitors
- Wireless video cameras
- IoT, smart home, and automation, such as Zigbee devices
- Industrial equipment (motors, fluorescent light ballasts, automatic door sensors, and so on)
- Jammers or malicious interference
Physical environment
The composition of the physical environment can significantly impact the performance of your wireless network. Besides identifying the best location of access points, a site survey can show you how the surrounding environment affects wireless signal coverages. Consider the following factors when planning the placement of access points:
- Physical obstacles that can block radio transmissions.
- Radio-frequency interference (RFI) from electronic devices and other radio sources.
- Electromagnetic interference (EMI) from fluorescent bulbs, motors, and appliances.
- Distances between access points and clients.
Any materials a wireless signal must pass though can negatively impact wireless performance. Walls, glass windows, and even water can significantly reduce wireless signals across the 2.4 GHz, 5 GHz, and 6 GHz bands. The following table shows the estimated signal reduction caused by some common building materials:
| Building material | Estimated 2.4 GHz signal reduction | Estimated 5 GHz signal reduction | Estimated 6 GHz signal reduction |
|---|---|---|---|
| Plywood | 1 dB | 1 dB | 1 dB |
| Drywall | 1 dB | 1 dB | 1 dB |
| Glass (untinted) | 1 dB | 1 dB | 1 dB |
| Wood | 3 dB | 4 dB | 4 dB |
| Brick | 6 dB | 15 dB | 15 dB |
| Concrete | 15 dB | 22 dB | 25 dB |
| Reinforced concrete | 16 dB | 25 dB | 31 dB |
Note
The values in this table are estimates and will vary due to material thickness, coating, and other factors.
While wireless signals can pass through certain materials with some attenuation, other materials, such as metal, can reflect the signals. This reflection creates significant signal loss on one side of the material and can lead to interference on the other side due to the reflected signal. Other materials, such as water in pipes, aquariums, and even humans, can absorb wireless signals, reducing signal strength and wireless coverage.
Next steps
Once your access points are mounted and your network is operational, we recommend conducting a post-deployment survey to verify your performance and settings and help you identify the best channels to use to ensure optimal performance.
Post-deployment survey
A post-deployment survey helps you make sure your wireless network is performing as expected. For optimal results we recommend using a site survey tool that supports a hybrid mode, which performs both passive and active surveys simultaneously. If one isn't available, use passive or active mode as appropriate.
The following list contains some recommended guidelines to follow when conducting a post-deployment site survey:
- Survey all frequency bands your access points broadcast. If you're using the 6 GHz band, make sure to include it in your survey.
- Turn off auto-channel selection before conducting the survey. See Access point details.
- Survey only one SSID at a time. Remove all other SSIDs during the survey.
- Gather a sufficient number of data points. For example, one data point for every 3 to 6 meters.
- Perform the survey with doors and windows closed, unless the access point is outside.
- Use a survey tool capable of measuring RF interference from other sources, such as fluorescent lights, phones, and Bluetooth devices.
- Check the Received Signal Strength Indicator (RSSI) at various locations. RSSI measures the strength of the access point's signal at the endpoint device. The closer the value is to zero, the stronger the signal is. See Signal strength.
- Check the signal-to-noise ratio (SNR) with your access points broadcasting. To achieve the highest performance, maintain a minimum SNR of at least 35 dB. We recommend 25 dB or greater throughout the whole coverage area. A larger value indicates a stronger signal. See Signal-to-noise ratio.
Channel selection
You must also monitor your wireless network's settings after deployment to adjust for new sources of interference and neighboring networks. See AP6 channel selection guide.