Use AWS CloudFormation
You can use our assistant to add AWS environments to Sophos Cloud Optix using AWS CloudFormation.
When you add AWS environments, the assistant prompts you to make choices and provide information. The assistant fills in the parameters needed to create the stack in AWS.
You can create AWS CloudTrail trails as you add the AWS accounts or use existing CloudTrail trails.
This document contains background information about the tasks you may need to complete and the parameters used.
Collect information
Before you create AWS CloudFormation StackSets, you must collect information from your Sophos Cloud Optix account. The AWS assistant guides you on the required information to collect, which you’ll use later when you launch your CloudFormation template in AWS.
- Sign in to your Sophos Cloud Optix.
- Click Add Environments then click AWS.
- Click Choose a full setup option.
- Click CloudFormation , or the relevant Go button.
- Select Add multiple AWS Accounts and choose whether you're using AWS Organizations, an existing CloudTrail aggregation, or both.
- If you select Use existing CloudTrail aggregation, fill in the S3 details.
- Click Continue.
-
Note the values of the following parameters as shown under Use AWS Console:
- DnsPrefixCloudTrail
- ExternalId
- ReqID
- CustomerId
- DnsPrefixFlow
- IsCloudTrailAggregation
- OptixBaseURL
Add your AWS environments
You can add single or multiple AWS accounts and multiple accounts managed by AWS Organizations or AWS Control Tower.
Warning
If you're using AWS Organizations or AWS Control Tower, don't follow these instructions. Instead, you must follow the instructions in Use AWS Organizations.
Add an AWS account
To add a single AWS account, do as follows:
- Sign in to your Sophos Cloud Optix.
- Click Add Environments then click AWS.
- Click Choose a full setup option.
- Click CloudFormation or the relevant Go button.
- Select Add a single AWS account and click Continue.
-
Choose an installation method from the following options:
- Select Use standard setup and click Continue.
- Select Customize your setup and click Continue.
If you select Customize your setup, you're asked questions about your CloudTrail and VPC flow log files.
-
Follow the on-screen instructions to add your AWS account to Sophos Cloud Optix, either using Use the AWS Console or Use the AWS CLI.
If you follow the Use the AWS CLI on-screen instructions, the assistant creates your script and other commands. After the script finishes, you'll see the message:
CREATE_COMPLETE. -
If there are no errors, click Finish.
Your AWS account is added to the Sophos Cloud Optix. You'll find it listed as CloudOptixStack-ACCOUNT_ID.
Add multiple AWS accounts
To add multiple AWS accounts, do as follows:
- Sign in to your Sophos Cloud Optix.
- Click Add Environments then click AWS.
- Click Choose a full setup option.
- Click CloudFormation or the relevant Go button.
- Select Add multiple AWS Accounts and choose whether you're using AWS Organizations, an existing CloudTrail aggregation, or both.
- If you select Use existing CloudTrail aggregation, fill in the S3 details.
- Click Continue.
-
Follow the on-screen instructions to add your AWS account to Sophos Cloud Optix, either using Use the AWS Console or Use the AWS CLI.
If you follow the Use the AWS CLI on-screen instructions, the assistant creates your script and other commands. After the script finishes, you'll see the message:
CREATE_COMPLETE. -
If there are no errors, click Finish.
Your AWS accounts are added to the Sophos Cloud Optix. You'll find it listed as CloudOptixStack-ACCOUNT_ID.
Assign admin account roles
You must choose an AWS account to act as your admin account.
To assign the appropriate role to this account, do as follows:
- Sign in to the AWS console using your chosen account.
- In Quick create stack, check the Template URL is
https://avidcore.s3-us-west-2.amazonaws.com/aws/cloudformation/cloudformation/AWSCloudFormationStackSetAdministrationRole.yml. -
Check that the Stack name is
CloudOptixStackSetAdmin.This image shows the correct name.

-
Select I acknowledge that AWS CloudFormation might create IAM resources with custom names.
- Click Create stack to create the role in your admin account.
- Sign out of your AWS console.
Assign target member roles
You assign roles for the designated target member accounts.
This process doesn't allow the AWS admin account to be added to Sophos Cloud Optix. It only adds the target member accounts. If you want to add the admin account, you must do it separately.
To create an AWS CloudFormation StackSet in every target member account, do as follows:
-
Sign in to the AWS console using your chosen account as a target account.
You mustn’t be signed in to your chosen admin account.
-
Click Launch Stack here to go to the Quick stack create page with the correct parameters:

Note
You must click Launch Stack on this help page. It's configured with the correct parameters.
-
In Quick create stack, check that the Template URL is
https://avidcore.s3-us-west-2.amazonaws.com/aws/cloudformation/cloudformation/AWSCloudFormationStackSetExecutionRole.yml. -
Check that the Stack name is
CloudOptixStackSetTarget.This image shows the correct name.

-
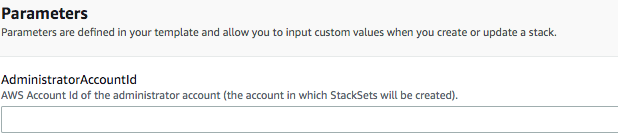
Under Parameters, enter the AWS Account ID of your admin account in AdministratorAccountId.
This image shows the account ID field.
-
Select I acknowledge that AWS CloudFormation might create IAM resources with custom names.
- Click Create stack to create the role in the target account.
- Sign out of your target member account's AWS console.
- Sign into the next target member account and repeat as required.
Configure admin account StackSet
To create the AWS CloudFormation StackSet in your admin account, do as follows:
- Sign in to the AWS console with your AWS admin account.
- Locate and select the CloudFormation service.
- In the left pane, select StackSets.
- Click Create StackSet.
-
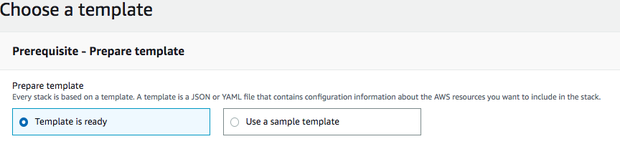
On the Choose a template page, select Template is ready.
Here's an image showing the template selection.
-
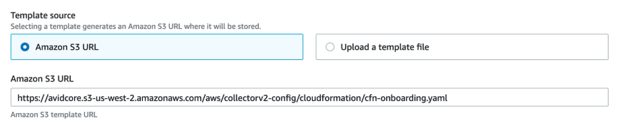
Select Amazon S3 URL as the template source.
-
Enter the template URL:
https://avidcore.s3-us-west-2.amazonaws.com/aws/collectorv2-config/cloudformation/cfn-onboarding.yamlHere's an image showing the correct URL.
-
Click Next.
- Continue creating CloudFormation StackSet. See Create CloudFormation StackSet.
Create CloudFormation StackSet
Use Sophos Cloud Optix information in the Create StackSet assistant.
Use the parameters you obtained earlier from your Sophos Cloud Optix account to fill in the fields in the AWS CloudFormation StackSet assistant. This links your StackSets to Sophos Cloud Optix.
Warning
Don't delete or amend any fields that are pre-populated by Sophos Cloud Optix or onboarding fails.
Make sure you're signed in to your chosen AWS admin account and do as follows:
- Enter
OptixStackSetinto StackSet name on the Specify StackSet details page. Change the description if necessary. -
Enter the following parameters from Sophos Cloud Optix:
- DnsPrefixCloudTrail
- ExternalId
- ReqID
- CustomerId
- DnsPrefixFlow
- IsCloudTrailAggregation
Don't change the SophosOptixAccountId field.
-
The pre-populated list in the RegionList must only be changed if some of your regions don't have a default Amazon Virtual Private Cloud (VPC). You must remove those regions from the RegionList field, or the onboarding process fails.
-
Don't change any other fields.
Here's an example of the Parameters menu with correct data.

-
Click Next. The Configure StackSet options page appears. You don't need to change anything.
- Click Next.
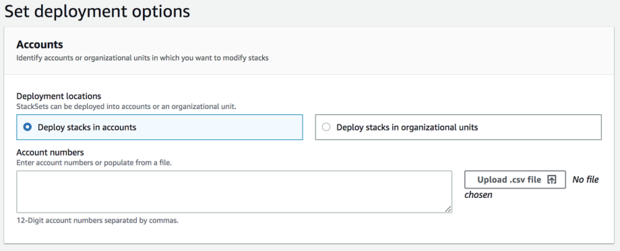
- On the Set deployment options page, select Deploy stacks in accounts.
-
In the Account numbers field, enter the account numbers of the target member accounts you want to add to Sophos Cloud Optix (the accounts in which you created the AWSCloudFormationStackSetExecutionRole).
-
In Specify regions, choose one region.
The CloudFormation stack instance is created in this region for the target member account.
-
Click Next.
- On the Review page, check all the options you've entered.
- Select I acknowledge that AWS CloudFormation might create IAM resources with custom names.
- Close the assistant.
This creates the stack instance and adds the target member accounts to Sophos Cloud Optix.
Adding EKS clusters
After adding your AWS account to Sophos Cloud Optix, you can add Amazon Elastic Kubernetes Service (EKS) clusters.
You must add these clusters to Sophos Cloud Optix separately, using the Amazon CLI script provided by Sophos. See Add Amazon EKS clusters.
Upgrade CloudFormation deployments
You may have to upgrade your CloudFormation deployments when we make changes to our deployment template. These changes could include fixing vulnerabilities, upgrading packages, or introducing new capabilities.
Follow the instructions below to upgrade CloudFormation Stacks or StackSets in the AWS console.
To upgrade a single AWS CloudFormation deployment, do as follows:
- Sign in to the AWS console with your AWS admin account.
- Locate and select the CloudFormation service.
- In the left pane, click Stacks.
- Select the stack named
CloudOptixStack. - In the top right, click Update.
- In Prerequsite - Prepare template, select Replace existing template.
-
In Specify template, enter the following template URL in Amazon S3 URL.
https://avidcore.s3-us-west-2.amazonaws.com/aws/collectorv2-config/cloudformation/cfn-onboarding.yaml -
Click Next.
- Keep everything by default and click Next until you reach the last page.
- Read and acknowledge the update, and click Submit.
Your CloudFormation stack instance is now successfully upgraded.
To upgrade multiple AWS CloudFormation deployments, do as follows:
- Sign in to the AWS console with your AWS admin account.
- Locate and select the CloudFormation service.
- In the left pane, click StackSets.
- Select the StackSet named
OptixStackSet. - In the top right, click Actions.
- Select Edit StackSet details.
- In Prerequisite - Prepare template, select Replace current template.
-
In Specify template, enter the following template URL in Amazon S3 URL.
https://avidcore.s3-us-west-2.amazonaws.com/aws/collectorv2-config/cloudformation/cfn-onboarding.yaml -
Click Next.
- On the following pages, click Next without making any changes.
-
In Set deployment options, select the accounts or organizational units (OUs) to which you've deployed the StackSet.
This ensures that the CloudFormation template is refreshed across all accounts or OUs.
-
Click Next until you reach the last page.
- Read and acknowledge the update, and click Submit.
Your CloudFormation StackSet instance is now successfully upgraded.