Migrate Sophos UTM and third-party firewalls
This guide is for Sophos Partners and administrators planning a migration from Sophos UTM, SonicWall, FortiGate, and Palo Alto Networks to Sophos Firewall using Sophos Firewall Config Studio.
Each firewall vendor uses different configuration models and schemas, so not all settings can be automatically migrated. Sophos Firewall fully supports some configurations. For other configurations, Config Studio minimizes compatibility issues by automatically resolving some items, identifying issues, and letting you resolve these manually.
Learn about the supported configurations, firewall‑specific migration steps, and how to review and import the migrated configuration into Sophos Firewall.
Best practices
Plan, review, and test the migration to minimize downtime and complete the migration smoothly.
Note
We recommend working with your Sophos Partner during the migration to achieve the best possible outcome. See Migration support.
People
Make sure the right people are involved before and during the migration.
- Inform your Sophos Partner in advance and confirm their availability.
- If you're migrating to a hardware Sophos Firewall, make sure an IT executive has physical access to the appliance.
Preparation
Complete the following tasks before you start the migration.
- Take a backup of the source firewall configuration.
- In Sophos Firewall Config Studio, review the Unsupported, Partial, and Manual configurations for the firewall you're migrating. See Status of configuration support.
- Create a checklist of configurations you must recreate manually in the firewall.
Resolution and testing
After you upload the configuration to Config Studio, review and resolve issues before importing it into Sophos Firewall.
- Resolve all Action required and Unsupported configurations.
- Review and remove duplicate and shadow configurations.
After importing the configuration to Sophos Firewall, recreate any missing configurations, and test traffic flow to verify that rules, policies, routing, and services work as expected.
Sophos Firewall Config Studio
Watch the video below.

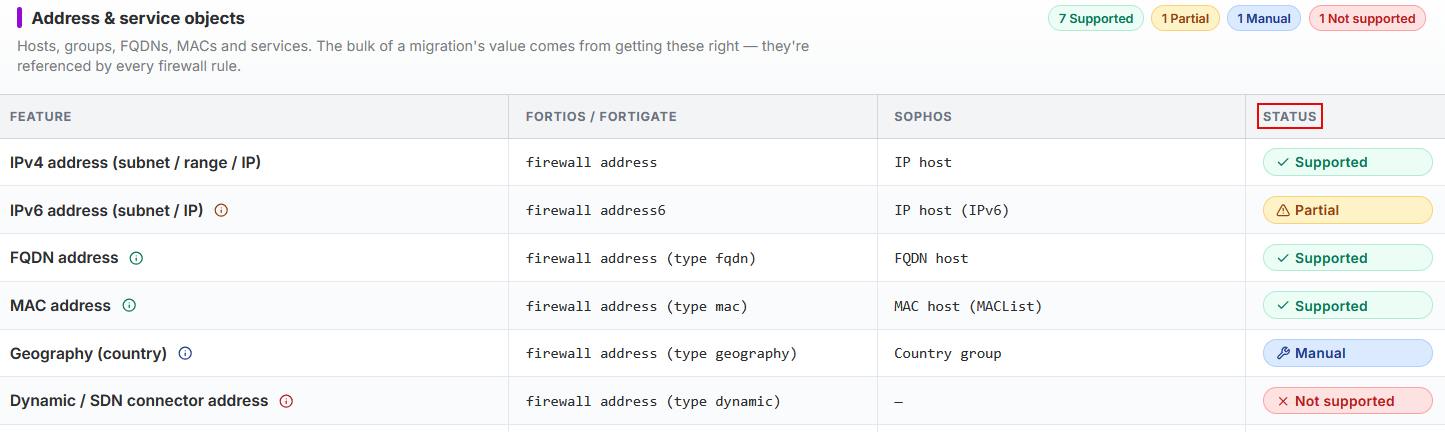
Status of configuration support
Sophos Firewall Config Studio shows the status of configuration support for each supported vendor firewall. The statuses help you resolve the configuration differences between the two firewalls.
- Supported: Migrated automatically without changes.
- Partial: Migrated with gaps. You must recreate the missing settings, for example, certificates and passwords.
- Manual: Not migrated. You must configure these items manually.
- Not supported: Not migrated at all.
Note
Click the tooltip next to each configuration to learn what's migrated.
How to migrate
Complete the following steps in Sophos Firewall Config Studio, then select your source firewall.
To open the tool in your browser, go to Config Studio and click the Migrate to Sophos Firewall panel. Sophos Firewall Config Studio.
Click the relevant tab to select the source firewall and migrate the configuration.
- Click Sophos UTM (SG).
- To convert the Sophos UTM configuration to a format that's compatible with SFOS, follow the instructions in the GitHub utility we provided and run the migration script. Go to Sophos Migration Utility.
- After the conversion is complete, copy the
Export.tarconfiguration file to your endpoint device. - To review the configuration, extract the
Entities.xmlfile. - Click Continue in Config Studio.
- Upload the
.xmlfile. - Select Keep all configurations.
- Click Import to Editor.
- Click the SonicWall panel and check which configurations are imported fully, partially, manually, or aren't supported.
- Click Continue to upload in the upper-right and upload the unencrypted backup (
.exp) file from SonicWall. - Click Import converted entities.
- Click the Migrate to Sophos Firewall panel.
- Click the FortiGate panel and check which configurations are imported fully, partially, manually, or aren't supported.
- Click Continue to upload in the upper-right and upload the unencrypted backup (
.conf) file from FortiGate. - Click Import converted entities.
Note
Config Studio automatically maps FortiGate interfaces to the zones corresponding to their role. So, review the zones and firewall rules. Firewall rules are zone-based in Sophos Firewall instead of the interface-based rules in FortiGate.
- Update each rule individually or click Bulk update in the upper-right and apply the changes to multiple rules.
- Click the Palo Alto Networks panel and check which configurations are imported fully, partially, manually, or aren't supported.
- Click Continue to upload in the upper-right and upload the
running-config.xmlfile from Palo Alto Networks. - Click Import converted entities.
The Port Mapping Wizard appears.
Review the configuration
You must review and resolve all configuration issues before importing the configuration into Sophos Firewall.
Note
Preview and download aren't available until you resolve the issues.
In Config Studio
In Config Studio, map interfaces, resolve migration issues, and prepare the configuration for import to Sophos Firewall.
- The Port Mapping Wizard appears after you import the configuration. Select the XGS model.
- Click Auto-assign in the bottom-right to assign the interfaces, or manually assign each interface.
-
Delete the interfaces you don't need.
This action doesn't delete configurations where the interfaces are in use.
-
Click Apply mapping.
The Configuration Editor page appears. If any configuration requires an action, a Migration report button appears at the top of the left menu.
-
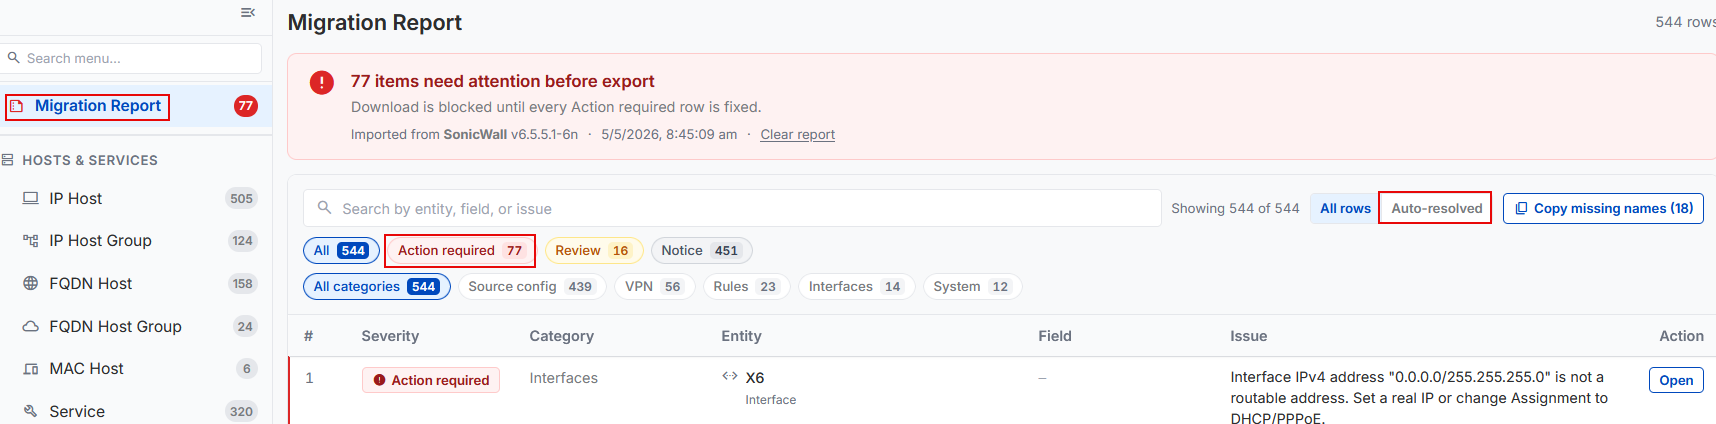
Click Migration report.
- Click Auto-resolved on the upper-right to review the automatically resolved issues.
-
To manually resolve the issues that require your action, click Action required above the list, click Open for each entry, and edit them.
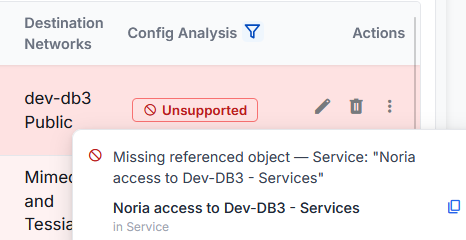
-
To see unsupported configurations directly, click a configuration in the left menu, filter the Config analysis column, and click Unsupported.
To learn more about an issue, hover over Unsupported before you edit or delete the configuration.
Warning
Deleting unsupported configurations may affect traffic flow.
After you resolve all the configurations that require action, a Ready to export banner appears.
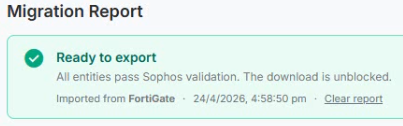
-
Click Download, and download the
.tarfile.
In Sophos Firewall
In Sophos Firewall, import the migrated configuration and complete the post‑migration verification and testing.
- Sign in to Sophos Firewall and go to Backup & firmware > Import export.
-
Under Import, upload the
.tarfile and click Import.The migration is complete.
-
Verify network connectivity and test network and server connections.
- Create the missing configurations, for example, certificates and passwords.
- Test configurations, such as firewall rules, VPN tunnels, and authentication servers, to make sure that traffic flows.