Alerts
Some features might not be available for all partners yet.
You can view and take action on the alerts for your Sophos Central customers that have partner assistance turned on.
Go to My Environment > Alerts.
The Alerts page lists all the alerts that require your action. We show you alerts for the last 90 days from your customers. We show you up to 2,500 alerts.
If you want to take action on alerts older than 90 days, you can do that in your customers' Sophos Central Admin accounts.
On the Alerts page, you can view, search, filter, and take actions against alerts.
View your alerts
To see your alerts, go to My Environment > Alerts.
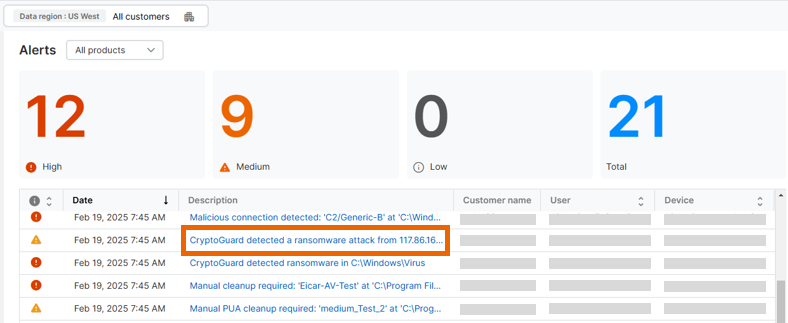
The alerts list shows details for each alert:
- Severity: High, Medium, or Low.
- Status: Open, Closed, Reopened, or Resolved.
- Events: Some alerts combine multiple events. This column shows the number of events.
- Device: The device where the event or events occurred.
Alerts with multiple events
You may see alerts that include multiple events.
Sophos Central automatically collates some repeated events and shows them as a single alert. For example, if a firewall VPN tunnel goes down and is later restored, both events are included in one alert.
Alerts resolved automatically
You may see alerts that are resolved automatically.
If an event resolves an earlier event in the same alert, for example, when a connection goes down and is then restored, the alert closes automatically. The alert is shown as "Resolved".
View alert details
To view the full details of an alert, do as follows:
-
In the alerts list, click the Alert title.
A slide-out opens on the right of the screen, showing alerts and the Associated events they're based on.

-
Click the Full screen icon
 in the upper right to see the details in full screen.
Group alerts
You can group all alerts for a specific threat or event under a single entry in the list. This makes alerts easier to manage.
Turn on Grouped above the alerts list.

Filter alerts
To view alerts with a specific priority, click the Filter icon next to the figures for High, Medium or Low alerts at the top of the page.
To view alerts for a specific product or threat type, do as follows:
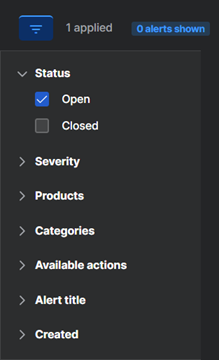
- Click the Filter icon above the alerts list.
-
Select the filter you want to use. You can filter by Status (Open or Closed), Severity, Products, Category (for example, Malware or Product Updates), Available actions, Alert title, or Last updated.
You can select multiple filter options. For example, you can select malware alerts from a specific product.
-
Click Apply to view your filtered alerts.
To reset filters, click Reset to defaults, and then click Apply.
Customize columns
You can choose which columns you want to show in the alerts list.
Click the Customize icon ![]() above the alerts list on the right, and select the columns you want.
above the alerts list on the right, and select the columns you want.
Take action against alerts
If you want to take action against alerts, use the filter options to find the alerts.
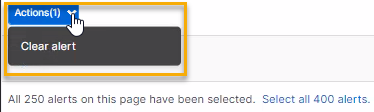
Select the alerts and click Actions.
We show you the actions that are available for all your selected alerts. We don't show you actions that are only available for some of your selected alerts. For example, if a cleanup action is available for some of your selected alerts but not all of them, we don't show you the cleanup action.
This is an example of selecting an action for alerts.
Depending on the alert type, the following actions are available for alerts:
- Clear alert: Use this to remove alerts from the list. We don't show the alert again .This action doesn't resolve threats.
- Clean up virus: Use this to remove malware.
-
Clean up PUA: Use this to remove a Potentially Unwanted Application (PUA).
Warning
You only see this action if you've turned off automatic cleanup in your threat protection policies. We recommend you don't do this.
-
Authorize PUA: Use this to authorize a PUA to run on all computers.
Close alerts
You can close alerts in one of these ways:
- Click an Alert title to open its details, then click Close alert.
- Select an alert in the alerts list, then go to Actions, and click Close alert.
Click the Customize column icon ![]() .
.
Use the Closed filter to see closed alerts.
Email alert frequency
You can change the frequency of PSA ticket creation for an email alert.
To change the frequency, do as follows:
- In the alerts list, click the Alert title.
-
In Email alert, select a frequency. Use any of the following options:

- None: No frequency is set, but PSA tickets are still created.
- Immediately: PSA tickets are created immediately.
- Hourly: PSA tickets are created once every hour.
- Daily: PSA tickets are created once a day.
- Never: PSA tickets won't be created.

You'll see a confirmation message at the bottom left of the Alert page.

You'll see the PSA ticket creation information below the frequency drop-down only when ticketing is enabled for Autotask or ConnectWise.
The alerts you've set exceptions on are listed on the Exceptions section.
To view the Exceptions section, click the Global Settings icon ![]() , and then click Configure API Alerts.
, and then click Configure API Alerts.
Tenant picker
If you add an Alerts widget to your custom dashboard, clicking an alert description in the Description column will take you to the Alerts page.
For information about custom dashboards, see Manage Dashboards.
You can use filters or customize the columns to manage the data displayed on the Alerts page.
Export to CSV
This option exports all alerts and ignores alert filters.
You can export all alerts to a CSV file, which you can then view in Microsoft Excel.